安卓:Tabstyle [英] Android: Tabstyle
问题描述
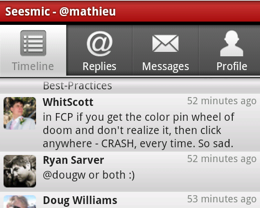
我一直在试图让一个tabstyle看起来像这样。但到目前为止,这是行不通的
有人可以帮我这个..
的http://www.technobuzz.net/wp-content/uploads/2010/02/seesmic-android-260-208.png
样式显示当只选择了颜色。当我使用一个白色的图标是文本(文本setindicator)白色。这也适用于灰色图标
在该图标的颜色是白色的从setindicator文字是那么也是白色的我...怎样才能解决这个问题。
在此先感谢!
Main.java
  =意向意向书新()setClass(这一点,Settings.class)。
         规格= tabHost.newTabSpec(设置)。setIndicator(设置,
                res.getDrawable(R.drawable.tab_settings))
                .setContent(意向);
                tabHost.addTab(规范);
                TabWidget TW = getTabWidget();
                的for(int i = 0; I< tw.getChildCount();我++){
                        视图V = tw.getChildAt(I)
                        v.setBackgroundDrawable(getResources()。getDrawable
                        (R.drawable.custom_tab));
                }
tab_settings
<选择的xmlns:机器人=http://schemas.android.com/apk/res/android>
<! - preSSED TAB - >
<项目
机器人:STATE_ pressed =真
机器人:可绘制=@绘制/ artists_on
机器人:颜色=#bfbfbf
/>
<! - 活动标签页 - >
<项目
机器人:state_selected =假
机器人:state_focused =假
机器人:STATE_ pressed =假
机器人:可绘制=@绘制/ artists_of
/>
<! - 活动标签 - >
<项目
机器人:state_selected =真
机器人:state_focused =假
机器人:STATE_ pressed =假
机器人:可绘制=@绘制/ artists_of
/>
<! - 选定的选项卡 - >
<项目
机器人:state_focused =真
机器人:state_selected =真
机器人:STATE_ pressed =假
机器人:可绘制=@绘制/ artists_on
/>
custom_tab.xml选项卡样式...
 <项目的android:STATE_ pressed =真正的>
    <形状和GT;
        <梯度
            机器人:startColor =#ea9d32
            机器人:ENDCOLOR =#ffcc50
            机器人:角=270/>
    < /形状>
< /项目><! - 如果选择 - > <! - 我怎么能说没有选定? - >
    <项目的android:state_focused =真正的>
        <形状和GT;
            <梯度
                机器人:ENDCOLOR =#ffcc50
                机器人:startColor =#ffcc50
                机器人:角=270/>
        < /形状>
    < /项目>       <项目的android:state_focused =假>
        <形状和GT;
            <梯度
                机器人:ENDCOLOR =#FFFFFF
                机器人:startColor =#AAAAAA
                机器人:角=270/>
            <中风
                机器人:宽=1px的
                机器人:颜色=#000000/>
        < /形状>
    < /项目>
< /选择>
有四个州为你的选项卡的背景 - 你几乎所有的人:
<选择的xmlns:机器人=http://schemas.android.com/apk/res/android>
<项目<! - preSSED TAB - >
机器人:STATE_ pressed =真
机器人:可绘制=@绘制/ minitab_ pressed
/>
<项目<! - 活动标签页 - >
机器人:state_selected =假
机器人:state_focused =假
机器人:STATE_ pressed =假
机器人:可绘制=@绘制/ minitab_unselected
/>
<项目<! - 活动标签 - >
机器人:state_selected =真
机器人:state_focused =假
机器人:STATE_ pressed =假
机器人:可绘制=@绘制/ minitab_default
/>
<项目<! - 选定的选项卡 - >
机器人:state_focused =真
机器人:state_selected =真
机器人:STATE_ pressed =假
机器人:可绘制=@绘制/ minitab_selected
/>
< /选择>
有关文字的颜色,你需要以及创建一个选择并指定此绘制的文字颜色:
<选择的xmlns:机器人=http://schemas.android.com/apk/res/android>
<项目的android:state_selected =真正的机器人:颜色=@色/白/>
<项目的android:state_focused =真正的机器人:颜色=@色/白/>
<项目的android:STATE_ pressed =真正的机器人:颜色=@色/白/>
<项目的android:颜色=#bfbfbf/>
< /选择>
I have been trying to make a tabstyle that looks like this. But so far it doesn't work Can someone help me with this..
http://www.technobuzz.net/wp-content/uploads/2010/02/seesmic-android-260-208.png
The style shows only the colors When selected. When I use a white icon is the text (text setindicator) white. This also applies to the gray icon.
When the icon color is white the text from the setindicator is then also white.. How can I fix this.
Thanks in advance!
Main.java
intent = new Intent().setClass(this, Settings.class);
         spec = tabHost.newTabSpec("settings").setIndicator("Settings",
                res.getDrawable(R.drawable.tab_settings))
                .setContent(intent);
                tabHost.addTab(spec);


                TabWidget tw = getTabWidget();
                for (int i = 0; i < tw.getChildCount(); i++) {
                        View v = tw.getChildAt(i);
                        v.setBackgroundDrawable(getResources().getDrawable
                        (R.drawable.custom_tab));
                }
tab_settings
  <selector xmlns:android="http://schemas.android.com/apk/res/android">
    <!-- PRESSED TAB -->
    <item
        android:state_pressed="true"
        android:drawable="@drawable/artists_on"
        android:color="#bfbfbf"
        />
    <!-- INACTIVE TABS -->
    <item
        android:state_selected="false"
        android:state_focused="false"
        android:state_pressed="false"
        android:drawable="@drawable/artists_of"
        />
    <!-- ACTIVE TAB -->
    <item
        android:state_selected="true"
        android:state_focused="false"
        android:state_pressed="false"
        android:drawable="@drawable/artists_of"
        />
    <!-- SELECTED TAB -->
    <item
        android:state_focused="true"
        android:state_selected="true"
        android:state_pressed="false"
        android:drawable="@drawable/artists_on"
        />
custom_tab.xml the tab style...
<item android:state_pressed="true" >
    <shape>
        <gradient
            android:startColor="#ea9d32"
            android:endColor="#ffcc50"
            android:angle="270" />
    </shape>
</item>

<!-- WHEN SELECTED --> <!-- HOW CAN I SAID WHEN NOT SELECTED? -->
    <item android:state_focused="true" >
        <shape>
            <gradient
                android:endColor="#ffcc50"
                android:startColor="#ffcc50"
                android:angle="270" />
        </shape>
    </item>

       <item android:state_focused="false" >
        <shape>
            <gradient
                android:endColor="#ffffff"
                android:startColor="#AAAAAA"
                android:angle="270" />
            <stroke
                android:width="1px"
                android:color="#000000" />
        </shape>
    </item>
</selector>
There's four states for the background of your tabs - you have almost all of them:
<selector xmlns:android="http://schemas.android.com/apk/res/android">
    <item <!-- PRESSED TAB -->
        android:state_pressed="true"
        android:drawable="@drawable/minitab_pressed"
        />
    <item <!-- INACTIVE TABS -->
        android:state_selected="false"
        android:state_focused="false"
        android:state_pressed="false"
        android:drawable="@drawable/minitab_unselected"
        />
    <item <!-- ACTIVE TAB -->
        android:state_selected="true"
        android:state_focused="false"
        android:state_pressed="false"
        android:drawable="@drawable/minitab_default"
        />
    <item <!-- SELECTED TAB -->
        android:state_focused="true"
        android:state_selected="true"
        android:state_pressed="false"
        android:drawable="@drawable/minitab_selected"
        />
</selector>
For text color, you need to create a selector as well and assign this drawable as the textColor:
<selector xmlns:android="http://schemas.android.com/apk/res/android">
    <item android:state_selected="true" android:color="@color/white" />
    <item android:state_focused="true" android:color="@color/white" />
    <item android:state_pressed="true" android:color="@color/white" />
    <item android:color="#bfbfbf" />
</selector>
这篇关于安卓:Tabstyle的文章就介绍到这了,希望我们推荐的答案对大家有所帮助,也希望大家多多支持IT屋!
