通知是一条消息,您可以在应用程序的普通用户界面之外向用户显示该消息.当您告诉系统发出通知时,它首先在通知区域中显示为图标.要查看通知的详细信息,用户将打开通知抽屉.通知区域和通知抽屉都是系统控制的区域,用户可以随时查看.
Android Toast 类提供了便利显示用户警报的方法,但问题是这些警报不是持久性的,这意味着警报在屏幕上闪烁几秒钟然后消失.

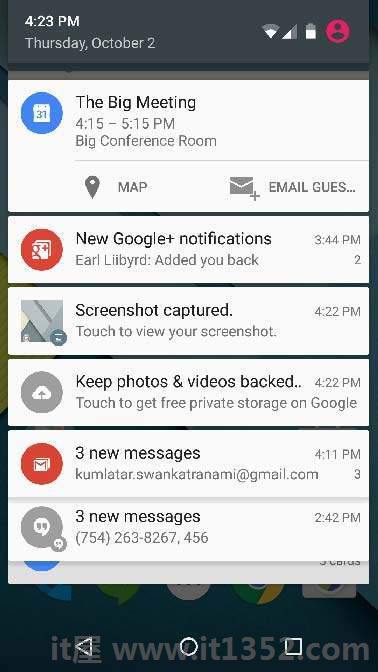
要查看通知的详细信息,您必须选择显示通知抽屉的图标,其中包含有关通知的详细信息.使用虚拟设备模拟器时,您必须单击并向下拖动状态栏以展开它,这将为您提供如下详细信息.这只是 64 dp 高,称为普通视图.
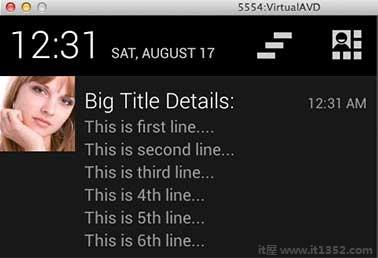
以上展开的表格可以有大视图,其中包含有关通知的其他详细信息.您可以在通知中添加最多六行.以下屏幕截图显示了此类通知.
您可以通过简单的方法创建通知.按照应用程序中的以下步骤创建通知 :
第一步是创建通知使用 NotificationCompat.Builder.build()的构建器.您将使用Notification Builder设置各种Notification属性,如小图标和大图标,标题,优先级等.
NotificationCompat.Builder mBuilder = new NotificationCompat .Builder(this)
一旦你有 Builder object,您可以根据需要使用Builder对象设置其Notification属性.但这必须设置至少以下 :
一个小图标,由 setSmallIcon()
标题,由 setContentTitle()设置
详细文本,由 setContentText()设置
mBuilder.setSmallIcon(R.drawable.notification_icon);
mBuilder.setContentTitle("Notification Alert, Click Me!");
mBuilder.setContentText("Hi, This is Android Notification Detail!");
您可以为通知设置大量可选属性.要了解有关它们的更多信息,请参阅NotificationCompat.Builder的参考文档.
这是一个可选部分,如果需要,则需要您想要附加通知的操作.操作允许用户直接从通知转到应用程序中的活动,在那里他们可以查看一个或多个事件或继续工作.
动作由 PendingIntent 定义,其中包含 Intent ,用于启动应用程序中的Activity.要将PendingIntent与手势相关联,请调用 NotificationCompat.Builder 的相应方法.例如,如果要在用户单击通知抽屉中的通知文本时启动"活动",则通过调用 setContentIntent()添加PendingIntent.
A PendingIntent对象可以帮助您代表您的应用程序执行操作,通常是在以后,而无需关心您的应用程序是否正在运行.
我们将获取堆栈构建器对象的帮助包含启动的Activity的人工后台堆栈.这可以确保从Activity中向后导航导出应用程序到主屏幕.
Intent resultIntent = new Intent(this, ResultActivity.class);
TaskStackBuilder stackBuilder = TaskStackBuilder.create(this);
stackBuilder.addParentStack(ResultActivity.class);

// Adds the Intent that starts the Activity to the top of the stack
stackBuilder.addNextIntent(resultIntent);
PendingIntent resultPendingIntent = stackBuilder.getPendingIntent(0,PendingIntent.FLAG_UPDATE_CURRENT);
mBuilder.setContentIntent(resultPendingIntent);
最后,通过调用NotificationManager.notify将Notification对象传递给系统()发送您的通知.确保在通知构建器对象之前调用 NotificationCompat.Builder.build()方法.此方法结合了所有已设置的选项并返回新的通知对象.
NotificationManager mNotificationManager = (NotificationManager) getSystemService(Context.NOTIFICATION_SERVICE);

// notificationID allows you to update the notification later on.
mNotificationManager.notify(notificationID, mBuilder.build());
NotificationCompat.Builder类允许更轻松地控制所有标志,以及帮助构建典型的通知布局.以下是作为NotificationCompat.Builder类的一部分可用的一些重要且最常用的方法.
| Sr.No. | 常数&说明 |
|---|---|
| 1 | Notification build() 合并所有已设置的选项并返回一个新的Notification对象. |
| 2 | NotificationCompat.Builder setAutoCancel(boolean autoCancel) 设置此标志会使用户在面板中单击时自动取消通知. |
| 3 | NotificationCompat.Builder setContent(RemoteViews views) 提供自定义RemoteViews而不是标准RemoteViews. |
| 4 | NotificationCompat.Builder setContentInfo(CharSequence info) 在右边设置大文本 - 通知的一面. |
| 5 | NotificationCompat.Builder setContentIntent(PendingIntent inten t) 在点击通知时提供要发送的PendingIntent. |
| 6 | NotificationCompat.Builder setContentText(CharSequence text) 在标准通知中设置通知的文本(第二行). |
| 7 | NotificationCompat.Builder setContentTitle(CharSequence title) 设置文本(第一行) )通知,在标准通知中. |
| 8 | NotificationCompat.Builder setDefaults(int defaults) 设置将使用的默认通知选项. |
| 9 | NotificationCompat.Builder setLargeIcon(Bitmap icon) 设置自动收报机和通知中显示的大图标. |
| 10 | NotificationCompat.Builder setNumber(int number) 在通知的右侧设置一个大数字. |
| 11 | NotificationCompat.Builder setOngoing(boolean ongoing) 设置这是否是持续通知. |
| 12 | NotificationCompat.Builder setSmallIcon(int icon) 将小图标设置为在通知布局中使用. |
| 13 | NotificationCompat.Builder setStyle(NotificationCompat.Style style) 添加要在构建时应用的丰富通知样式. |
| 14 | NotificationCompat.Builder setTicker(CharSequence tickerText) 设置通知首次到达时状态栏中显示的文本. |
| 15 | NotificationCompat.Builder setVibrate(long [] pattern) 设置要使用的振动模式. |
| 16 | NotificationCompat.Builder setWhen(long when) 设置事件发生的时间.面板中的通知按此时间排序. |
以下示例使用Android 4.1中引入的 NotificationCompat.Builder 类显示Android通知的功能.
| 步骤 | 描述 |
|---|---|
| 1 | 您将使用Android studio IDE创建Android应用程序并将其命名为包 com.example.notificationdemo 下的it1352. |
| 2 | 修改 src/MainActivity.java 文件并添加代码以通知(""),如果用户点击按钮,它将调用android通知服务. |
| 3 | 创建一个新的Java文件 src/NotificationView.java ,将用于显示新布局,作为将要开始的新活动的一部分当用户点击任何通知时 |
| 4 | 修改布局XML file res/layout/activity_main.xml 在相对布局中添加通知按钮. |
| 5 | 创建新的布局XML文件 res/layout/notification.xml .这将用作新活动的布局文件,该活动将在用户点击任何通知时开始. |
| 6 | 无需更改默认字符串常量. Android studio负责默认字符串常量 |
| 7 | 运行应用程序到启动Android模拟器并验证应用程序中所做更改的结果. |
以下是修改后的主要内容活动文件 src/com.example.notificationdemo/MainActivity.java .此文件可以包含每个基本生命周期方法.
package com.example.notificationdemo;

import android.app.Activity;
import android.app.NotificationManager;
import android.app.PendingIntent;
import android.content.Context;
import android.content.Intent;
import android.support.v4.app.NotificationCompat;
import android.os.Bundle;
import android.view.View;
import android.widget.Button;

public class MainActivity extends Activity {
   Button b1;
   @Override
   protected void onCreate(Bundle savedInstanceState) {
      super.onCreate(savedInstanceState);
      setContentView(R.layout.activity_main);

      b1 = (Button)findViewById(R.id.button);
      b1.setOnClickListener(new View.OnClickListener() {
         @Override
         public void onClick(View v) {
            addNotification();
         }
      });
   }

   private void addNotification() {
      NotificationCompat.Builder builder =
         new NotificationCompat.Builder(this)
         .setSmallIcon(R.drawable.abc)
         .setContentTitle("Notifications Example")
         .setContentText("This is a test notification");

      Intent notificationIntent = new Intent(this, MainActivity.class);
      PendingIntent contentIntent = PendingIntent.getActivity(this, 0, notificationIntent,
         PendingIntent.FLAG_UPDATE_CURRENT);
      builder.setContentIntent(contentIntent);

      // Add as notification
      NotificationManager manager = (NotificationManager) getSystemService(Context.NOTIFICATION_SERVICE);
      manager.notify(0, builder.build());
   }
}
以下是 res/layout/notification.xml 文件的内容&减号;
<?xml version="1.0" encoding="utf-8"?>
<LinearLayout xmlns:android="http://schemas.android.com/apk/res/android"
   android:orientation="vertical"
   android:layout_width="fill_parent"
   android:layout_height="fill_parent" >

   <TextView
      android:layout_width="fill_parent"
      android:layout_height="400dp"
      android:text="Hi, Your Detailed notification view goes here...." />
</LinearLayout>
以下是修改后的主要活动文件的内容 src/com.example.notificationdemo/NotificationView.java .
package com.example.notificationdemo;

import android.os.Bundle;
import android.app.Activity;

public class NotificationView extends Activity{
   @Override
   public void onCreate(Bundle savedInstanceState){
      super.onCreate(savedInstanceState);
      setContentView(R.layout.notification);
   }
}
以下是 res/layout/activity_main.xml 文件的内容&减号;
<RelativeLayout xmlns:android="http://schemas.android.com/apk/res/android"
   xmlns:tools="http://schemas.android.com/tools"
   android:layout_width="match_parent"
   android:layout_height="match_parent"
   android:paddingBottom="@dimen/activity_vertical_margin"
   android:paddingLeft="@dimen/activity_horizontal_margin"
   android:paddingRight="@dimen/activity_horizontal_margin"
   android:paddingTop="@dimen/activity_vertical_margin"
   tools:context="MainActivity">

   <TextView
      android:id="@+id/textView1"
      android:layout_width="wrap_content"
      android:layout_height="wrap_content"
      android:text="Notification Example"
      android:layout_alignParentTop="true"
      android:layout_centerHorizontal="true"
      android:textSize="30dp" />

   <TextView
      android:id="@+id/textView2"
      android:layout_width="wrap_content"
      android:layout_height="wrap_content"
      android:text="Tutorials point "
      android:textColor="#ff87ff09"
      android:textSize="30dp"
      android:layout_below="@+id/textView1"
      android:layout_centerHorizontal="true"
      android:layout_marginTop="48dp" />

   <ImageButton
      android:layout_width="wrap_content"
      android:layout_height="wrap_content"
      android:id="@+id/imageButton"
      android:src="@drawable/abc"
      android:layout_below="@+id/textView2"
      android:layout_centerHorizontal="true"
      android:layout_marginTop="42dp" />

   <Button
      android:layout_width="wrap_content"
      android:layout_height="wrap_content"
      android:text="Notification"
      android:id="@+id/button"
      android:layout_marginTop="62dp"
      android:layout_below="@+id/imageButton"
      android:layout_centerHorizontal="true" />

</RelativeLayout>
以下将是 res/values/strings.xml 的内容来定义两个新的常量 :
<?xml version="1.0" encoding="utf-8"?>
<resources>
   <string name="action_settings">Settings</string>
   <string name="app_name">it1352 </string>
</resources>
以下是 AndroidManifest.xml的默认内容 :
<?xml version="1.0" encoding="utf-8"?>
<manifest xmlns:android="http://schemas.android.com/apk/res/android"
   package="com.example.notificationdemo" >

   <application
      android:allowBackup="true"
      android:icon="@drawable/ic_launcher"
      android:label="@string/app_name"
      android:theme="@style/AppTheme" >

      <activity
         android:name="com.example.notificationdemo.MainActivity"
         android:label="@string/app_name" >

         <intent-filter>
            <action android:name="android.intent.action.MAIN" />
            <category android:name="android.intent.category.LAUNCHER" />
         </intent-filter>

      </activity>

      <activity android:name=".NotificationView"
         android:label="Details of notification"
         android:parentActivityName=".MainActivity">
         <meta-data
         android:name="android.support.PARENT_ACTIVITY"
         android:value=".MainActivity"/>
      </activity>

   </application>
</manifest>
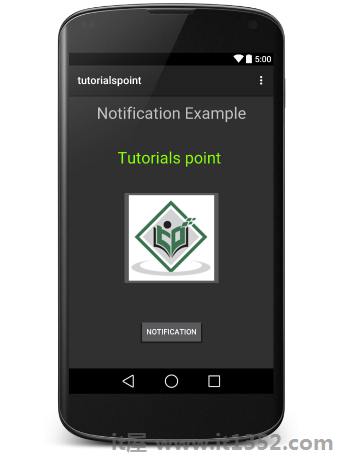
让我们试着运行你的 it1352应用程序.我假设您在进行环境设置时创建了 AVD .要从Android Studio运行APP,请打开项目的一个活动文件,然后单击运行 icon从工具栏中. Android Studio在您的AVD上安装应用程序并启动它,如果您的设置和应用程序一切正常,它将显示以下模拟器窗口 :
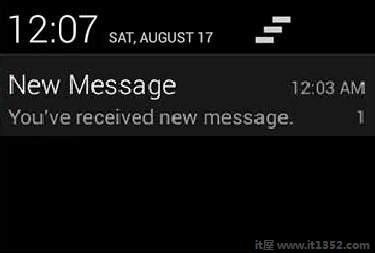
现在点击按钮,您会在顶部看到一条消息"新消息提醒!"将暂时显示,然后您将在左上角有一个小图标的跟随屏幕.
现在让我们展开视图,长按一下小图标,一秒后它会显示日期信息,这是您应该在不释放鼠标的情况下向下拖动状态栏的时间.您将看到状态栏将展开,您将获得以下屏幕和减号;
以下代码段演示了如何更改在上一个代码段中创建的通知以使用收件箱大视图样式.我将更新displayNotification()修改方法以显示此功能 :
protected void displayNotification() {
   Log.i("Start", "notification");

   /* Invoking the default notification service */
   NotificationCompat.Builder  mBuilder = new NotificationCompat.Builder(this);

   mBuilder.setContentTitle("New Message");
   mBuilder.setContentText("You've received new message.");
   mBuilder.setTicker("New Message Alert!");
   mBuilder.setSmallIcon(R.drawable.woman);

   /* Increase notification number every time a new notification arrives */
   mBuilder.setNumber(++numMessages);

   /* Add Big View Specific Configuration */
   NotificationCompat.InboxStyle inboxStyle = new NotificationCompat.InboxStyle();

   String[] events = new String[6];
   events[0] = new String("This is first line....");
   events[1] = new String("This is second line...");
   events[2] = new String("This is third line...");
   events[3] = new String("This is 4th line...");
   events[4] = new String("This is 5th line...");
   events[5] = new String("This is 6th line...");

   // Sets a title for the Inbox style big view
   inboxStyle.setBigContentTitle("Big Title Details:");

   // Moves events into the big view
   for (int i=0; i < events.length; i++) {
      inboxStyle.addLine(events[i]);
   }

   mBuilder.setStyle(inboxStyle);

   /* Creates an explicit intent for an Activity in your app */
   Intent resultIntent = new Intent(this, NotificationView.class);

   TaskStackBuilder stackBuilder = TaskStackBuilder.create(this);
   stackBuilder.addParentStack(NotificationView.class);

   /* Adds the Intent that starts the Activity to the top of the stack */
   stackBuilder.addNextIntent(resultIntent);
   PendingIntent resultPendingIntent =stackBuilder.getPendingIntent(0,PendingIntent.FLAG_UPDATE_CURRENT);

   mBuilder.setContentIntent(resultPendingIntent);
   mNotificationManager = (NotificationManager) getSystemService(Context.NOTIFICATION_SERVICE);

   /* notificationID allows you to update the notification later on. */
   mNotificationManager.notify(notificationID, mBuilder.build());
}
现在,如果您尝试运行您的应用程序,那么您将在视图的扩展形式中找到以下结果 :