Android框架包含一个集成的测试框架,可帮助您测试应用程序的各个方面,SDK工具包括用于设置和运行测试应用程序的工具.无论您是使用ADT在Eclipse中工作还是在命令行中工作,SDK工具都可以帮助您在模拟器或您要定位的设备中设置和运行测试.
Android的构建和测试工具假设测试项目被组织成测试,测试用例类,测试包和测试项目的标准结构.
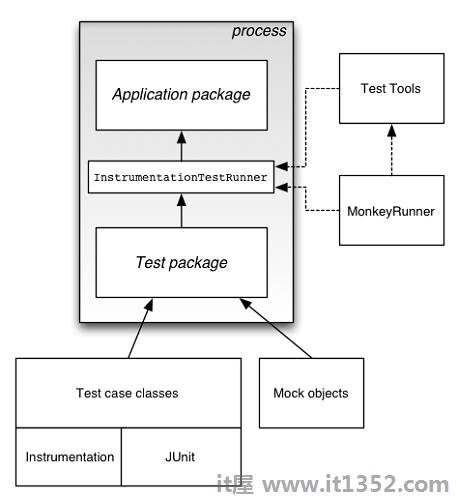
有很多工具可以可用于测试Android应用程序.有些是官方的,如Junit,Monkey,有些是第三方工具,可用于测试Android应用程序.在本章中,我们将解释这两个测试Android应用程序的工具.
JUnit
Monkey
您可以使用JUnit TestCase 类来执行单元测试不调用Android API的类. TestCase也是AndroidTestCase的基类,可用于测试依赖于Android的对象.除了提供JUnit框架之外,AndroidTestCase还提供特定于Android的设置,拆卸和帮助方法.
为了使用TestCase,使用TestCase类扩展您的类并实现方法调用setUp() .它的语法在下面和下面给出;
public class MathTest extends TestCase {
   protected double fValue1;
   protected double fValue2;

   protected void setUp() {
      fValue1= 2.0;
      fValue2= 3.0;
   }
}
对于每个测试工具,一个与夹具交互的方法.通过使用布尔值调用assertTrue(String,boolean)指定的断言来验证预期结果.
public void testAdd() {
   double result= fValue1 + fValue2;
   assertTrue(result == 5.0);
}
断言方法将您期望的测试值与实际结果进行比较,并在比较失败时抛出异常.
定义方法后,您可以运行它们.它的语法在下面和下面给出;
TestCase test= new MathTest("testAdd");
test.run();UI/Application Exerciser Monkey,通常称为"monkey",是一个命令行工具,向设备发送击键,触摸和手势的伪随机流.您可以使用Android Debug Bridge(adb)工具运行它.
您可以使用它来对应用程序进行压力测试并报告遇到的错误.您可以通过每次使用相同的随机数种子运行该工具来重复事件流.
Monkey有许多功能,但是它可以归结为这四个类别.
基本配置选项
运营约束
事件类型和频率
调试选项
要使用monkey,请打开命令提示符,然后导航到以下目录.
android ->sdk ->platform-tools
进入目录后,将设备连接到PC,然后运行以下命令.
adb shell monkey -p your.package.name -v 500
此命令可以分解为以下步骤.
adb - Android Debug Bridge.用于从台式机或笔记本电脑连接和发送命令到Android手机的工具.
shell - shell只是设备上的一个接口,用于将命令转换为系统命令.
monkey - monkey是测试工具.
v - v代表详细方法.
500- it是频率调整或要发送以进行测试的事件数.
这也显示在图中 :
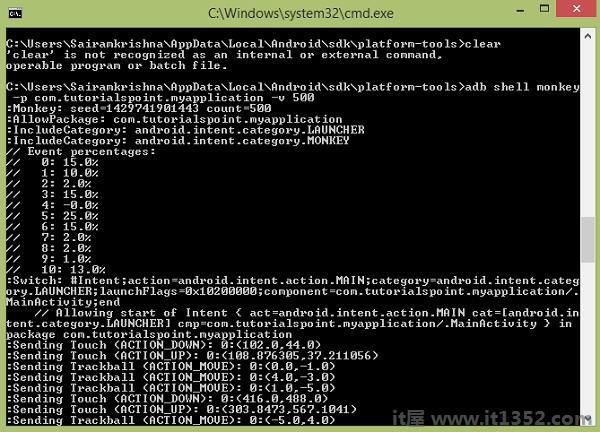
在上面的命令中,你在默认的android UI应用程序上运行猴子工具.现在,为了将它运行到你的应用程序,这里你需要做什么.
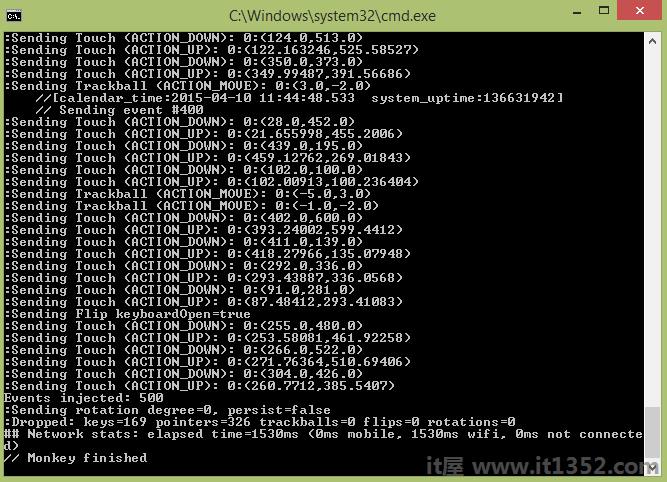
最后你会得到如下所示的完成
这也是如下图所示.通过输入此命令,您实际上生成500个随机事件进行测试.
以下示例演示了如何使用测试.它包含了一个可以用于猴子的基本应用程序.
要试验这个例子,你需要在实际的设备上运行它,然后按照开头说明的猴子步骤./p>
| 步骤 | 描述 |
|---|---|
| 1 | 您将使用Android工作室创建一个com.it1352.myapplication包下的Android应用程序. |
| 2 | 修改src/MainActivity.java文件以添加活动代码. |
| 3 | 修改layouta XML文件res/layout/activity_main.xml如果需要,添加任何GUI组件. |
| 4 | 创建src/second.java文件以添加活动代码. |
| 5 | 修改布局XML文件res/layout/view.xml如果需要,添加任何GUI组件. |
| 6 | 运行应用程序并选择正在运行的Android设备并在其上安装应用程序并验证结果. |
以下是 MainActivity.java 的内容.
package com.IT屋.myapplication;

import android.content.Intent;
import android.os.Bundle;
import android.support.v7.app.AppCompatActivity;
import android.view.View;
import android.widget.Button;

public class MainActivity extends AppCompatActivity {
   Button b1;
   @Override

   protected void onCreate(Bundle savedInstanceState) {
      super.onCreate(savedInstanceState);
      setContentView(R.layout.activity_main);
      b1=(Button)findViewById(R.id.button);
   }

   public void button(View v){
      Intent in =new Intent(MainActivity.this,second.class);
      startActivity(in);
   }

}
以下是 second.java 的内容.
package com.it1352.myapplication;

import android.app.Activity;
import android.os.Bundle;
import android.view.View;
import android.widget.Button;
import android.widget.Toast;

public class second extends Activity{
   @Override

   protected void onCreate(Bundle savedInstanceState) {
      super.onCreate(savedInstanceState);
      setContentView(R.layout.view);
      Button b1=(Button)findViewById(R.id.button2);

      b1.setOnClickListener(new View.OnClickListener() {
         @Override
         public void onClick(View v) {
            Toast.makeText(second.this,"Thanks",Toast.LENGTH_SHORT).show();
         }
      });
   }
}
以下是 activity_main.xml 的内容.
在下面的代码中 abc 表示it1352的标识.com
<?xml version="1.0" encoding="utf-8"?>
<RelativeLayout xmlns:android="http://schemas.android.com/apk/res/android"
   xmlns:tools="http://schemas.android.com/tools" android:layout_width="match_parent"
   android:layout_height="match_parent" android:paddingLeft="@dimen/activity_horizontal_margin"
   android:paddingRight="@dimen/activity_horizontal_margin"
   android:paddingTop="@dimen/activity_vertical_margin"
   android:paddingBottom="@dimen/activity_vertical_margin" tools:context=".MainActivity">

   <TextView
      android:layout_width="wrap_content"
      android:layout_height="wrap_content"
      android:text="UI Animator Viewer"
      android:id="@+id/textView"
      android:textSize="25sp"
      android:layout_centerHorizontal="true" />

   <TextView
      android:layout_width="wrap_content"
      android:layout_height="wrap_content"
      android:text="Tutorials point"
      android:id="@+id/textView2"
      android:layout_below="@+id/textView"
      android:layout_alignRight="@+id/textView"
      android:layout_alignEnd="@+id/textView"
      android:textColor="#ff36ff15"
      android:textIsSelectable="false"
      android:textSize="35dp" />

   <ImageView
      android:layout_width="wrap_content"
      android:layout_height="wrap_content"
      android:id="@+id/imageView"
      android:src="@drawable/abc"
      android:layout_below="@+id/textView2"
      android:layout_centerHorizontal="true" />

   <Button
      android:layout_width="wrap_content"
      android:layout_height="wrap_content"
      android:text="Button"
      android:onClick="button"
      android:id="@+id/button"
      android:layout_below="@+id/imageView"
      android:layout_centerHorizontal="true"
      android:layout_marginTop="100dp" />

</RelativeLayout>
以下是 view.xml的内容
<?xml version="1.0" encoding="utf-8"?>
<RelativeLayout xmlns:android="http://schemas.android.com/apk/res/android"
   android:layout_width="match_parent" android:layout_height="match_parent">

   <Button
      android:layout_width="wrap_content"
      android:layout_height="wrap_content"
      android:text="button"
      android:id="@+id/button2"
      android:layout_centerVertical="true"
      android:layout_centerHorizontal="true" />

   <TextView
      android:layout_width="wrap_content"
      android:layout_height="wrap_content"
      android:text="Tutorials point "
      android:id="@+id/textView3"
      android:textColor="#ff3aff22"
      android:textSize="35dp"
      android:layout_above="@+id/button2"
      android:layout_centerHorizontal="true"
      android:layout_marginBottom="90dp" />

</RelativeLayout>
以下是 Strings.xml 的内容.
<resources>
   <string name="app_name">My Application</string>
</resources>
以下是 AndroidManifest.xml 的内容.
<?xml version="1.0" encoding="utf-8"?>
<manifest xmlns:android="http://schemas.android.com/apk/res/android"
   package="com.it1352.myapplication" >

   <application
      android:allowBackup="true"
      android:icon="@mipmap/ic_launcher"
      android:label="@string/app_name"
      android:theme="@style/AppTheme" >

      <activity
         android:name=".MainActivity"
         android:label="@string/app_name" >

         <intent-filter>
            <action android:name="android.intent.action.MAIN" />
            <category android:name="android.intent.category.LAUNCHER" />
         </intent-filter>

      </activity>

      <activity android:name=".second"></activity>

   </application>
</manifest>
让我们尝试运行您的Android测试应用程序.我假设您已将实际的Android移动设备与计算机相关联.要从Android工作室运行应用程序,请打开项目的一个活动文件,然后单击运行 icon从工具栏中.在开始申请之前,Android studio将显示以下窗口,以选择您要运行Android应用程序的选项.

选择您的移动设备作为选项,然后检查将显示应用程序屏幕的移动设备.现在,只需按照猴子部分顶部提到的步骤操作,即可对此应用程序进行测试.