Android SDK提供以下工具来支持您的应用程序的自动功能UI测试.
uiautomatorviewer
uiautomator
用于扫描和分析Android UI组件的GUI工具应用程序.
uiautomatorviewer工具提供了一个方便的可视界面,用于检查布局层次结构并查看测试设备上显示的各个UI组件的属性.使用此信息,您可以稍后使用针对要测试的特定UI组件的选择器对象创建uiautomator测试.
要分析要测试的应用程序的UI组件,请执行以下步骤安装示例中给出的应用程序后.
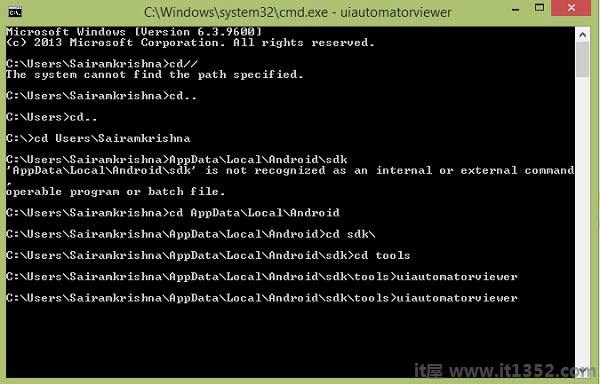
将Android设备连接到开发计算机
打开终端窗口并导航到< android-sdk>/tools/
使用此命令运行该工具
uiautomatorviewer
将按照以下命令执行命令
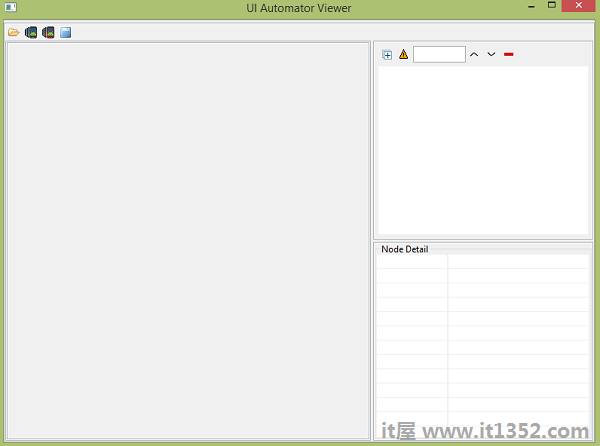
您将看到以下窗口.它是UI Automator Viewer的默认窗口.
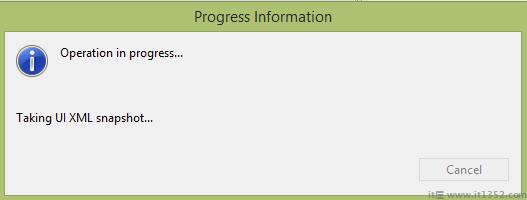
单击右上角的设备图标.它将开始获取当前在设备中打开的屏幕的UI XML快照.它会是这样的.
之后,您将在uiautomatorviewer窗口中看到设备屏幕的快照.
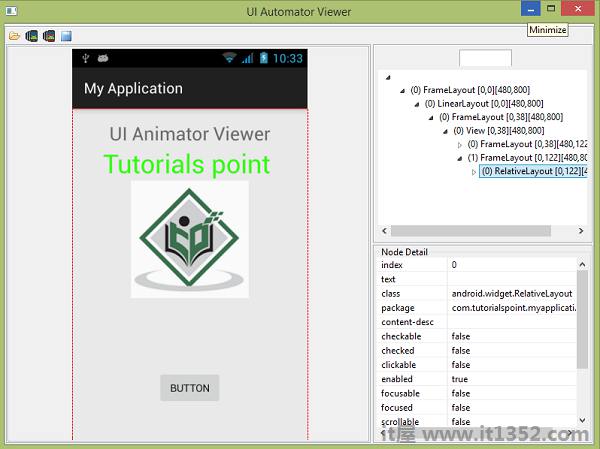
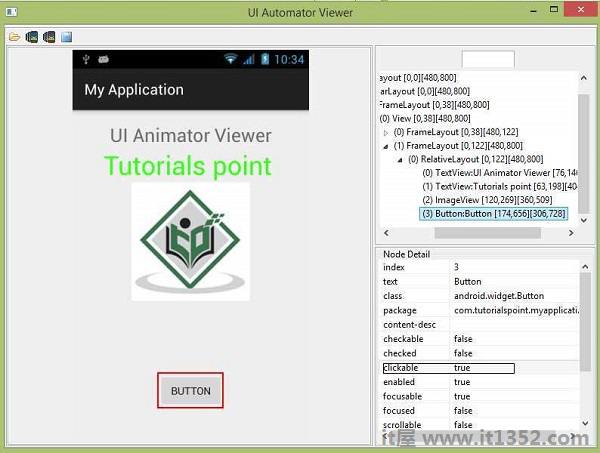
在此窗口的右侧,您将看到两个分区.上部分区解释了节点结构,UI组件的排列和包含方式.单击每个节点可在下部分区中显示详细信息.
作为示例,请考虑下图.单击该按钮时,您可以在上部分区中看到选中了Button,在下部分区中,将显示其详细信息.由于此按钮是可点击的,这就是为什么它的clickable属性设置为true.
UI Automator Viewer还可以帮助您以不同的方向检查UI.例如,只需将设备方向更改为横向,然后再次捕获屏幕截图.它如下图所示 :

现在您可以创建自己的测试用例并使用uiautomatorviewer运行它来检查它们.为了创建自己的测试用例,您需要执行以下步骤 :
从Project Explorer中,右键 - 单击您创建的新项目,然后选择属性> Java构建路径,并执行以下和减去;
单击添加库>然后JUnit选择JUnit3来添加JUnit支持.
单击Add External JARs ...并导航到SDK目录.在platforms目录下,选择最新的SDK版本并添加uiautomator.jar和android.jar文件.
使用UiAutomatorTestCase扩展您的类
正确的必要测试用例.
编码测试后,请按照以下步骤构建并将测试JAR部署到目标Android测试设备.
创建所需的构建配置文件以构建输出JAR.要生成构建配置文件,请打开终端并运行以下命令:
<android-sdk>/tools/android create uitest-project -n <name> -t 1 -p <path>
< name>是包含uiautomator测试源文件的项目的名称,以及< path>是相应项目目录的路径.
从命令行设置ANDROID_HOME变量.
set ANDROID_HOME=<path_to_your_sdk>
转到build.xml文件所在的项目目录并构建测试JAR./li>
ant build
使用adb push命令将生成的测试JAR文件部署到测试设备.
adb push <path_to_output_jar> /data/local/tmp/
按照以下命令运行测试 :
adb shell uiautomator runtest LaunchSettings.jar -c com.uia.example.my.LaunchSettings
下面的示例演示了如何使用UITesting.它包含了一个可用于uiautomatorviewer的基本应用程序.
要试验这个例子,你需要在实际设备上运行它,然后按照开头说明的uiautomatorviewer步骤进行操作./p>
| 步骤 | 描述 |
|---|---|
| 1 | 您将使用Android工作室创建com.it1352.myapplication包下的Android应用程序. |
| 2 | 修改src/MainActivity.java文件以添加活动代码. |
| 3 | 修改布局XML文件res/layout/activity_main.xml如果需要,添加任何GUI组件. |
| 4 | 创建src/second.java文件以添加活动代码. |
| 5 | 修改布局XML文件res/layout/view.xml如果需要,添加任何GUI组件. |
| 6 | 运行应用程序并选择正在运行的Android设备并在其上安装应用程序并验证结果. |
以下是 MainActivity.java 的内容.
package com.IT屋.myapplication;

import android.content.Intent;
import android.support.v7.app.ActionBarActivity;
import android.os.Bundle;
import android.view.View;
import android.widget.Button;

public class MainActivity extends ActionBarActivity {
   Button b1;

   @Override
   protected void onCreate(Bundle savedInstanceState) {
      super.onCreate(savedInstanceState);
      setContentView(R.layout.activity_main);

      b1=(Button)findViewById(R.id.button);
      b1.setOnClickListener(new View.OnClickListener() {
         @Override
         public void onClick(View v) {
            Intent in =new Intent(MainActivity.this,second.class);
            startActivity(in);
         }
      });
   }
}
以下是 second.java 的内容.
package com.IT屋.myapplication;

import android.app.Activity;
import android.os.Bundle;
import android.view.View;
import android.widget.Button;
import android.widget.Toast;

public class second extends Activity {
   @Override
   protected void onCreate(Bundle savedInstanceState) {
      super.onCreate(savedInstanceState);
      setContentView(R.layout.view);
      Button b1=(Button)findViewById(R.id.button2);

      b1.setOnClickListener(new View.OnClickListener() {
         @Override
         public void onClick(View v) {
            Toast.makeText(second.this,"Thanks",Toast.LENGTH_LONG).show();
         }
      });
   }
}
以下是 activity_main.xml 的内容
在下面的代码中 abc 表示it1352的标识.com
<?xml version="1.0" encoding="utf-8"?>
<RelativeLayout xmlns:android="http://schemas.android.com/apk/res/android"
   xmlns:tools="http://schemas.android.com/tools" android:layout_width="match_parent"
   android:layout_height="match_parent" android:paddingLeft="@dimen/activity_horizontal_margin"
   android:paddingRight="@dimen/activity_horizontal_margin"
   android:paddingTop="@dimen/activity_vertical_margin"
   android:paddingBottom="@dimen/activity_vertical_margin" tools:context=".MainActivity">

   <TextView
      android:layout_width="wrap_content"
      android:layout_height="wrap_content"
      android:text="UI Animator Viewer"
      android:id="@+id/textView"
      android:textSize="25sp"
      android:layout_centerHorizontal="true" />

   <TextView
      android:layout_width="wrap_content"
      android:layout_height="wrap_content"
      android:text="Tutorials point"
      android:id="@+id/textView2"
      android:layout_below="@+id/textView"
      android:layout_alignRight="@+id/textView"
      android:layout_alignEnd="@+id/textView"
      android:textColor="#ff36ff15"
      android:textIsSelectable="false"
      android:textSize="35dp" />

   <ImageView
      android:layout_width="wrap_content"
      android:layout_height="wrap_content"
      android:id="@+id/imageView"
      android:src="@drawable/abc"
      android:layout_below="@+id/textView2"
      android:layout_centerHorizontal="true" />

   <Button
      android:layout_width="wrap_content"
      android:layout_height="wrap_content"
      android:text="Button"
      android:id="@+id/button"
      android:layout_marginTop="98dp"
      android:layout_below="@+id/imageView"
      android:layout_centerHorizontal="true" />

</RelativeLayout>
以下是 view.xml 的内容.
<?xml version="1.0" encoding="utf-8"?>
<RelativeLayout xmlns:android="http://schemas.android.com/apk/res/android"
   android:orientation="vertical" android:layout_width="match_parent"
   android:layout_height="match_parent">

   <Button
      android:layout_width="wrap_content"
      android:layout_height="wrap_content"
      android:text=" Button"
      android:id="@+id/button2"
      android:layout_gravity="center_horizontal"
      android:layout_centerVertical="true"
      android:layout_centerHorizontal="true" />
</RelativeLayout>
以下是 Strings.xml 的内容.
<resources>
   <string name="app_name">My Application</string>
</resources>
以下是 AndroidManifest.xml 的内容.
<?xml version="1.0" encoding="utf-8"?>
<manifest xmlns:android="http://schemas.android.com/apk/res/android"
   package="com.IT屋.myapplication" >

   <application
      android:allowBackup="true"
      android:icon="@mipmap/ic_launcher"
      android:label="@string/app_name"
      android:theme="@style/AppTheme" >

      <activity
         android:name=".MainActivity"
         android:label="@string/app_name" >

         <intent-filter>
            <action android:name="android.intent.action.MAIN" />
            <category android:name="android.intent.category.LAUNCHER" />
         </intent-filter>

      </activity>

      <activity android:name=".second"></activity>

   </application>
</manifest>
让我们尝试运行您的UI测试应用程序.我假设您已将实际的Android移动设备与计算机相关联.要从Android工作室运行应用程序,请打开项目的一个活动文件,然后单击运行 icon从工具栏.在开始申请之前,Android studio将显示以下窗口,以选择您要运行Android应用程序的选项.

选择您的移动设备作为选项,然后检查将显示应用程序屏幕的移动设备.现在只需按照ui automator viewer部分顶部提到的步骤操作,即可对此应用程序执行ui测试.