身份验证是验证用户或进程身份的过程或操作.重要的是,应用程序对用户进行身份验证,以确保匿名用户无法使用该数据.在本节中,我们将学习如何验证GraphQL客户端.
在此示例中,我们将使用jQuery创建客户端应用.要对请求进行身份验证,我们将在服务器端使用 express-jwt 模块.
express-jwt模块是一个中间件,可让您使用身份验证HTTP请求JWT代币. JSON Web Token(JWT)是一个标识登录用户的长字符串.
用户成功登录后,服务器将生成JWT令牌.此令牌清楚地标识日志.换句话说,令牌是用户身份的表示.因此,下次当客户端到达服务器时,它必须提供此令牌以获取所需的资源.客户端可以是移动应用程序或Web应用程序.

我们将按照逐步的步骤来理解此插图.
以下是设置服务器的步骤 :
创建文件夹 auth-server-app .从终端将目录更改为 auth-server-app .按照环境设置章节中说明的步骤3到5进行操作.
在项目文件夹 auth-server-app 中添加 schema.graphql 文件并添加以下代码 :
type Query
{
   greetingWithAuth:String
}在项目文件夹中创建文件 resolvers.js 并添加以下代码 :
解析器将验证GraphQL的上下文对象中是否有经过身份验证的用户对象.如果经过身份验证的用户不可用,它将引发异常.
const db = require('./db')

const Query = {
   greetingWithAuth:(root,args,context,info) => {

      //check if the context.user is null
      if (!context.user) {
         throw new Error('Unauthorized');
      }
      return "Hello from TutorialsPoint, welcome back : "+context.user.firstName;
   }
}

module.exports = {Query}身份验证中间件使用JSON Web令牌对呼叫者进行身份验证.身份验证的URL是 http://localhost:9000/login .
这是一个后期操作.用户必须提交他的电子邮件和密码,该密码将从后端进行验证.如果使用jwt.sign方法生成有效令牌,则客户端必须在头中发送此令牌以用于后续请求.
如果令牌有效,则req.user将设置为解码后的JSON对象供以后的中间件用于授权和访问控制.
以下代码使用两个模块 : jsonwebtoken和express-jwt来验证请求 :
当用户点击 greet 时按钮,发出/graphql路由的请求.如果用户未经过身份验证,系统将提示他自己进行身份验证.
向用户显示一个接受电子邮件ID和密码的表单.在我们的示例中,/login路由负责对用户进行身份验证.
/login route验证是否在数据库中找到了由用户.
如果凭据无效,则会向用户返回HTTP 401异常.
如果凭据有效,则服务器生成令牌.此令牌作为响应的一部分发送给用户.这是由jwt.sign函数完成的.
const expressJwt = require('express-jwt');
const jwt = require('jsonwebtoken');

//private key
const jwtSecret = Buffer.from('Zn8Q5tyZ/G1MHltc4F/gTkVJMlrbKiZt', 'base64');

app.post('/login', (req, res) => {
   const {email, password} = req.body;

   //check database
   const user = db.students.list().find((user) =>  user.email === email);
   if (!(user && user.password === password)) {
      res.sendStatus(401);
      return;
   }

   //generate a token based on private key, token doesn't have an expiry
   const token = jwt.sign({sub: user.id}, jwtSecret);
   res.send({token});
});
对于每个请求,都会调用app.use()函数.这反过来将调用expressJWT中间件.该中间件将解码JSON Web令牌.存储在令牌中的用户ID将被检索并作为属性用户存储在请求对象中.
//decodes the JWT and stores in request object
app.use(expressJwt({
   secret: jwtSecret,
   credentialsRequired: false
}));
要在GraphQL上下文中提供用户属性,此属性将分配给 context 对象,如下所示 :
//Make req.user available to GraphQL context
app.use('/graphql', graphqlExpress((req) => ({
   schema,
   context: {user: req.user &&apm; db.students.get(req.user.sub)}
})));
在当前文件夹路径中创建 server.js .完整的server.js文件如下 :
const bodyParser = require('body-parser');
const cors = require('cors');
const express = require('express');
const expressJwt = require('express-jwt'); //auth
const jwt = require('jsonwebtoken'); //auth
const db = require('./db');

var port = process.env.PORT || 9000
const jwtSecret = Buffer.from('Zn8Q5tyZ/G1MHltc4F/gTkVJMlrbKiZt', 'base64');
const app = express();

const fs = require('fs')
const typeDefs = fs.readFileSync('./schema.graphql',{encoding:'utf-8'})
const resolvers = require('./resolvers')
const {makeExecutableSchema} = require('graphql-tools')

const schema = makeExecutableSchema({typeDefs, resolvers})

app.use(cors(), bodyParser.json(), expressJwt({
   secret: jwtSecret,
   credentialsRequired: false
}));

const  {graphiqlExpress,graphqlExpress} = require('apollo-server-express')

app.use('/graphql', graphqlExpress((req) => ({
   schema,
   context: {user: req.user && db.students.get(req.user.sub)}
})));
app.use('/graphiql',graphiqlExpress({endpointURL:'/graphql'}))

//authenticate students
app.post('/login', (req, res) => {
   const email = req.body.email;
   const password = req.body.password;

   const user = db.students.list().find((user) =>  user.email === email);
   if (!(user && user.password === password)) {
      res.sendStatus(401);
      return;
   }
   const token = jwt.sign({sub: user.id}, jwtSecret);
   res.send({token});
});

app.listen(port, () => console.info(`Server started on port ${port}`));在终端中执行命令 npm .服务器将在9000端口上启动并运行.在这里,我们使用GraphiQL作为客户端来测试应用程序.
打开浏览器并输入URL http://localhost:9000/graphiql .在编辑器中输入以下查询 :
{
   greetingWithAuth
}
在下面的回复中,我们收到了一个错误,因为我们不是经过身份验证的用户.
{
   "data": {
      "greetingWithAuth": null
   },
   "errors": [
      {
         "message": "Unauthorized",
         "locations": [
            {
               "line": 2,
               "column": 3
            }
         ],
         "path": [
            "greetingWithAuth"
         ]
      }
   ]
}
在下一节中,让我们创建一个客户端应用程序进行身份验证.
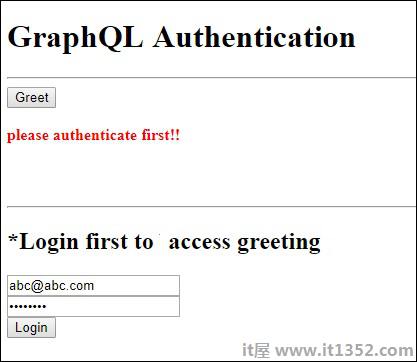
在客户端应用程序中,提供了一个调用按钮,它将调用schema greetingWithAuth .如果您在没有登录的情况下单击按钮,它将显示错误消息,如下所示;
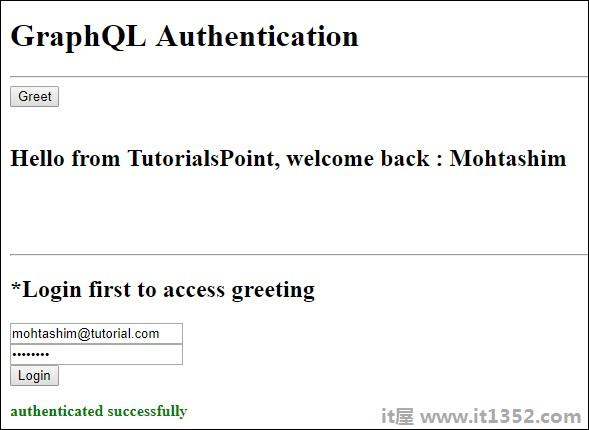
使用数据库中可用的用户登录后,将显示以下屏幕 :
要访问问候语,我们需要先访问URL http://localhost:9000/login 路由如下.
响应将包含从服务器生成的令牌.
$.ajax({
   url:"http://localhost:9000/login",
   contentType:"application/json",
   type:"POST",
   data:JSON.stringify({email,password}),
   success:function(response) {
      loginToken = response.token;
      $('#authStatus')
      .html("authenticated successfully")
      .css({"color":"green",'font-weight':'bold'});
      $("#greetingDiv").html('').css({'color':''});
   },
   error:(xhr,err) =>  alert('error')
})
成功登录后,我们可以访问 greetingWithAuth 架构,如下所示.所有后续请求都应该有一个Authorizationheader,带有bearer token.
{
   url: "http://localhost:9000/graphql",
   contentType: "application/json",
   headers: {"Authorization": 'bearer '+loginToken},  type:'POST',
   data: JSON.stringify({
   query:`{greetingWithAuth}`
}
以下是index.html : 的代码;
<!DOCTYPE html>
<html>
   <head>
      <script src = "https://ajax.googleapis.com/ajax/libs/jquery/3.3.1/jquery.min.js"></script>
      <script>
         $(document).ready(function() {
            let loginToken = "";
            $("#btnGreet").click(function() {
                  $.ajax({url: "http://localhost:9000/graphql",
                  contentType: "application/json",
                  headers: {"Authorization": 'bearer '+loginToken},
                  type:'POST',
                  data: JSON.stringify({
                  query:`{greetingWithAuth}` }),
                  success: function(result) {
                  $("#greetingDiv").html("<h1>"+result.data.greetingWithAuth+"</h1>")
                  },
                  error:function(jQxhr,error) {
                     if(jQxhr.status == 401) {
                        $("#greetingDiv").html('please authenticate first!!')
                        .css({"color":"red",'font-weight':'bold'})
                        return;
                     }
                     $("#greetingDiv").html('error').css("color","red");
                  }
               });
            });
            $('#btnAuthenticate').click(function() {
               var email =  $("#txtEmail").val();
               var password =  $("#txtPwd").val();
               if(email && password) {
                  $.ajax({
                     url:"http://localhost:9000/login",
                     contentType:"application/json",
                     type:"POST",
                     data:JSON.stringify({email,password}),
                     success:function(response) {
                        loginToken =  response.token;
                        $('#authStatus')
                        .html("authenticated successfully")
                        .css({"color":"green",'font-weight':'bold'});
                        $("#greetingDiv").html('').css({'color':''});
                     },
                     error:(xhr,err) =>  alert('error')
                  })
               }else alert("email and pwd empty")
            })
         });
      </script>
   </head>

   <body>
      <h1> GraphQL Authentication </h1>
      <hr/>
      <section>
         <button id = "btnGreet">Greet</button>
         <br/> <br/>
         <div id = "greetingDiv"></div>
      </section>
      <br/> <br/> <br/>
      <hr/>

      <section id = "LoginSection">
         <header>
            <h2>*Login first to  access greeting </h2>
         </header>
         <input type = "text" value = "mohtashim.mohammad@tutorialpoint.org" placeholder = "enter email" id = "txtEmail"/>
         <br/>

         <input type = "password" value = "pass123" placeholder = "enter password" id = "txtPwd"/>
         <br/>

         <input type = "button" id = "btnAuthenticate"  value = "Login"/>
         <p id = "authStatus"></p>
      </section>
   </body>
</html>