在了解了机器学习概念之后,我们现在可以将注意力转移到深度学习概念上.深度学习是机器学习的一个分支,被认为是近几十年来研究人员采取的关键步骤.深度学习实现的例子包括图像识别和语音识别等应用.
以下是两种重要类型的深度神经网络 :
卷积神经网络
递归神经网络
本章内容,我们将专注于CNN,卷积神经网络.
卷积神经网络旨在通过多层数组处理数据.这种类型的神经网络用于图像识别或面部识别等应用. CNN与任何其他普通神经网络的主要区别在于CNN将输入视为二维阵列,并直接在图像上运行,而不是专注于其他神经网络关注的特征提取.
CNN的主导方法包括识别问题的解决方案.像谷歌和Facebook这样的顶级公司已投入研究和开发识别项目,以更快的速度完成活动.
卷积神经网络使用三个基本思路和减号;
本地相应字段
卷积
合并
让我们详细了解这些想法.
CNN利用输入数据中存在的空间相关性.神经网络的每个并发层连接一些输入神经元.该特定区域称为局部感受野.局部感受野聚焦于隐藏的神经元.隐藏的神经元处理所提到的字段内的输入数据,而没有实现特定边界之外的变化.
以下是生成本地相应字段的图表表示 :
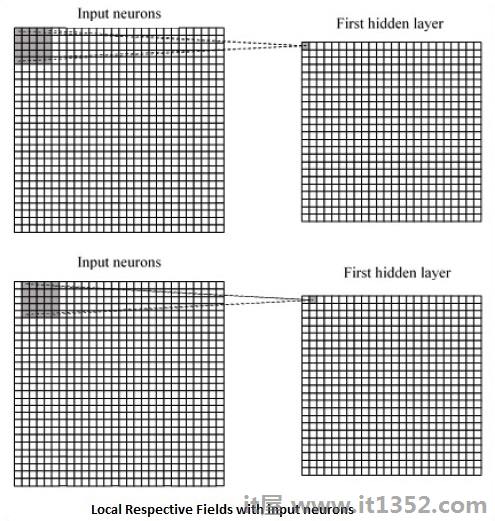
如果我们观察上述表示,每个连接都会学习隐藏神经元的权重与从一层到另一层的移动相关联.在这里,各个神经元不时地进行转换.此过程称为"卷积".
从输入层到隐藏要素图的连接映射定义为"共享权重",包含偏差称为"共享偏差"./p>
CNN或卷积神经网络使用池化层,这些层是在CNN声明之后立即定位的层.它将来自用户的输入作为来自卷积网络的特征映射并准备精简的特征映射.池化图层有助于创建具有前一层神经元的图层.
在本节中,我们将了解TensorFlow实现CNN.需要执行整个网络的适当尺寸的步骤如下所示 :
步骤1 : 包括计算CNN模型所需的TensorFlow和数据集模块所需的模块.
import tensorflow as tf
import numpy as np
from tensorflow.examples.tutorials.mnist import input_data
步骤2 : 声明一个名为 run_cnn()的函数,该函数包含各种参数和优化变量以及数据占位符的声明.这些优化变量将声明训练模式.
 def run_cnn():
 mnist = input_data.read_data_sets("MNIST_data/", one_hot = True)
 learning_rate = 0.0001
 epochs = 10
 batch_size = 50
第3步 : 在此步骤中,我们将使用输入参数声明训练数据占位符 - 对于28 x 28像素= 784.这是从 mnist.train.nextbatch()中提取的展平图像数据.
我们可以根据我们的要求重塑张量.第一个值(-1)告诉函数根据传递给它的数据量动态调整该维度.两个中间维度设置为图像大小(即28 x 28).
x = tf.placeholder(tf.float32,[None, 784])
 x_shaped = tf.reshape(x,[ -  1,28,28,1])$ b $ by = tf.placeholder(tf.float32,[None,10])
第4步 : 现在重要的是创建一些卷积层 :
 layer1 = create_new_conv_layer(x_shaped,1,32,[5,5],[2 ,2],name ='layer1')
 layer2 = create_new_conv_layer(layer1,32,64,[5,5],[2,2],name ='layer2')
第5步 : 让我们将输出平坦化为完全连接的输出级 - 在尺寸为28 x 28的两个步幅2汇集后,尺寸为14 x 14或最小7 x 7 x,y坐标,但是具有64个输出通道.要创建与"密集"层完全连接,新形状需要为[-1,7 x 7 x 64].我们可以为这一层设置一些权重和偏差值,然后用ReLU激活.
 flattened = tf.reshape(layer2,[ -  1 ,7 * 7 * 64])
 wd1 = tf.Variable(tf.truncated_normal([7 * 7 * 64,1000],stddev = 0.03),name ='wd1')
 bd1 = tf.Variable(tf.truncated_normal([1000],stddev = 0.01),name ='bd1')
 dense_layer1 = tf.matmul(flattened,wd1)+ bd1
 dense_layer1 = tf.nn.relu(dense_layer1)
第6步 : 具有特定softmax激活的另一层与所需的优化器定义精度评估,这使得初始化操作符的设置.
 wd2 = tf.Variable( tf.truncated_normal([1000,10],stddev = 0.03),name ='wd2')
 bd2 = tf.Variable(tf.truncated_normal([10],stddev = 0.01),name ='bd2')
 dense_layer2 = tf.matmul(dense_layer1,wd2)+ bd2
 y_ = tf.nn.softmax(dense_layer2)
 cross_entropy = tf.reduce_mean(
 tf.nn.softmax_cross_entropy_with_logits(logits = dense_layer2,labels = y))
 optimiser = tf.train.AdamOptimizer(learning_rate = learning_rate).minimize(cross_entropy)
 correct_prediction = tf.equal(tf.argmax(y,1),tf.argmax(y_,1))
 accuracy = tf.reduce_mean(tf.cast(correct_prediction,tf.float32))
 init_op = tf.global_variables_initializer()
第7步 : 我们应该设置记录变量.这会添加一个汇总来存储数据的准确性.
tf.summary.scalar('accuracy', accuracy)
   merged = tf.summary.merge_all()
   writer = tf.summary.FileWriter('E:\TensorFlowProject')

   with tf.Session() as sess:
      sess.run(init_op)
      total_batch = int(len(mnist.train.labels) / batch_size)

      for epoch in range(epochs):
         avg_cost = 0
      for i in range(total_batch):
         batch_x, batch_y = mnist.train.next_batch(batch_size = batch_size)
            _, c = sess.run([optimiser, cross_entropy], feed_dict = {
            x:batch_x, y: batch_y})
            avg_cost += c / total_batch
         test_acc = sess.run(accuracy, feed_dict = {x: mnist.test.images, y:
            mnist.test.labels})
            summary = sess.run(merged, feed_dict = {x: mnist.test.images, y:
            mnist.test.labels})
         writer.add_summary(summary, epoch)

   print("\nTraining complete!")
   writer.add_graph(sess.graph)
   print(sess.run(accuracy, feed_dict = {x: mnist.test.images, y:
      mnist.test.labels}))

def create_new_conv_layer(
   input_data, num_input_channels, num_filters,filter_shape, pool_shape, name):

   conv_filt_shape = [
      filter_shape[0], filter_shape[1], num_input_channels, num_filters]

   weights = tf.Variable(
      tf.truncated_normal(conv_filt_shape, stddev = 0.03), name = name+'_W')
   bias = tf.Variable(tf.truncated_normal([num_filters]), name = name+'_b')

#Out layer defines the output
   out_layer =
      tf.nn.conv2d(input_data, weights, [1, 1, 1, 1], padding = 'SAME')

   out_layer += bias
   out_layer = tf.nn.relu(out_layer)
   ksize = [1, pool_shape[0], pool_shape[1], 1]
   strides = [1, 2, 2, 1]
   out_layer = tf.nn.max_pool(
      out_layer, ksize = ksize, strides = strides, padding = 'SAME')

   return out_layer

if __name__ == "__main__":
run_cnn()
以下是上述代码生成的输出 :
See @{tf.nn.softmax_cross_entropy_with_logits_v2}.

2018-09-19 17:22:58.802268: I
T:\src\github\tensorflow\tensorflow\core\platform\cpu_feature_guard.cc:140]
Your CPU supports instructions that this TensorFlow binary was not compiled to
use: AVX2

2018-09-19 17:25:41.522845: W
T:\src\github\tensorflow\tensorflow\core\framework\allocator.cc:101] Allocation
of 1003520000 exceeds 10% of system memory.

2018-09-19 17:25:44.630941: W
T:\src\github\tensorflow\tensorflow\core\framework\allocator.cc:101] Allocation
of 501760000 exceeds 10% of system memory.

Epoch: 1 cost = 0.676 test accuracy: 0.940

2018-09-19 17:26:51.987554: W
T:\src\github\tensorflow\tensorflow\core\framework\allocator.cc:101] Allocation
of 1003520000 exceeds 10% of system memory.