在本章中,我们将创建一个允许用户注册的登录系统.然后,我们将在注册成功后将注册用户带到我们应用程序的主屏幕.
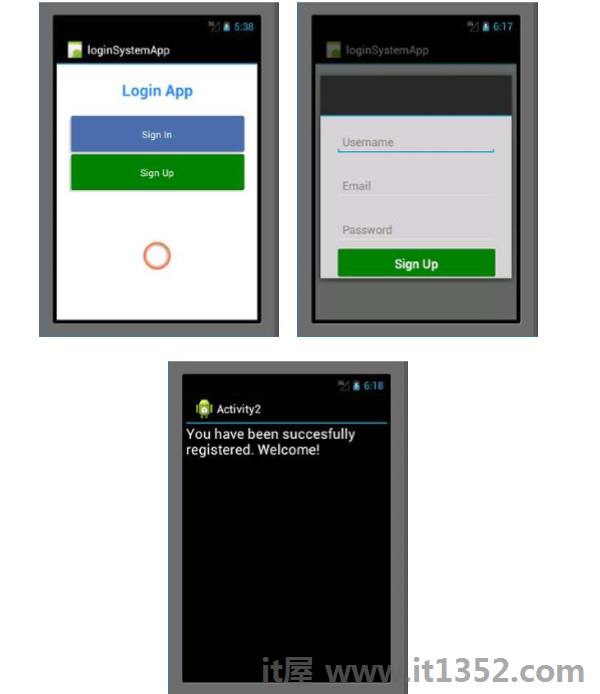
首先,创建一个新项目并将其命名为登录系统 .在您的新项目中,转到 main.axml 并添加两个按钮和一个进度条,如下所示.
<?xml version = "1.0" encoding = "utf-8"?>
<LinearLayout xmlns:android = "http://schemas.android.com/apk/res/android"
   android:orientation = "vertical"
   android:layout_width = "fill_parent"
   android:layout_height = "fill_parent"
   android:background = "@android:color/background_light"
   android:weightSum = "100"
   android:minWidth = "25px"
   android:minHeight = "25px">
   <TextView
      android:text = "Login App"
      android:textAppearance = "?android:attr/textAppearanceMedium"
      android:layout_width = "match_parent"
      android:layout_weight = "20"
      android:layout_height = "0dp"
      android:textColor = "#368DEB"
      android:id = "@+id/txtCreatAccount"
      android:gravity = "center"
      android:textStyle = "bold"
      android:textSize = "25sp" />
   <Button
      android:text = "Sign In"
      android:layout_width = "match_parent"
      android:layout_weight = "15"
      android:layout_height = "0dp"
      android:background = "@drawable/btnSignInStyle"
      android:id = "@+id/btnSignIn"
      android:layout_marginLeft = "20dp"
      android:layout_marginRight = "20dp"
      android:textSize = "15sp" />
   <Button
      android:text = "Sign Up"
      android:layout_width = "match_parent"
      android:layout_weight = "15"
      android:layout_height = "0dp"
      android:background = "@drawable/btnSignUpStyle"
      android:id = "@+id/btnSignUp"
      android:layout_marginLeft = "20dp"
      android:layout_marginRight = "20dp"
      android:textSize = "15sp" />
   <RelativeLayout
      android:layout_width = "match_parent"
      android:layout_height = "0dp"
      android:layout_weight = "50"
      android:minWidth = "25px"
      android:minHeight = "25px">
      <ProgressBar
         android:layout_width = "wrap_content"
         android:layout_height = "wrap_content"
         android:id = "@+id/progressBar1"
         android:background = "@drawable/progressBarStyle"
         android:layout_centerInParent="true"
         android:indeterminate = "true"
         xmlns:tools = "
            http://schemas.android.com/tools"
         tools:visibility = "invisible" />
   </RelativeLayout>
</LinearLayout>
创建用户界面后,设置按钮的样式以使它们看起来更具吸引力非常重要.为此,请在 drawable文件夹下创建一个新的XML文件,并将该文件命名为 btnSignInStyle.xml .
在XML文件中,添加以下代码行 :
<selector xmlns:android = "http://schemas.android.com/apk/res/android">
   <item android:state_pressed = "false">
      <layer-list>
         <item android:right = "5dp" android:top = "5dp">
            <shape>
               <corners android:radius = "2dp"/>
               <solid android:color = "#D6D6D6"/>
            </shape>
         </item>
         <item android:left = "2dp" android:bottom = "2dp">
            <shape>
               <corners android:radius = "4dp"/>
               <gradient android:angle = "270"
                  android:endColor = "#486EA9" android:startColor = "#486EA9"/>
               <stroke android:width = "1dp" android:color = "#BABABA"/>
               <padding android:bottom = "10dp"
                  android:right = "10dp" android:left = "10dp" android:top = "10dp"/>
            </shape>
         </item>
      </layer-list>
   </item>
   <item android:state_pressed = "true">
      <layer-list>
         <item android:right = "5dp" android:top = "5dp">
            <shape>
               <corners android:radius = "2dp"/>
               <solid android:color = "#D6D6D6"/>
            </shape>
         </item>
         <item android:left = "2dp" android:bottom = "2dp">
            <shape>
               <corners android:radius = "4dp"/>
               <gradient android:angle = "270"
                  android:endColor = "#79C791" android:startColor = "#486EA9"/>
               <stroke android:radius = "4dp" android:color = "#BABABA"/>
               <padding android:bottom = "10dp"
                  android:right = "10dp" android:left = "10dp" android:top = "10dp"/>
            </shape>
         </item>
      </layer-list>
  </item>
</selector>
上面的代码设置了加载和点击时按钮的颜色,它还设置了按钮的边框半径.
接下来,我们为注册按钮创建与上面类似的样式XML.为此,在 drawable 文件夹下创建另一个XML并将其命名为 btnSignUpStyle.xml .它将继承 btnSignInStyle.xml 中的所有内容.唯一的区别是按钮的渐变开始和结束颜色.
在 btnSignUpStyle中更改 startColor 和 endColor . xml 到
<gradient android:angle="270"
   android:endColor="#008000" android:startColor="#008000"/>
转到布局文件夹并创建一个新的AXML文件并将其命名为registerDailog.axml.此文件将包含我们应用中新用户的注册详细信息.该页面将包含三个 EditTexts 和一个用于提交数据的按钮.在线性布局代码中添加以下代码.
<EditText
   android:layout_width = "match_parent"
   android:layout_marginBottom = "10dp"
   android:layout_marginTop = "25dp"
   android:layout_marginRight = "25dp"
   android:layout_marginLeft = "25dp"
   android:layout_height = "35dp"
   android:paddingLeft = "10dp"
   android:id = "@+id/txtUsername"
   android:hint = "Username"
   android:textColor = "#000" />
<EditText
   android:layout_width = "match_parent"
   android:layout_height = "35dp"
   android:id = "@+id/txtEmail"
   android:layout_marginBottom = "10dp"
   android:layout_marginTop = "25dp"
   android:layout_marginRight = "25dp"
   android:layout_marginLeft = "25dp"
   android:paddingLeft = "10dp"
   android:textColor = "#000"
   android:hint = "Email" />
<EditText
   android:layout_width = "match_parent"
   android:layout_height = "35dp"
   android:layout_marginBottom = "10dp"
   android:layout_marginTop = "25dp"
   android:layout_marginRight = "25dp"
   android:layout_marginLeft = "25dp"
   android:paddingLeft = "10dp"
   android:textColor = "#000"
   android:id = "@+id/txtPassword"
   android:hint = "Password" />
<Button
   android:text = "Sign Up"
   android:layout_width = "match_parent"
   android:layout_height = "wrap_content"
   android:id = "@+id/btnSave"
   android:textSize = "20dp"
   android:textColor = "#fff"
   android:textStyle = "bold"
   android:height = "70dp"
   android:background = "@drawable/btnSignUpStyle"
   android:paddingLeft = "5dp"
   android:paddingRight = "5dp"
   android:paddingTop = "5dp"
   android:paddingBottom = "5dp"
   android:layout_marginLeft = "25dp"
   android:layout_marginRight = "25dp"
   android:layout_centerHorizontal = "true" />
接下来,添加一个名为 signUpDialog.cs 的新类.该类将包含创建对话框所需的代码.以下示例显示了代码.
public class OnSignUpEvent:EventArgs {
   private string myUserName;
   private string myEmail;
   private string myPassword;
   public string UserName {
      get {
         return myUserName;
      }
      set{
         myUserName = value;
      }
   }

   public string Email {
      get {
         return myEmail;
      }
      set {
         myEmail = value;
      }
   }

   public string Password {
      get {
         return myPassword;
      }
      set {
         myPassword = value;
      }
   }
   public OnSignUpEvent(string username, string
      email, string password):base() {
      UserName = username;
      Email = email;
      Password = password;
   }

   class SignUpDialog:DialogFragment {
      private EditText txtUsername;
      private EditText txtEmail;
      private EditText txtPassword;
      private Button btnSaveSignUp;
      public event EventHandler<OnSignUpEvent> onSignUpComplete;
      public override View OnCreateView(LayoutInflater inflater,
         ViewGroup container, Bundle savedInstanceState) {
         base.OnCreateView(inflater, container, savedInstanceState);
         var view = inflater.Inflate(Resource.Layout.registerDialog, container, false);
         txtUsername = view.FindViewById<EditText>(Resource.Id.txtUsername);
         txtEmail = view.FindViewById<EditText>(Resource.Id.txtEmail);
         txtPassword = view.FindViewById<EditText>(Resource.Id.txtPassword);
         btnSaveSignUp = view.FindViewById<Button>(Resource.Id.btnSave);
         btnSaveSignUp.Click += btnSaveSignUp_Click;
         return view;
      }
      void btnSaveSignUp_Click(object sender, EventArgs e) {
         onSignUpComplete.Invoke(this, new OnSignUpEvent(txtUsername.Text,

            txtEmail.Text, txtPassword.Text));
         this.Dismiss();
      }
   }
}
在上面的代码中,我们使用了 get 和设置属性. get 方法返回一个变量,而 set 方法为返回的变量赋值.这是一个例子 :
public string Color {
   get {
      return color;
   }
   set {
      color = value;
   }
}
在前面的例子中,我们创建了一个覆盖视图的方法.在方法内部,我们创建了一个名为 view 的 var ,它引用了布局文件夹中包含的 registerDialog.axml .
接下来,转到 mainActivity.cs 创建对话框片段.
private Button signUp;
private Button submitNewUser;
private EditText txtUsername;
private EditText txtEmail;
private EditText txtPassword;

protected override void OnCreate(Bundle bundle) {
   base.OnCreate(bundle);
   SetContentView(Resource.Layout.Main);
   signUp = FindViewById<Button>(Resource.Id.btnSignUp);
   submitNewUser = FindViewById<Button>(Resource.Id.btnSave);
   txtUsername = FindViewById<EditText>(Resource.Id.txtUsername);
   txtEmail = FindViewById<EditText>(Resource.Id.txtEmail);
   txtPassword = FindViewById<EditText>(Resource.Id.txtPassword);

   signUp.Click += (object sender, EventArgs args) => {
      FragmentTransaction transFrag = FragmentManager.BeginTransaction();
      SignUpDialog diagSignUp = new SignUpDialog();
      diagSignUp.Show(transFrag, "Fragment Dialog");
      diagSignUp.onSignUpComplete += diagSignUp_onSignUpComplete;
   };
}
void diagSignUp_onSignUpComplete(object sender, OnSignUpEvent e) {
   StartActivity(typeof(Activity2));
}
上面的代码包含一个按钮点击事件,点击该事件会加载signUp对话框.在按钮单击内,我们创建了一个 SignUpDialog 类,它加载 registerDialog.axml 文件.
然后我们使用了 FragmentTransaction transFrag = FragmentManager.BeginTransaction(); 将我们的 registerDialog 页面显示为Android对话框片段.
我们是要添加另一个名为 home.axml 的 .axml 文件.一旦用户成功登录系统,此布局将成为登陆屏幕.在这个布局中,我们将添加一个textview,如下面的代码所示.
<TextView
   android:text = "You have been succesfully registered. Welcome!"
   android:textAppearance = "?android:attr/textAppearanceLarge"
   android:layout_width = "match_parent"
   android:layout_height = "wrap_content"
   android:id = "@+id/textView1" />
接下来,我们创建一个名为 Activity2.cs 的最终活动.在此活动中,我们将使用 findViewById 找到 home.axml .
最后,构建并运行您的应用程序.它将显示以下屏幕作为输出.