控制器是一个简单的类文件.顾名思义,它通过URI控制整个应用程序.
首先,转到应用程序/控制器文件夹.你会在那里找到两个文件, index.html 和 Welcome.php .这些文件随CodeIgniter一起提供.
保持这些文件不变.在名为" Test.php "的相同路径下创建新文件.在该文件中写下以下代码 :
<?php
   class Test extends CI_Controller {

      public function index() {
         echo "Hello World!";
      }
   }
?>
Test 类扩展了一个名为 CI_Controller 的内置类.每当你想创建自己的Controller类时,必须扩展这个类.
上面的控制器可以通过URI调用如下 :
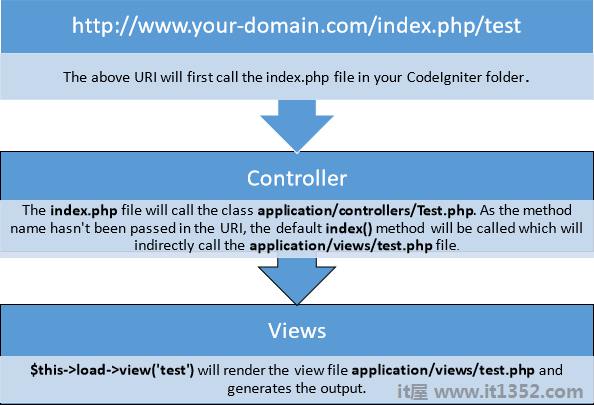
http://www.your-domain.com/index.php/test
注意index.php之后的上述URI中的单词" test ".这表示控制器的类名.由于我们已经给出了控制器" Test "的名称,我们在index.php之后写了" test ".类名必须以大写字母开头,但是当我们通过URI调用该控制器时,我们需要写小写字母.调用控制器的一般语法如下 :
http://www.your-domain.com/index.php/controller/method-name
让我们修改上面的类并创建另一个名为"hello"的方法.
<?php
class Test extends CI_Controller {
public function index() {
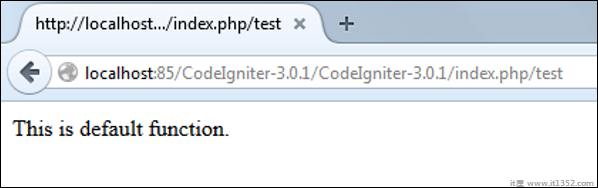
echo "This is default function.";
}
public function hello() {
echo "This is hello function.";
}
}
?>我们可以通过以下三种方式执行上述控制器 :
http://www.your-domain.com/index.php/test
http://www.your-domain.com/index.php/test/index
http://www.your-domain.com/index.php/test/hello
访问浏览器中的第一个URI后,我们得到如下图所示的输出.正如您所看到的,我们获得了方法" index "的输出,即使我们没有传递URI方法的名称.我们在URI中只使用了控制器名称.在这种情况下,CodeIgniter调用默认方法" index ".
访问浏览器中的第二个URI,我们得到相同的输出,如上图所示.在这里,我们在URI中的控制器名称之后传递了方法的名称.由于方法的名称是" index ",我们得到相同的输出.
访问浏览器中的第三个URI,我们得到如图所示的输出如下图所示.正如您所看到的,我们正在获取方法" hello "的输出,因为我们已经将" hello "作为方法名称,在控制器名称之后"

控制器类的名称必须以大写字母开头.
必须使用小写字母调用控制器.
请勿使用与您的方法相同的名称父类,因为它将覆盖父类的功能.
这可以是一个简单或复杂的网页,可由控制器调用.网页可能包含页眉,页脚,侧边栏等.无法直接调用视图.让我们创建一个简单的视图.在 application/views 下创建一个名为" test.php "的新文件,并将下面给出的代码复制到该文件中.
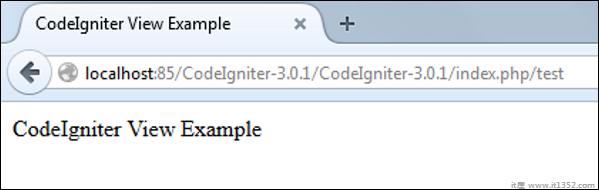
<!DOCTYPE html>
<html lang = "en">

   <head>
      <meta charset = "utf-8">
      <title>CodeIgniter View Example</title>
   </head>

   <body>
      CodeIgniter View Example
   </body>

</html>
更改 application/controllers/test.php 文件的代码,如下所示.
可以通过以下语法加载视图 :
$this->load->view('name');其中name是正在呈现的视图文件.如果您计划将视图文件存储在某个目录中,则可以使用以下语法 :
$this->load->view('directory-name/name');没有必要将扩展名指定为php,除非使用.php以外的其他内容.
index()方法调用view方法并将"test"作为参数传递给view()方法,因为我们已将html编码存储在 application/views下的" test.php "文件中/test.php.
<?php
   class Test extends CI_Controller {

      public function index() {
         $this->load->view('test');
      }
   }
?>
以下是上述代码的输出 :
以下流程图说明了一切如何工作 :
模型类用于处理数据库中的信息.例如,如果您使用CodeIgniter来管理应用程序中的用户,那么您必须拥有模型类,其中包含插入,删除,更新和检索用户数据的函数.
模型类存储在 application/models 目录中.下面的代码显示了如何在CodeIgniter中创建模型类.
<?php
类Model_name扩展CI_Model {
公共函数__construct(){
 parent :: __ construct();
}
}
?>
其中Model_name是您要提供的模型类的名称.每个模型类都必须继承CodeIgniter的CI_Model类.模型类的第一个字母必须是大写字母.以下是用户模型类的代码.
<?php
   Class Model_name extends CI_Model {

      Public function __construct() {
         parent::__construct();
      }
   }
?>
上述模型类必须保存为User_model.php.类名和文件名必须相同.
可以在控制器中调用模型.以下代码可用于加载任何模型.
$ this-> load-> model('model_name');其中model_name是要加载的模型的名称.加载模型后,您只需调用其方法,如下所示.
$ this-> model_name-> method();
在某些情况下,您可能需要在整个应用程序中使用某些模型类.在这种情况下,最好自动加载它.
/*
| ---------------------------------------------------------------
|  Auto-Load Models
| ---------------------------------------------------------------
| Prototype:
|
|   $autoload['model'] = array('first_model', 'second_model');
|
| You can also supply an alternative model name to be assigned
| in the controller:
|
|   $autoload['model'] = array('first_model' => 'first');
*/
$autoload['model'] = array();
如上图所示,传递要自动加载的数组中的模型名称,它将自动加载,同时系统处于初始化状态状态并且可以在整个应用程序中访问.
顾名思义,它将帮助您构建系统.它分为小功能以提供不同的功能. CodeIgniter中提供了许多帮助程序,这些帮助程序在下表中列出.我们也可以构建自己的帮助程序.
帮助程序通常存储在 system/helpers 或 application/helpers目录中.自定义帮助程序存储在 application/helpers 目录中,系统帮助程序存储在 system/helpers 目录中. CodeIgniter将首先在 application/helpers目录中查找.如果目录不存在或找不到指定的帮助程序,则CodeIgniter将查找全局 system/helpers /目录.每个帮助程序,无论是自定义程序还是系统帮助程序,都必须在使用之前加载.
Array Helper The Array Helper file contains functions that assist in working with arrays. CAPTCHA Helper The CAPTCHA Helper file contains functions that assist in creating CAPTCHA images. Cookie Helper The Cookie Helper file contains functions that assist in working with cookies. Date Helper The Date Helper file contains functions that help you work with dates. Directory Helper The Directory Helper file contains functions that assist in working with directories. Download Helper The Download Helper lets you download data to your desktop. Email Helper The Email Helper provides some assistive functions for working with Email. For a more robust email solution, see CodeIgniter’s Email Class. File Helper The File Helper file contains functions that assist in working with files. Form Helper The Form Helper file contains functions that assist in working with forms. HTML Helper The HTML Helper file contains functions that assist in working with HTML. Inflector Helper The Inflector Helper file contains functions that permits you to change words to plural, singular, camel case, etc. Language Helper The Language Helper file contains functions that assist in working with language files. Number Helper The Number Helper file contains functions that help you work with numeric data. Path Helper The Path Helper file contains functions that permits you to work with file paths on the server. Security Helper The Security Helper file contains security related functions. Smiley Helper The Smiley Helper file contains functions that let you manage smileys (emoticons). String Helper The String Helper file contains functions that assist in working with strings. Text Helper The Text Helper file contains functions that assist in working with text. Typography Helper The Typography Helper file contains functions that help your format text in semantically relevant ways. URL Helper The URL Helper file contains functions that assist in working with URLs. XML Helper The XML Helper file contains functions that assist in working with XML data.S.N. Helper Name & Description 1 2 3 4 5 6 7 8 9 10 11 12 13 14 15 16 17 18 19 20 21
可以加载助手,如下图所示 :
$ this-> load-> helper('name');其中name是帮助程序的名称.例如,如果您要加载URL Helper,则可以将其加载为 :
$this->load->helper('url');CodeIgniter具有用户友好的URI路由系统,因此您可以轻松地重新路由URL.通常,URL字符串与其对应的控制器类/方法之间存在一对一的关系. URI中的段通常遵循此模式 :
your-domain.com/class/method/id/
第一段表示应该调用的控制器类.
第二段表示应该调用的类函数或方法.
第三个,以及任何其他段,代表ID和将传递给控制器的任何变量.
在某些情况下,您可能希望更改此默认路由机制. CodeIgniter提供了设置您自己的路由规则的工具.
有一个特定的文件可以处理所有这些.该文件位于application/config/routes.php.您将找到一个名为$ route的数组,您可以在其中自定义路由规则. $ route数组中的键将决定路由的内容,值将决定路由的位置. CodeIgniter中有三条保留路由.
| SN | 保留路线&描述 |
|---|---|
| 1 | $ route ['default_controller '] 此路由指示应该加载哪个控制器类,如果URI不包含数据,那么当人们加载根URL时就是这种情况.建议您使用默认路由,否则将显示404页面.我们可以在这里设置网站的主页,以便默认加载. |
| 2 | $ route ['404_override'] 此路由指示如果请求的控制器是,则应加载哪个控制器类未找到.它将覆盖默认的404错误页面.它不会影响 show_404()函数,该函数将继续加载 中的默认 error_404.php 文件application/views/errors/error_404.php . |
| 3 | $ route ['translate_uri_dashes'] 布尔值显而易见,这不完全是路线.此选项使您可以使用控制器和方法URI段中的下划线自动替换短划线(' - '),从而在需要时节省其他路径条目.这是必需的,因为破折号不是有效的类或方法名称字符,并且如果您尝试使用它将导致致命错误. |
路由可以通过通配符或使用正则表达式进行自定义,但请记住,这些自定义的路由规则必须在保留规则.
我们可以使用两个通配符,如下所述 :
(:num) : 它将匹配仅包含数字的细分.
(:any) : 它将匹配包含任何字符的段.
示例
$ route ['product/:num'] ='catalog/product_lookup';
在上面的示例中,如果在URL的第一个段中找到文字"product",并且在第二个段中找到一个数字,改为使用"catalog"类和"product_lookup"方法.
与通配符一样,我们也可以在 $ route array key 部分.如果任何URI与正则表达式匹配,则它将被路由到设置为$ route数组的值部分.
示例
$ route ['products/([az] +)/(\d +)'] ='$ 1/id_ $ 2';
在上面的示例中,类似于products/shoes/123的URI将改为调用" shoes "控制器类和" id_123 "方法.