让我们开始使用Concordion进行编程.在使用Concordion开始编写第一个示例之前,必须确保已按照 Concordion - Environment Setup
所以让我们继续编写一个简单的Concordion应用程序,它将打印以下验收测试 :
Example
When Robert logs in the system, a greeting "Hello Robert!" is displayed.
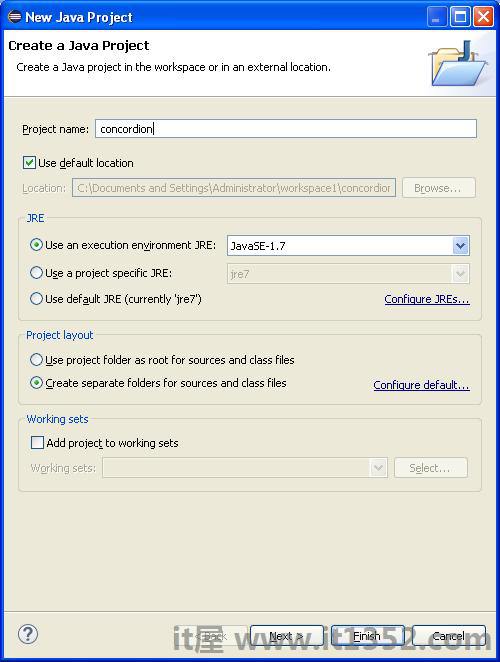
第一步是使用Eclipse IDE创建一个简单的Java项目.按照选项 File → 新的 → 项目,最后从向导列表中选择 Java Project 向导.现在使用向导窗口将项目命名为 Concordion ,如下所示;
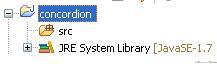
成功创建项目后,您将在项目浏览器 :
让我们添加一致性及其我们项目中的依赖项.要执行此操作,请右键单击项目名称 concordion ,然后按照上下文菜单中的可用选项进行操作: Build Path → 配置构建路径以显示Java构建路径窗口,如下所示;

现在使用 Libraries 选项卡下的 Add External JARs 按钮从Concordion文件夹添加以下核心JAR.
concordion-1.5.1
hamcrest-core-1.3
junit -4.12
ognl-2.6.9
xom-1.2.5
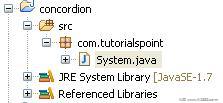
现在让我们在 concordion 项目下创建实际的源文件.首先,我们需要创建一个名为 com.it1352的包.要执行此操作,请右键单击包浏览器部分中的 src ,然后单击选项: New → 包.
接下来,我们将在com.it1352包下创建System .java 文件.
以下是 System.java 文件的内容 :
package com.it1352;
 public class System {
   public String getGreeting(String userName){
      return "Hello " + userName + "!";
   }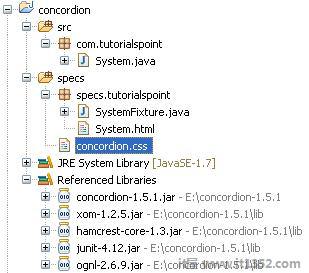
}现在让我们创建实际 concordion 项目下的规范文件.首先,我们需要创建一个名为 specs 的新源文件夹.该文件夹将包含规范文件,如JUnitFixture或测试运行器和html文件,这些都是规范.现在我们需要创建一个名为 specs.it1352的包.要执行此操作,请右键单击软件包资源管理器部分中的规范,然后按照以下选项进行操作: New → 包.
接下来,我们将在specs.it1352下创建 System.html 和 SystemFixture.java 文件包.此后,我们将在specs源文件夹下添加 concordion.css .
以下是 System.html 文件的内容 :
<html xmlns:concordion = "http://www.concordion.org/2007/concordion">
   <head>
      <link href = "../concordion.css" rel = "stylesheet" type="text/css" />
   </head>

   <body>
      <h1>System Specifications</h1>
      <p>We are building specifications for our online order tracking application.</p>
      <p>Following is the requirement to show greeting to logged in user:</p>
      <div class = "example">
         <h3>Example</h3>
         <p>When <span concordion:set = "#userName">Robert</span>
            logs in the system, a greeting "<span concordion:assertEquals = "getGreeting(#userName)">
            Hello Robert!</span>" is displayed.</p>
      </div>
   </body>

</html>
以下是 SystemFixture.java 文件的内容 :
package specs.it1352;
import com.it1352.System;
import org.concordion.integration.junit4.ConcordionRunner;
import org.junit.runner.RunWith;

@RunWith(ConcordionRunner.class)

public class SystemFixture {

   System system = new System();

   public String getGreeting(String userName){
      return system.getGreeting(userName);
   }
}
以下是 concordion.css 文件的内容 :
* {
   font-family: Arial;
}

body {
   padding: 32px;
}

pre {
   padding: 6px 28px 6px 28px;
   background-color: #E8EEF7;
}

pre, pre *, code, code *, kbd {
   font-family: Courier New, Courier;
   font-size: 10pt;
}

h1, h1 * {
   font-size: 24pt;
}

p, td, th, li, .breadcrumbs {
   font-size: 10pt;
}

p, li {
   line-height: 140%;
}

table {
   border-collapse: collapse;
   empty-cells: show;
   margin: 8px 0px 8px 0px;
}

th, td {
   border: 1px solid black;
   padding: 3px;
}

td {
   background-color: white;
   vertical-align: top;
}

th {
   background-color: #C3D9FF;
}

li {
   margin-top: 6px;
   margin-bottom: 6px;
}

.example {
   padding: 6px 16px 6px 16px;
   border: 1px solid #D7D7D7;
   margin: 6px 0px 28px 0px;
   background-color: #F7F7F7;
}

.example h3 {
   margin-top: 8px;
   margin-bottom: 8px;
   font-size: 12pt;
}

.special {
  font-style: italic;
}

.idea {
  font-size: 9pt;
  color: #888;
  font-style: italic;
}

.tight li {
  margin-top: 1px;
  margin-bottom: 1px;
}

.commentary {
  float: right;
  width: 200px;
  background-color: #ffffd0;
  padding:8px;
  border: 3px solid #eeeeb0;
  margin: 10px 0px 10px 10px;
}

.commentary, .commentary * {
  font-size: 8pt;
}
关于规范html文件和测试夹具 : 号有两个要点需要注意;
System.html是使用concordion名称空间的规范html文件.
< html xmlns:concordion ="http://www.concordion.org/2007/concordion">
System.html使用concordion:set命令将临时变量userName的值设置为是罗伯特.这里,userName是要传递给System fixture的getGreeting方法的参数.
When <span concordion:set="#userName">Robert</span> logs in the system
System.html使用concordion:assertEquals命令检查输出getGreeting(userName)函数是Hello Robert!.
a greeting "<span concordion:assertEquals="getGreeting(#userName)">
Hello Robert!</span>" is displayed.
SystemFixture是一个用ConcordionRunner.class注释的JUnit测试夹具.
 @RunWith(ConcordionRunner.class)
 public class SystemFixture {}
SystemFixture有一个getGreeting方法,可以向用户返回问候语.
 public String getGreeting(String userName){
 return system.getGreeting(userName);
}右键单击SystemFixture的内容区域,选择运行方式> JUnit测试用例. junit成功后你会看到以下输出.
C:\DOCUME~1\ADMINI~1\LOCALS~1\Temp\concordion\specs\it1352\System.html
Successes: 1, Failures: 0
System.html是Concordion测试运行的输出.

恭喜你,你有成功创建了您的第一个Concordion Acceptance测试.此外,让我们在接下来的几章中开始做一些更有趣的事情.