的Android / Java的:EditText上焦点移到整个布局,只有滚动型应 [英] Android/Java: EditText focus moves whole layout, and only ScrollView should be
问题描述
这阶段应该采取的所有基本信息,并添加所谓的将军,因为用户希望尽可能多的,但是当我点击连接输入您的电话号码的EditText,或任何将军EditTexts的,和虚拟键盘出现,整个布局得到拉升,使聚焦的EditText可以是可见
问题是,我需要有一个包含顶部功能区确认可在各种场合按钮即可。我知道的事实,用户可以修复由pressing后退按钮,但是这会是非常不现实的。我需要知道如何为保持带子那里一切得到由提到EditTexts拉升之后。
布局的截图之前提到EditTexts被挖掘:
https://www.mediafire.com/convkey/2da9/4pa1balkda4y4d46g.jpg
布局的截图 提到EditTexts被窃听后:
https://www.mediafire.com/convkey/3f9e/so8qq8vud6m3h996g.jpg
下面是布局的XML。 topRibbonLL 的LinearLayout应该始终保持其发生在顶部,而其他一切应该通过点击提到EditTexts拉升。
<?XML版本=1.0编码=UTF-8&GT?;
< LinearLayout中的xmlns:机器人=http://schemas.android.com/apk/res/android
机器人:layout_width =match_parent
机器人:layout_height =match_parent
机器人:方向=垂直> <的LinearLayout
机器人:ID =@ + ID / topRibbonLL
机器人:layout_width =match_parent
机器人:layout_height =WRAP_CONTENT> <的TextView
机器人:ID =@ + ID / firstDataTextView
机器人:layout_width =WRAP_CONTENT
机器人:layout_height =WRAP_CONTENT
机器人:layout_gravity =左| center_vertical
机器人:layout_weight =1
机器人:文字=第3步:第一个数据
机器人:textAppearance =:/>中的Android ATTR / textAppearanceLarge? <按钮
机器人:ID =@ + ID / confirmButton
机器人:layout_width =WRAP_CONTENT
机器人:layout_height =WRAP_CONTENT
机器人:layout_gravity =右
机器人:layout_weight =1
机器人:文字=确认
安卓的onClick =newFileStep3Confirm pressed/> < / LinearLayout中> <复选框
机器人:ID =@ + ID / shareableCheckBox
机器人:layout_width =WRAP_CONTENT
机器人:layout_height =WRAP_CONTENT
机器人:文字=其他人可以分享我的文件/> <的TextView
机器人:ID =@ + ID / shareableDescription
机器人:layout_width =WRAP_CONTENT
机器人:layout_height =WRAP_CONTENT
机器人:paddingBottom会=16DP
机器人:文字=的shareableCheckBox效果说明。
机器人:textAppearance =:/>中的Android ATTR / textAppearanceSmall? <滚动型
机器人:ID =@ + ID / dataScrollView
机器人:layout_width =match_parent
机器人:layout_height =match_parent> <的LinearLayout
机器人:layout_width =match_parent
机器人:layout_height =match_parent
机器人:方向=垂直> <的EditText
机器人:ID =@ + ID / dataFileName
机器人:layout_width =match_parent
机器人:layout_height =WRAP_CONTENT
机器人:EMS =10
机器人:可聚焦=真
机器人:focusableInTouchMode =真正的>
< /&的EditText GT; <的EditText
机器人:ID =@ + ID / dataFullName
机器人:layout_width =match_parent
机器人:layout_height =WRAP_CONTENT
机器人:EMS =10
安卓的inputType =textPersonName
机器人:可聚焦=真
机器人:focusableInTouchMode =真/> <的EditText
机器人:ID =@ + ID / dataAddress
机器人:layout_width =match_parent
机器人:layout_height =WRAP_CONTENT
机器人:EMS =10
安卓的inputType =textPostalAddress
机器人:可聚焦=真
机器人:focusableInTouchMode =真/> <的EditText
机器人:ID =@ + ID / dataPhoneNumber
机器人:layout_width =match_parent
机器人:layout_height =WRAP_CONTENT
机器人:EMS =10
安卓的inputType =手机
机器人:可聚焦=真
机器人:focusableInTouchMode =真/> <的TextView
机器人:ID =@ + ID / textView2
机器人:layout_width =WRAP_CONTENT
机器人:layout_height =WRAP_CONTENT
机器人:layout_gravity =中心
机器人:文字=将军
机器人:textAppearance =:/>中的Android ATTR / textAppearanceLarge? <的LinearLayout
机器人:ID =@ + ID / generalsContainer
机器人:layout_width =match_parent
机器人:layout_height =WRAP_CONTENT
机器人:方向=垂直> <按钮
机器人:ID =@ + ID / newGeneralButton
机器人:layout_width =WRAP_CONTENT
机器人:layout_height =WRAP_CONTENT
机器人:layout_gravity =中心
机器人:文字=添加新通用
安卓的onClick =newGeneralButton pressed/> < / LinearLayout中> < / LinearLayout中>
< /滚动型>< / LinearLayout中>
必要EditTexts为重新建立布局打开后,这样他们就会有灰色的文字等。
 私人无效setupNewCardEditText(最终的EditText EDITTEXT,最后字符串文本){
    editText.setTextColor(R.integer.tempTextColor);
    editText.setText(文本);
    editText.setGravity(Gravity.CENTER);
    editText.setFocusable(真);
    editText.setFocusableInTouchMode(真);    editText.setOnFocusChangeListener(新OnFocusChangeListener(){        @覆盖
        公共无效onFocusChange(视图V,布尔hasFocus){
            如果(hasFocus){
                如果(editText.getTextColors()。getDefaultColor()== R.integer.tempTextColor){
                    editText.setTextColor(0xFF000000);
                    editText.setText();
                }
            }其他{
                如果(editText.getText()。的toString()。等于()){
                    editText.setTextColor(R.integer.tempTextColor);
                    editText.setText(文本);
                }
            }
        }    });
}
我解决我的问题。我用低优先级的线程while循环,只要它不是在上面,可见重新定位的功能区。我也不得不将根布局更改为RelativeLayout的到我可以有坐标的控制。
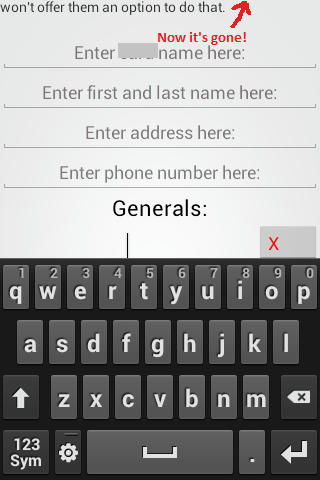
This phase is supposed to take all basic information and add so-called "Generals", as many as the user wants, but when I click on en "Enter your phone number" EditText, or any of the generals' EditTexts, and the virtual keyboard appears, the whole layout gets pulled up so that the focused EditText can be visible.
Problem is that I need to have the top ribbon containing "Confirm" button available at all occasions. I'm aware of the fact the user can fix that by pressing the Back button, but that'd be extremely unpractical. I need to know how to keep the ribbon up there after everything else gets pulled up by the mentioned EditTexts.
Screenshot of the layout before mentioned EditTexts are tapped: https://www.mediafire.com/convkey/2da9/4pa1balkda4y4d46g.jpg
Screenshot of the layout after mentioned EditTexts are tapped: https://www.mediafire.com/convkey/3f9e/so8qq8vud6m3h996g.jpg
Here is layout's XML. "topRibbonLL" LinearLayout should always keep its place at the top, while everything else should be pulled up by tapping the mentioned EditTexts.
<?xml version="1.0" encoding="utf-8"?>
<LinearLayout xmlns:android="http://schemas.android.com/apk/res/android"
    android:layout_width="match_parent"
    android:layout_height="match_parent"
    android:orientation="vertical" >

    <LinearLayout
        android:id="@+id/topRibbonLL"
        android:layout_width="match_parent"
        android:layout_height="wrap_content" >

        <TextView
            android:id="@+id/firstDataTextView"
            android:layout_width="wrap_content"
            android:layout_height="wrap_content"
            android:layout_gravity="left|center_vertical"
            android:layout_weight="1"
            android:text="Step 3: First data"
            android:textAppearance="?android:attr/textAppearanceLarge" />

        <Button
            android:id="@+id/confirmButton"
            android:layout_width="wrap_content"
            android:layout_height="wrap_content"
            android:layout_gravity="right"
            android:layout_weight="1"
            android:text="Confirm"
            android:onClick="newFileStep3ConfirmPressed" />

    </LinearLayout>

    <CheckBox
        android:id="@+id/shareableCheckBox"
        android:layout_width="wrap_content"
        android:layout_height="wrap_content"
        android:text="Other people can share my file" />

    <TextView
        android:id="@+id/shareableDescription"
        android:layout_width="wrap_content"
        android:layout_height="wrap_content"
        android:paddingBottom="16dp"
        android:text="Description of the shareableCheckBox effect."
        android:textAppearance="?android:attr/textAppearanceSmall" />

    <ScrollView
        android:id="@+id/dataScrollView"
        android:layout_width="match_parent"
        android:layout_height="match_parent" >

        <LinearLayout
            android:layout_width="match_parent"
            android:layout_height="match_parent"
            android:orientation="vertical" >

            <EditText
                android:id="@+id/dataFileName"
                android:layout_width="match_parent"
                android:layout_height="wrap_content"
                android:ems="10"
                android:focusable="true"
                android:focusableInTouchMode="true" >
            </EditText>

            <EditText
                android:id="@+id/dataFullName"
                android:layout_width="match_parent"
                android:layout_height="wrap_content"
                android:ems="10"
                android:inputType="textPersonName"
                android:focusable="true"
                android:focusableInTouchMode="true" />

            <EditText
                android:id="@+id/dataAddress"
                android:layout_width="match_parent"
                android:layout_height="wrap_content"
                android:ems="10"
                android:inputType="textPostalAddress"
                android:focusable="true"
                android:focusableInTouchMode="true" />

            <EditText
                android:id="@+id/dataPhoneNumber"
                android:layout_width="match_parent"
                android:layout_height="wrap_content"
                android:ems="10"
                android:inputType="phone"
                android:focusable="true"
                android:focusableInTouchMode="true" />

            <TextView
                android:id="@+id/textView2"
                android:layout_width="wrap_content"
                android:layout_height="wrap_content"
                android:layout_gravity="center"
                android:text="Generals:"
                android:textAppearance="?android:attr/textAppearanceLarge" />

            <LinearLayout
                android:id="@+id/generalsContainer"
                android:layout_width="match_parent"
                android:layout_height="wrap_content"
                android:orientation="vertical" >

                <Button
                    android:id="@+id/newGeneralButton"
                    android:layout_width="wrap_content"
                    android:layout_height="wrap_content"
                    android:layout_gravity="center"
                    android:text="Add new general"
                    android:onClick="newGeneralButtonPressed" />

            </LinearLayout>

        </LinearLayout>
    </ScrollView>

</LinearLayout>
Necessary EditTexts are re-set-up after the layout is opened, so that they'd have grey text etc.
private void setupNewCardEditText(final EditText editText, final String text) {
    editText.setTextColor(R.integer.tempTextColor);
    editText.setText(text);
    editText.setGravity(Gravity.CENTER);
    editText.setFocusable(true);
    editText.setFocusableInTouchMode(true);

    editText.setOnFocusChangeListener(new OnFocusChangeListener() {

        @Override
        public void onFocusChange(View v, boolean hasFocus) {
            if (hasFocus) {
                if (editText.getTextColors().getDefaultColor() == R.integer.tempTextColor) {
                    editText.setTextColor(0xFF000000);
                    editText.setText("");
                }
            } else {
                if (editText.getText().toString().equals("")) {
                    editText.setTextColor(R.integer.tempTextColor);
                    editText.setText(text);
                }
            }
        }

    });
}
I solved my problem. I used low-priority threading with a while loop to re-position the ribbon whenever it's not on top and visible. I also had to change the root layout to RelativeLayout to I could have control of the coordinates.
这篇关于的Android / Java的:EditText上焦点移到整个布局,只有滚动型应的文章就介绍到这了,希望我们推荐的答案对大家有所帮助,也希望大家多多支持IT屋!
