如何将ipython笔记本转换为具有折叠输出(和/或输入)的html [英] How to convert an ipython notebook to html with collapsed output (and/or input)
问题描述
我有一个 ipython笔记本我想与可能没有安装ipython的同事分享。
所以我将它转换为html:
ipython nbconvert my_notebook.ipynb
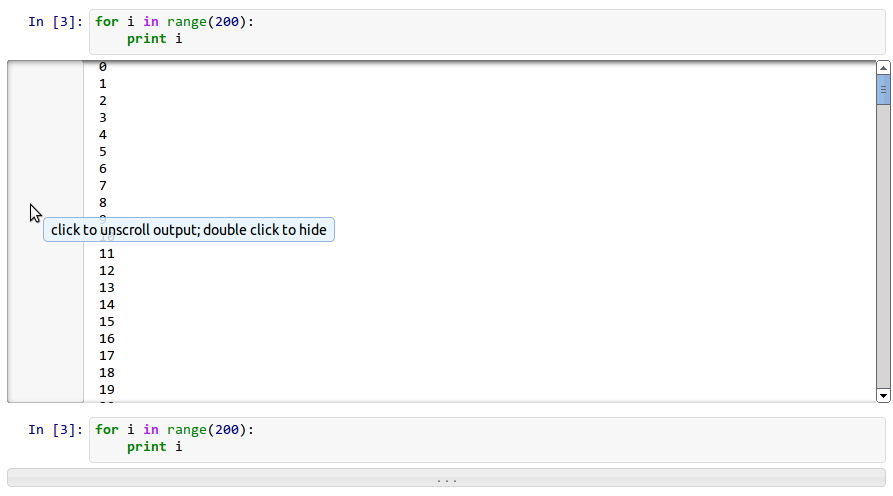
但是我的问题是我有很长的输出让阅读变得困难,我想知道是否可以使用折叠或滚动选项在html版本上的笔记本浏览器。
基本上,我想这样:
但是在html版本中。这甚至有可能吗?
感谢您的帮助! 找到我想要的感谢,因为博客它完全符合我的要求。
我修改了一下它,使其能够与ipython 2.1一起工作,并将输入和输出隐藏技巧。
功能:
打开html文件时,所有输入都会显示并隐藏输出。通过点击输入字段,它将显示输出字段。一旦你有两个领域,你可以通过点击另一个隐藏一个。
编辑:它现在隐藏了长输入,并且总是显示大约1行(通过defa。您可以通过点击输入号码来显示所有内容。当您没有输出时,这很方便(就像您想隐藏在HTML文档中的一个长函数的定义一样)。
您需要在执行nbconvert时添加模板:
ipython nbconvert - 模板切换my_notebook.ipynb
其中toggle是一个包含以下内容的文件:
  {% -  extends'full.tpl' - %}

 {%block output_group%}
< div class =output_hidden>
 {{super()}}
< / div>
 {%endblock output_group%}

 {%block input_group  - %}
< div class =input_hidden>
 {{super()}}
< / div>
 {%endblock input_group%}

 {% -  - %}
< div class =in_container>
< div class = in_hidden >
 {{super()}}
< div class =gradient>
< / div>
< / div>
< / div>
 {% -  endblock input  - %}


 {% -  block header  - %}
 {{super()}}

< script src =http://ajax.googleapis.com/ajax/libs/jquery/1.10.2/jquery.min.js>< / script>

< style type =text / css>
 div.output_wrapper {
 margin-top:0px;
}
 .output_hidden {
 display:block;
 margin-top:5px;
}
 .in_hidden {
 width:100%;
 overflow:hidden;
职位:亲属;
}

 .in_container {
 width:100%;
 margin-left:20px;
 margin-right:20px;
}

 .gradient {
 width:100%;
 height:3px;
背景:#eeeeee;
位置:绝对;
 bottom:0px;
剩下:0;
 display:none;
不透明度:0.4;
 border-bottom:2px虚线#000;
}
 div.input_prompt {
 color:#178CE3;
 font-weight:bold;
}
 div.output_prompt {
 color:rgba(249,33,33,1);
 font-weight:bold;
}
< / style>

< script>
 $(document).ready(function(){
 $(。output_hidden)。click(function(){
 $(this).prev('。input_hidden')。 slideToggle();
});
 $(。input_hidden)。click(function(){
 $(this).next('。output_hidden')。
});
 var slideHeight = 25;
 $(。in_container)。each(function(){
 var $ this = $(this);
 $ var $ in_hidden = $ this.children(。in_hidden);
 var defHeight = $ in_hidden.height();
 if(defHeight> = 61){
 var $ prompt = $ this.prev(。input_prompt);
 var $ gradient = $ in_hidden.children(。gradient);
 $ in_hidden.css(height,slideHeight +px) ;
 $ gradient.css(display,block);
 $ prompt.click(function(){
 var curHeight = $ in_hidden.height();
 if(curHeight == slideHeight){
 $ in_hidden.animate({
 height:defHeight
},normal);
 $ gradient.fadeOut();
}
 else {
 $ in_hidden.animate({
 height:slideHeight
},normal);
 $ gradient.fadeIn();
}
返回false;
});
}
});
});

< / script>
 {% -  endblock header  - %}
基本上,你可以注入任何javascript和css你想自定义你的笔记本!
玩得开心!
I have an ipython notebook I'd like to share with colleagues who may not have ipython installed.
So I converted it to html with :
ipython nbconvert my_notebook.ipynb
But my problem is that I have very long outputs which make the reading difficult, and I'd like to know whether it's possible to have the collapse or scroll option of the notebook viewer on the html version.
Basically, I'd like this : output example
But in the html version. Is this even possible ?
Thanks for helping !
I found what I wanted thanks to that blog which does exactly what I wanted.
I modified it a bit to make it work with ipython 2.1 [edit: works aslo with Jupyter], and mixed the input and output hidding tricks.
What it does:
When opening the html file, all input will be shown and output hidden. By clicking on the input field it will show the output field. And once you have both fields, you can hide one by clicking the other.
edit: It now hides long input, and about 1 line is always shown (by defa. You can show everything by clicking on the input number. This is convenient when you don't have output (like a definition of a long function you'd like to hide in your HTML doc)
You need to add a template while doing nbconvert :
ipython nbconvert --template toggle my_notebook.ipynb
where toggle is a file containing :
{%- extends 'full.tpl' -%}

{% block output_group %}
<div class="output_hidden">
{{ super() }}
</div>
{% endblock output_group %}

{% block input_group -%}
<div class="input_hidden">
{{ super() }}
</div>
{% endblock input_group %}

{%- block input -%}
<div class="in_container">
<div class="in_hidden">
{{ super() }}
<div class="gradient">
</div>
</div>
</div>
{%- endblock input -%}


{%- block header -%}
{{ super() }}

<script src="http://ajax.googleapis.com/ajax/libs/jquery/1.10.2/jquery.min.js"></script>

<style type="text/css">
div.output_wrapper {
  margin-top: 0px;
}
.output_hidden {
  display: block;
  margin-top: 5px;
}
.in_hidden {
   width: 100%;
   overflow: hidden;
   position: relative;
}

.in_container {
    width: 100%;
    margin-left: 20px;
    margin-right: 20px;
}

.gradient {
    width:100%;
    height:3px;
    background:#eeeeee;
    position:absolute;
    bottom:0px;
    left:0;
    display: none;
    opacity: 0.4;
    border-bottom: 2px dashed #000;
}
div.input_prompt {
    color: #178CE3;
    font-weight: bold;
}
div.output_prompt {
    color: rgba(249, 33, 33, 1);
    font-weight: bold;
}
</style>

<script>
$(document).ready(function(){
  $(".output_hidden").click(function(){
      $(this).prev('.input_hidden').slideToggle();
  });
  $(".input_hidden").click(function(){
      $(this).next('.output_hidden').slideToggle();
  });
var slideHeight = 25;
$(".in_container").each(function () {
    var $this = $(this);
    var $in_hidden = $this.children(".in_hidden");
    var defHeight = $in_hidden.height();
    if (defHeight >= 61) {
        var $prompt = $this.prev(".input_prompt");
        var $gradient = $in_hidden.children(".gradient");
        $in_hidden.css("height", slideHeight + "px");
        $gradient.css("display", "block");
        $prompt.click(function () {
            var curHeight = $in_hidden.height();
            if (curHeight == slideHeight) {
                $in_hidden.animate({
                    height: defHeight
                }, "normal");
                $gradient.fadeOut();
            }
            else {
                $in_hidden.animate({
                    height: slideHeight
                }, "normal");
                $gradient.fadeIn();
            }
            return false;
        });
    }
});
});

</script>
{%- endblock header -%}
Basically, you can inject whatever javascript and css you want to customize your notebook at will!
Have fun !
这篇关于如何将ipython笔记本转换为具有折叠输出(和/或输入)的html的文章就介绍到这了,希望我们推荐的答案对大家有所帮助,也希望大家多多支持IT屋!
