在本章中,我们将学习使用网格构建器创建不同的形状.我们已经学习了如何在前面的章节中创建形状.
不同的是,使用meshbuilder可以灵活地为形状添加颜色和图像.
现在让我们看看如何使用MeshBuilder创建框.
<!doctype html>
<html>
   <head>
      <meta charset = "utf-8">
      <title>BabylonJs - Basic Element-Creating Scene</title>
      <script src = "babylon.js"></script>
      <style>
         canvas {width: 100%; height: 100%;}
      </style>
   </head>

   <body>
      <canvas id = "renderCanvas"></canvas>
      <script type = "text/javascript">
         var canvas = document.getElementById("renderCanvas");
         var engine = new BABYLON.Engine(canvas, true);

         var createScene  = function() {
            var scene = new BABYLON.Scene(engine);
            scene.clearColor = new BABYLON.Color3(0, 0, 1);

            var camera = new BABYLON.ArcRotateCamera("Camera", 1, 0.8, 10, new BABYLON.Vector3(0, 0, 0), scene);
            camera.attachControl(canvas, true);

            var light = new BABYLON.HemisphericLight("light1", new BABYLON.Vector3(0, 1, 0), scene);
            light.intensity = 0.7;

            var pl = new BABYLON.PointLight("pl", BABYLON.Vector3.Zero(), scene);
            pl.diffuse = new BABYLON.Color3(1, 1, 1);
            pl.specular = new BABYLON.Color3(1, 1, 1);
            pl.intensity = 0.8;

            var mat = new BABYLON.StandardMaterial("mat1", scene);
            mat.alpha = 1.0;
            mat.diffuseColor = new BABYLON.Color3(0, 1, 0);

            var texture = new BABYLON.Texture("images/cube.png", scene);
            mat.diffuseTexture = texture;

            var hSpriteNb =  3;  // 3 sprites per raw
            var vSpriteNb =  2;  // 2 sprite raws

            var faceUV = new Array(6);
            for (var i = 0; i < 6; i++) {
               faceUV[i] = new BABYLON.Vector4(i/hSpriteNb, i/vSpriteNb, (i+1)/hSpriteNb, (i+1)/vSpriteNb);
            }

            var options = {
               width: 1.5,
               height: 1.5,
               depth: 1.5,
               faceUV: faceUV
            };

            var box = BABYLON.MeshBuilder.CreateBox("box", options, scene);
            box.material = mat;

            scene.registerBeforeRender(function() {
               pl.position = camera.position;
            });
            return scene;
         };
         var scene = createScene();
         engine.runRenderLoop(function() {
            scene.render();
         });
      </script>
   </body>
</html>上面的代码行生成以下输出 :
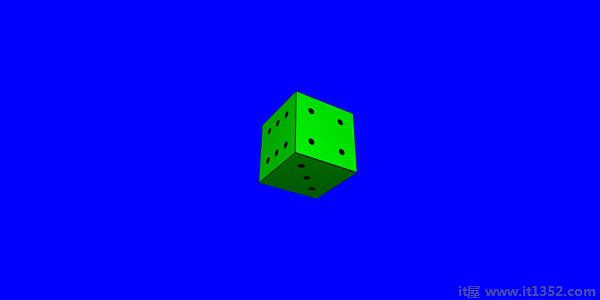
对于上面的例子,我们使用了一个精灵图像,如下所示.它有水平3 Colums和垂直2行.
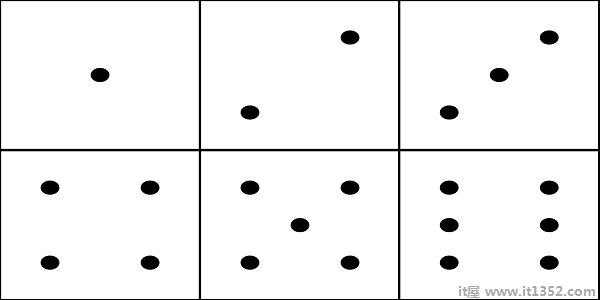
In在这个演示中,我们使用了一个名为cube.png的图像.图像存储在本地的图像/文件夹中,也粘贴在下面以供参考.请注意,cube.png是精灵图像,精灵图像是图像的集合.我们想在立方体上显示图像,因此希望立方体的所有边都在一起.您也可以下载您选择的类似精灵图像,并在演示链接中使用.
createBox构建器为您提供尺寸选项.
For例如,
var box = BABYLON.MeshBuilder.CreateBox("box",options,scene);var hSpriteNb = 3; // 3 sprites per raw ie colums horizontally as shown in the image
var vSpriteNb = 2; // 2 sprite raws as shown in the image above.
var faceUV = new Array(6); // the cube has 6 sides so creating array for same.
for (var i = 0; i < 6; i++) {
faceUV[i] = new BABYLON.Vector4(i/hSpriteNb, i/vSpriteNb, (i+1)/hSpriteNb, (i+1)/vSpriteNb);
}
var options = {
width: 1.5,
height: 1.5,
depth: 1.5,
faceUV: faceUV
};这称为使用createBox方法将纹理应用于meshbuilder.我们使用了图像 cube.png 水平3 colums和vertical 2 row.The cube或box有6个边.
要应用纹理,我们使用options参数.例如,
Var box = BABYLON.MeshBuilder.CreateBox('box',options,scene);我们已经定义了一个名为faceUV的数组,其大小为6,它是多维数据集的两侧.该数组将始终具有Vector4元素.每个Vector4(x,y,z,w)将定义如下 :
x = Ubottom
y = Vbottom
z = Utop
w = Vtop
向量在[0,1]范围内. Ubottom和Vbottom是纹理裁剪开始的左下角的2D坐标. Utop,Vtop是纹理裁剪结束的右上角.
var hSpriteNb =  3;  // 3 sprites per raw
var vSpriteNb =  2;  // 2 sprite raws

var faceUV = new Array(6);
for (var i = 0; i < 6; i++) {
   faceUV[i] = new BABYLON.Vector4(i/hSpriteNb, i/vSpriteNb, (i+1)/hSpriteNb, (i+1)/vSpriteNb);
}
假设默认纹理,即给定的图像应用于框的所有面.如果您只想更改框的1面或1面,您可以直接指定值,如下所示 :
var hSpriteNb =  3;  // 3 sprites per raw
var vSpriteNb =  2;  // 2 sprite raws

var faceUV = new Array(6);
faceUV[4] = new BABYLON.Vector4(0, 0, 1/hSpriteNb, 1/vSpriteNb);
<!doctype html>
<html>
   <head>
      <meta charset = "utf-8">
      <title>BabylonJs - Basic Element-Creating Scene</title>
      <script src = "babylon.js"></script>
      <style>
         canvas {width: 100%; height: 100%;}
      </style>
   </head>

   <body>
      <canvas id = "renderCanvas"></canvas>
      <script type = "text/javascript">
         var canvas = document.getElementById("renderCanvas");
         var engine = new BABYLON.Engine(canvas, true);

         var createScene  = function() {
            var scene = new BABYLON.Scene(engine);
            scene.clearColor = new BABYLON.Color3(0, 0, 1);

            var camera = new BABYLON.ArcRotateCamera("Camera", 1, 0.8, 10, new BABYLON.Vector3(0, 0, 0), scene);
            camera.attachControl(canvas, true);

            var light = new BABYLON.HemisphericLight("light1", new BABYLON.Vector3(0, 1, 0), scene);
            light.intensity = 0.7;

            var pl = new BABYLON.PointLight("pl", BABYLON.Vector3.Zero(), scene);
            pl.diffuse = new BABYLON.Color3(1, 1, 1);
            pl.specular = new BABYLON.Color3(1, 1, 1);
            pl.intensity = 0.8;

            var mat = new BABYLON.StandardMaterial("mat1", scene);
            mat.alpha = 1.0;
            mat.diffuseColor = new BABYLON.Color3(0.8, 0.8, 0.8);

            var texture = new BABYLON.Texture("images/3d.png", scene);
            mat.diffuseTexture = texture;

            var hSpriteNb =  3;  // 3 sprites per raw
            var vSpriteNb =  2;  // 2 sprite raws

            var faceUV = new Array(6);
            faceUV[4] = new BABYLON.Vector4(0, 0, 1/hSpriteNb, 1/vSpriteNb);

            var options = {
               width:3,
               height:3,
               depth: 3,
               faceUV:faceUV
            };

            var box = BABYLON.MeshBuilder.CreateBox("box", options, scene);
            box.material = mat;

            scene.registerBeforeRender(function() {
               pl.position = camera.position;
            });
            return scene;
         };
         var scene = createScene();
         engine.runRenderLoop(function() {
            scene.render();
         });
      </script>
   </body>
</html>上面的代码行生成以下输出 :
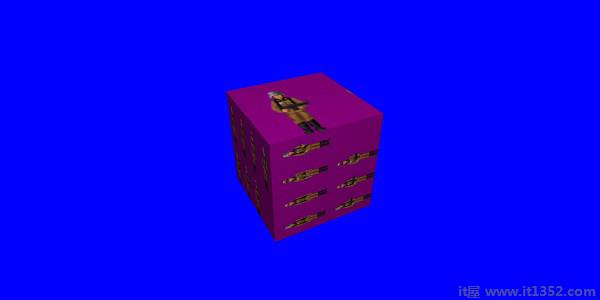
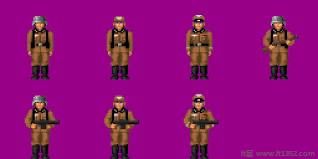
在本演示中,我们使用了一个名为3d.png的图像.图像存储在本地的图像/文件夹中,也粘贴在下面以供参考.请注意3d.png是一个精灵图像;精灵图像是图像的集合.我们想要将立方体的所有边都放在一个立方体上.您也可以下载您选择的类似精灵图像,并在演示链接中使用.
用于框和减号的纹理; images/3d.png
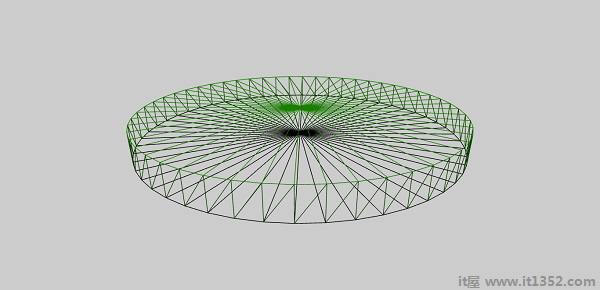
在本节中,我们将了解如何创建MeshCylinder.
要创建MeshCylinder,您需要使用类BABYLON.MeshBuilder.CreateCylinder.
该类的参数如下 :
var meshcylinder = BABYLON.MeshBuilder.CreateCylinder("meshcylinder", {
   height: 3,
   diameter: 35,
   tessellation: 52
}, scene);
使用网格和网格构建器的CreateCylinder之间的区别是 - 你可以在meshbuilder中使用选项.现在我们使用高度,直径和曲面细分作为传递给圆柱体的选项.我们使用带有线框的标准材料作为此网格的材质.检查浏览器中的输出并查看柱面.您可以在游戏中使用类似的结构作为在场景中旋转的轮子.
<!doctype html>
<html>
   <head>
      <meta charset = "utf-8">
      <title>Babylon.js demo - Mesh Builder</title>
      <script src = "babylon.js"></script>
      <style>
         html,body,canvas { margin: 0; padding: 0; width: 100%; height: 100%; font-size: 0; }
      </style>
   </head>

   <body>
      <canvas id = "renderCanvas"></canvas>
      <script type = "text/javascript">
         var canvas = document.getElementById("renderCanvas");
         var engine = new BABYLON.Engine(canvas, true);
         var createScene  = function() {
            var scene = new BABYLON.Scene(engine);
            scene.clearColor = new BABYLON.Color3(0.8, 0.8, 0.8);

            var camera = new BABYLON.ArcRotateCamera("Camera", -Math.PI / 6, 1.3, 40, new BABYLON.Vector3(0, -3, 0), scene);

            var light = new BABYLON.HemisphericLight("hemi", new BABYLON.Vector3(0, 1, 0), scene);

            var mat = new BABYLON.StandardMaterial("mat", scene);
            mat.diffuseColor = new BABYLON.Color3(0.1, .5, 0);
            mat.specularColor = new BABYLON.Color3(0, 0, 0);
            mat.wireframe = true;

            var meshcylinder = BABYLON.MeshBuilder.CreateCylinder("meshcylinder", {
               height: 3,
               diameter: 35,
               tessellation: 52
            }, scene);

            meshcylinder.material = mat;
            meshcylinder.position = new BABYLON.Vector3(0, 0, 0);

            scene.activeCamera.attachControl(canvas);
            return scene;
         };

         var scene = createScene();
         engine.runRenderLoop(function() {
            scene.render();
         });
      </script>
   </body>
</html>上面的代码行生成以下输出 :
使用网格构建器创建的许多形状现在将在一个演示中一起使用.以下演示链接中包含的形状将在后续章节中列出.
Ground
Cone
Plane
Disc
Torus
Polyhedron
IcoSphere
网格游戏中的交叉非常重要,因为您知道当两个物体在游戏中相交时需要做什么.下面的演示中解释了相同的概念,即当网格相交时需要捕获的事件.
在下面给出的演示中,我们已经涵盖了以下两个概念 :
相交网格
相交点
<!doctype html>
<html>
   <head>
      <meta charset = "utf-8">
      <title>BabylonJs - Basic Element-Creating Scene</title>
      <script src = "babylon.js"></script>
      <style>
         canvas {width: 100%; height: 100%;}
      </style>
   </head>

   <body>
      <canvas id = "renderCanvas"></canvas>
      <script type = "text/javascript">
         var canvas = document.getElementById("renderCanvas");
         var engine = new BABYLON.Engine(canvas, true);

         var createScene  = function() {
            var scene = new BABYLON.Scene(engine);
            scene.clearColor = new BABYLON.Color3(1, 1, 1);

            var camera = new BABYLON.ArcRotateCamera("ArcRotateCamera", 1, 0.8, 20, new BABYLON.Vector3(0, 0, 0), scene);
            camera.attachControl(canvas, true);

            var matcone = new BABYLON.StandardMaterial("mat1", scene);
            matcone.alpha = 1.0;
            matcone.diffuseColor = new BABYLON.Color3(0, 0, 0);
            matcone.wireframe = true;

            var cone = BABYLON.MeshBuilder.CreateCylinder("cone", {height : 10, diameterTop: 10,diameterBottom:10, tessellation: 5}, scene);
            cone.position= new BABYLON.Vector3(12,1,0);
            cone.material = matcone;

            var balloon1 = BABYLON.Mesh.CreateSphere("balloon1",5, 1.0, scene);
            var balloon2 = BABYLON.Mesh.CreateSphere("balloon2", 5, 1.0, scene);
            var balloon3 = BABYLON.Mesh.CreateSphere("balloon3", 5, 1.0, scene);

            balloon1.material = new BABYLON.StandardMaterial("matBallon", scene);
            balloon2.material = new BABYLON.StandardMaterial("matBallon", scene);
            balloon3.material = new BABYLON.StandardMaterial("matBallon", scene);

            balloon1.position = new BABYLON.Vector3(4, 2, 0);
            balloon2.position = new BABYLON.Vector3(5, 1, 0);
            balloon3.position = new BABYLON.Vector3(7, 0, 0);

            var pointToIntersect = new BABYLON.Vector3(10, 0, 0);
            var a = 0.01;

            scene.registerBeforeRender(function () {
               if (balloon1.intersectsMesh(cone, false)) {
                  balloon1.material.emissiveColor = new BABYLON.Color3(1, 0, 0);
               } else {
                  balloon1.material.emissiveColor = new BABYLON.Color3(0, 1, 0);
               }

               if (balloon2.intersectsMesh(cone, false)) {
                  balloon2.material.emissiveColor = new BABYLON.Color3(1, 0, 0);
               } else {
                  balloon2.material.emissiveColor = new BABYLON.Color3(0, 1, 0);
               }

               if (balloon3.intersectsMesh(cone, false)) {
                  balloon3.material.emissiveColor = new BABYLON.Color3(1, 0, 0);
               } else {
                  balloon3.material.emissiveColor = new BABYLON.Color3(0, 1, 0);
               }

               if (balloon3.intersectsPoint(pointToIntersect)) {
                  balloon3.material.emissiveColor = new BABYLON.Color3(0, 0, 0);
               }

               a += 0.01;
               balloon1.position.x += Math.cos(a) / 10;
               balloon2.position.x += Math.cos(a) / 10;
               balloon3.position.x += Math.cos(a) / 10;
            });
            return scene;
         };
         var scene = createScene();
         engine.runRenderLoop(function() {
            scene.render();
         });
      </script>
   </body>
</html>以上代码生成以下输出 :
使用上面的代码,我们创建了一个圆柱体,线框为真.我们创造了3个球体.球体的原始颜色为绿色.
在 scene.registerBeforeRender 功能中,我们将根据与网格的交点更改球体的颜色.这里的柱面.
在 registerBeforeRender :
if (balloon1.intersectsMesh(cone, false)) {
   balloon1.material.emissiveColor = new BABYLON.Color3(1, 0, 0);
} else {
   balloon1.material.emissiveColor = new BABYLON.Color3(0, 1, 0);
}
intersectsMesh 如果与传递给它的参数中给出的网格相交,则给出true或false./p>
例如,
balloon1.intersectsMesh(cone,false);//cone在这里指的是圆柱网格.
球体的颜色变为红色,与圆柱体相交;否则,它是绿色的.
以下代码用于交叉和减去的点;
var pointToIntersect = new BABYLON.Vector3(10, 0, 0);
if (balloon3.intersectsPoint(pointToIntersect)) {
   balloon3.material.emissiveColor = new BABYLON.Color3(0, 0, 0);
}
这里, pointtoIntersect 变量是位于x轴上10的位置向量.如果球体穿过相交点,球体的颜色将变为黑色.
采摘碰撞实际上为您提供坐标,您可以将网格定位在该位置.鼠标拾取对象,您可以将鼠标放在用鼠标点击的位置.考虑到需要在用户单击鼠标的位置放置网格(对象);所以,在挑选碰撞的帮助下,它可以帮助你在点击位置的位置进行协调.
<!doctype html>
< html>
< head>
< meta charset ="utf-8">
< title> BabylonJs  - 基本元素 - 创建场景</title>
< script src ="babylon.js"></script>
< style>
 canvas {width:100%;身高:100%;}
</style>
</head>
< body>
< canvas id ="renderCanvas"></canvas>
< script type ="text/javascript">
 var canvas = document.getElementById("renderCanvas");
 var engine = new BABYLON.Engine(canvas,true);
 var createScene = function(){
 var scene = new BABYLON.Scene(engine);
 scene.clearColor = new BABYLON.Color3(1,1,1);
//设置环境
 var light0 = new BABYLON.PointLight("Omni",new BABYLON.Vector3(0,10,20),scene);
 var freeCamera = new BABYLON.FreeCamera("FreeCamera",new BABYLON.Vector3(0,0,-30),scene);
 var balloon1 = BABYLON.Mesh.CreateSphere("balloon1",5,1.0,scene);
 var balloon2 = BABYLON.Mesh.CreateSphere("balloon2",5,1.0,scene);
 balloon1.material = new BABYLON.StandardMaterial("matBallon",scene);
 balloon2.material = new BABYLON.StandardMaterial("matBallon",scene);
 balloon1.position = new BABYLON.Vector3(0,0,-0.1);
 balloon2.position = new BABYLON.Vector3(0,0,-0.1);
 balloon1.material.emissiveColor = new BABYLON.Color3(1,0,0);
 balloon2.material.emissiveColor = new BABYLON.Color3(0,0,1);
//Wall
 var wall = BABYLON.Mesh.CreatePlane("wall",30.0,场景);
 wall.material = new BABYLON.StandardMaterial("wallMat",scene);
 wall.material.emissiveColor = new BABYLON.Color3(0.5,1,0.5);
//当指针向下事件被引发时
 scene.onPointerDown = function(evt,pickResult){
//如果点击击中地面对象,我们更改影响位置
 if(pickResult.hit){
 var dateValue = new Date();
 var secondNumber = dateValue.getSeconds();
 if(secondNumber%2 == 0){
 balloon1.position.x = pickResult.pickedPoint.x;
 balloon1.position.y = pickResult.pickedPoint.y;
} else {
 balloon2.position.x = pickResult.pickedPoint.x;
 balloon2.position.y = pickResult.pickedPoint.y;
}
}
};
返回场景;
};
 var scene = createScene();
 engine.runRenderLoop(function(){
 scene.render();
});
</script>
</body>
</html>
在上面的例子中,我们使用了一个平面和2个球体.要生成此输出,请使用以下代码 :
scene.onPointerDown = function (evt, pickResult) {
   // if the click hits the ground object, we change the impact position
   if (pickResult.hit) {
      var dateValue = new Date();
      var secondNumber = dateValue.getSeconds();
      if (secondNumber % 2 == 0) {
      balloon1.position.x = pickResult.pickedPoint.x;
      balloon1.position.y = pickResult.pickedPoint.y;
      } else {
         balloon2.position.x = pickResult.pickedPoint.x;
         balloon2.position.y = pickResult.pickedPoint.y;
      }
   }
};
事件 scene.onPointerDown 为您提供了协调的-x,y和z,在我们的例子中是 pickResult .
如果单击地面网格,它会将pickResult.hit设为true.我们考虑奇数/偶数秒并改变球体的位置以选择结果z和y坐标,如上所示.更改位置后,将球体放置在您单击并放置鼠标的位置.您可以尝试上述演示.
Raycasts就像太阳光线一样,用于检查碰撞和交叉点现场.
var ray = new BABYLON.Ray(origin,direction,length) ;
考虑以下参数为raycasts :
Origin : 光线开始的位置.
方向 : 光线的方向计算如下 :
var forward = new BABYLON.Vector3(0,0,1);
forward = vecToLocal(forward, box);
var direction = forward.subtract(origin);
然后,为了获得方向,我们从原点,框位置减去它;
长度 : 光线的长度.
<!doctype html>
<html>
   <head>
      <meta charset = "utf-8">
      <title>BabylonJs - Basic Element-Creating Scene</title>
      <script src = "babylon.js"></script>
      <style>
         canvas {width: 100%; height: 100%;}
      </style>
   </head>

   <body>
      <canvas id = "renderCanvas"></canvas>
      <script type = "text/javascript">
         var canvas = document.getElementById("renderCanvas");
         var engine = new BABYLON.Engine(canvas, true);

         var createScene  = function() {
            var scene = new BABYLON.Scene(engine);

            var light = new BABYLON.PointLight("Omni", new BABYLON.Vector3(0, 100, 100), scene);

            var camera = new BABYLON.ArcRotateCamera("Camera", 0, 0.8, 100, new BABYLON.Vector3.Zero(), scene);
            camera.attachControl(canvas, true);

            var ground = BABYLON.Mesh.CreateGround("ground", 500, 500, 10, scene);

            var box = BABYLON.Mesh.CreateBox("box", 4.0, scene);
            box.position.y = 2;
            box.scaling.z = 2;

            var matBox = new BABYLON.StandardMaterial("matBox", scene);
            matBox.diffuseColor = new BABYLON.Color3(0.8, 0.1, 0.5);
            box.material = matBox;
            box.isPickable = false;

            var box2 = BABYLON.Mesh.CreateBox("box2", 8.0, scene);
            box2.position = new BABYLON.Vector3(-20, 4, 0);

            var matBox2 = new BABYLON.StandardMaterial("matBox2", scene);
            matBox2.diffuseColor = new BABYLON.Color3(1, 0, 0);
            box2.material = matBox2;

            var box3 = BABYLON.Mesh.CreateBox("box3", 8.0, scene);
            box3.position = new BABYLON.Vector3(20, 4, 0);

            var matBox3 = new BABYLON.StandardMaterial("matBox3", scene);
            matBox3.diffuseColor = new BABYLON.Color3(1, 0, 0);
            box3.material = matBox3;

            var box4 = BABYLON.Mesh.CreateBox("box4", 8.0, scene);
            box4.position = new BABYLON.Vector3(0, 0, 20);

            var matBox4 = new BABYLON.StandardMaterial("matBox4", scene);
            matBox4.diffuseColor = new BABYLON.Color3(0, 1, 0);
            box4.material = matBox4;

            var box5 = BABYLON.Mesh.CreateBox("box5", 8.0, scene);
            box5.position = new BABYLON.Vector3(0, 0, -20);

            var matBox5 = new BABYLON.StandardMaterial("matBox5", scene);
            matBox5.diffuseColor = new BABYLON.Color3(0, 1, 0);
            box5.material = matBox5;

            function mousemovef() {
               var pickResult = scene.pick(scene.pointerX, scene.pointerY);

               if (pickResult.hit) {
                  var diffX = pickResult.pickedPoint.x - box.position.x;
                  var diffY = pickResult.pickedPoint.z - box.position.z;
                  box.rotation.y = Math.atan2(diffX,diffY);
               }
            }

            scene.onPointerMove = function () {
               mousemovef();
            };

            function vecToLocal(vector, mesh) {
               var m = mesh.getWorldMatrix();
               var v = BABYLON.Vector3.TransformCoordinates(vector, m);
               return v;
            }

            scene.registerBeforeRender(function () {
               var origin = box.position;

               var forward = new BABYLON.Vector3(0,0,1);
               forward = vecToLocal(forward, box);

               var direction = forward.subtract(origin);
               direction = BABYLON.Vector3.Normalize(direction);

               var length = 100;

               var ray = new BABYLON.Ray(origin, direction, length);
               // ray.show(scene, new BABYLON.Color3(1, 1, 0.1));

               var hit = scene.pickWithRay(ray);

               if (hit.pickedMesh) {
                  hit.pickedMesh.scaling.y  += 0.01;
               }
            });
            return scene;
         };
         var scene = createScene();
         engine.runRenderLoop(function() {
            scene.render();
         });
      </script>
   </body>
</html>上面的代码行生成以下输出 :

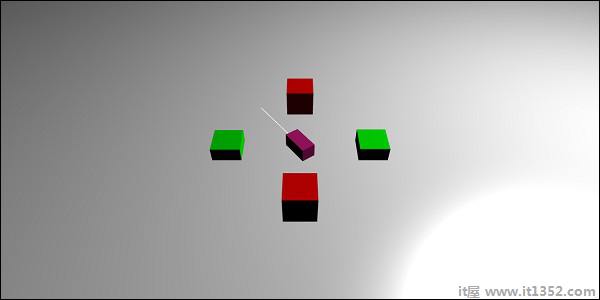
中心有一个主箱它充当了光线投射.它指向任何盒子的那一刻,盒子的大小会增加.这个概念在玩游戏时证明是有用的,可以知道哪个其他对象正在接触并且可以采取必要的行动.
添加 box.isPickable = false; 以便不考虑中心的主箱.如果您不希望任何对象包含在光线中以进行接触,请将 box.isPickable = false; 添加到其中.
以下代码添加射线拾取的盒子缩放.
scene.registerBeforeRender(function () {
   var origin = box.position;
   var forward = new BABYLON.Vector3(0,0,1);
   forward = vecToLocal(forward, box);

   var direction = forward.subtract(origin);
   direction = BABYLON.Vector3.Normalize(direction);

   var length = 100;

   var ray = new BABYLON.Ray(origin, direction, length);

   var hit = scene.pickWithRay(ray);

   if (hit.pickedMesh) {
      hit.pickedMesh.scaling.y  += 0.01;
   }
});
var ray = new BABYLON.Ray(原点,方向,长度); 创建一条光线,它占据主框位置作为原点.
光线的方向计算如下:
var forward = new BABYLON.Vector3(0,0,1);
forward = vecToLocal(forward, box);
var direction = forward.subtract(origin);
然后,为了获得方向,我们从原点,框位置减去它.函数 vecToLocal 用于通过将矢量乘以网格矩阵来从网格视点转换位置.
我们从光线中获取生命值使用 var hit = scene.pickWithRay(ray);
它给出光线与网格重合的位置.
缩放应用于网格,通过执行以下代码行并选择:
if (hit.pickedMesh) {
   hit.pickedMesh.scaling.y  += 0.01;
}
在浏览器中尝试上面的示例以查看输出.
现在让我们看看具有谓词功能的光线投射是如何工作的以及如何用rayhelper显示方向.
<!doctype html>
<html>
   <head>
      <meta charset = "utf-8">
      <title>BabylonJs - Basic Element-Creating Scene</title>
      <script src = "babylon.js"></script>
      <style>
         canvas {width: 100%; height: 100%;}
      </style>
   </head>

   <body>
      <canvas id = "renderCanvas"></canvas>
      <script type = "text/javascript">
         var canvas = document.getElementById("renderCanvas");
         var engine = new BABYLON.Engine(canvas, true);
         var createScene  = function() {
            var scene = new BABYLON.Scene(engine);

            var light = new BABYLON.PointLight("Omni", new BABYLON.Vector3(0, 100, 100), scene);
            var camera = new BABYLON.ArcRotateCamera("Camera", 0, 0.8, 100, new BABYLON.Vector3.Zero(), scene);
            camera.attachControl(canvas, true);

            var ground = BABYLON.Mesh.CreateGround("ground", 500, 500, 10, scene);

            var box = BABYLON.Mesh.CreateBox("box", 4.0, scene);
            box.position.y = 2;
            box.scaling.z = 2;
            var matBox = new BABYLON.StandardMaterial("matBox", scene);
            matBox.diffuseColor = new BABYLON.Color3(0.8, 0.1, 0.5);
            box.material = matBox;
            box.isPickable = false;

            var box2 = BABYLON.Mesh.CreateBox("box2", 8.0, scene);
            box2.position = new BABYLON.Vector3(-20, 4, 0);
            var matBox2 = new BABYLON.StandardMaterial("matBox2", scene);
            matBox2.diffuseColor = new BABYLON.Color3(1, 0, 0);
            box2.material = matBox2;

            var box3 = BABYLON.Mesh.CreateBox("box3", 8.0, scene);
            box3.position = new BABYLON.Vector3(20, 4, 0);
            var matBox3 = new BABYLON.StandardMaterial("matBox3", scene);
            matBox3.diffuseColor = new BABYLON.Color3(1, 0, 0);
            box3.material = matBox3;

            var box4 = BABYLON.Mesh.CreateBox("box4", 8.0, scene);
            box4.position = new BABYLON.Vector3(0, 0, 20);
            var matBox4 = new BABYLON.StandardMaterial("matBox4", scene);
            matBox4.diffuseColor = new BABYLON.Color3(0, 1, 0);
            box4.material = matBox4;

            var box5 = BABYLON.Mesh.CreateBox("box5", 8.0, scene);
            box5.position = new BABYLON.Vector3(0, 0, -20);
            var matBox5 = new BABYLON.StandardMaterial("matBox5", scene);
            matBox5.diffuseColor = new BABYLON.Color3(0, 1, 0);
            box5.material = matBox5;

            //ray showing the direction
            var ray = new BABYLON.Ray();
            var rayHelper = new BABYLON.RayHelper(ray);

            var localMeshDirection = new BABYLON.Vector3(0, 0, -1);
            var localMeshOrigin = new BABYLON.Vector3(0, 0, -.4);
            var length = 10;

            rayHelper.attachToMesh(box, localMeshDirection, localMeshOrigin, length);
            rayHelper.show(scene);

            function mousemovef() {
               var pickResult = scene.pick(scene.pointerX, scene.pointerY);

               if (pickResult.hit) {
                  var diffX = pickResult.pickedPoint.x - box.position.x;
                  var diffY = pickResult.pickedPoint.z - box.position.z;
                  box.rotation.y = Math.atan2(diffX,diffY);
               }
            }

            scene.onPointerMove = function () {
               mousemovef();
            };

            function vecToLocal(vector, mesh) {
               var m = mesh.getWorldMatrix();
               var v = BABYLON.Vector3.TransformCoordinates(vector, m);
               return v;
            }

            scene.registerBeforeRender(function () {
               var origin = box.position;
               function predicate(mesh) {
                  if (mesh == box2 || mesh == box || mesh == box5) {
                     return false;
                  }
                  return true;
               }

               var forward = new BABYLON.Vector3(0,0,1);
               forward = vecToLocal(forward, box);

               var direction = forward.subtract(origin);
               direction = BABYLON.Vector3.Normalize(direction);

               var length = 100;

               var ray = new BABYLON.Ray(origin, direction, length);
               // ray.show(scene, new BABYLON.Color3(1, 1, 0.1));

               var hit = scene.pickWithRay(ray, predicate);
               if (hit.pickedMesh) {
                  hit.pickedMesh.scaling.y  += 0.01;
               }
            });
            return scene;
         };
         var scene = createScene();
         engine.runRenderLoop(function() {
            scene.render();
         });
      </script>
   </body>
</html>T他在上面的代码行生成以下输出 :
具有谓词函数的Raycast有助于选择我们想要的网格。 如果我们不想挑选网格,我们可以忽略它。
function predicate(mesh) {
   if (mesh == box2 || mesh == box || mesh == box5) {
      return false;
   }
   return true;
}
T
上面的函数给出了由光线选择的网格。 如果选择的网格是box2,box或box5,则返回false; 否则,是的。
您可以尝试上面的示例。
阴影基于光落在创建的网格上的方式呈现。 它们对于使输出在3D世界中看起来更逼真起着重要作用。
现在让我们学习如何使用babylonjs创建阴影。
var shadowGenerator00 = new BABYLON.ShadowGenerator(shadowsize, light);
考虑以下与网格阴影相关的参数 :
Shadowsize : Size of the shadow.
Light : Light used in the scene.
<!doctype html>
<html>
   <head>
      <meta charset = "utf-8">
      <title>BabylonJs - Basic Element-Creating Scene</title>
      <script src = "babylon.js"></script>
      <style>
         canvas {width: 100%; height: 100%;}
      </style>
   </head>

   <body>
      <canvas id = "renderCanvas"></canvas>
      <script type = "text/javascript">
         var canvas = document.getElementById("renderCanvas");
         var engine = new BABYLON.Engine(canvas, true);

         var createScene  = function() {
            var scene = new BABYLON.Scene(engine);
            scene.clearColor = new BABYLON.Color3(1, 1, 1);
            var camera = new BABYLON.ArcRotateCamera("ArcRotateCamera", 1, 0.8, 20, new BABYLON.Vector3(0, 0, 0), scene);
            camera.attachControl(canvas, true);
            // light1
            var light = new BABYLON.DirectionalLight("dir01", new BABYLON.Vector3(-1, -2, -1), scene);
            light.position = new BABYLON.Vector3(20, 40, 20);

            var ground01 = BABYLON.Mesh.CreateGround("Spotlight Hard Shadows", 24, 60, 1, scene, false);
            var groundMaterial = new BABYLON.StandardMaterial("ground", scene);
            groundMaterial.diffuseTexture = new BABYLON.Texture("images/gr1.jpg", scene);
            groundMaterial.specularColor = new BABYLON.Color3(0, 0, 0);
            groundMaterial.emissiveColor = new BABYLON.Color3(0.2, 0.2, 0.2);

            ground01.material = groundMaterial;
            ground01.receiveShadows = true;
            ground01.position.x = -5;

            var box = BABYLON.Mesh.CreateBox("box", 3.0, scene);
            box.position.x = -5;
            box.position.y = 5;
            var shadowGenerator00 = new BABYLON.ShadowGenerator(512, light);
            shadowGenerator00.getShadowMap().renderList.push(box);
            //shadowGenerator00.usePoissonSampling = true;
            //shadowGenerator00.useExponentialShadowMap = true;
            shadowGenerator00.useBlurExponentialShadowMap = true;
            shadowGenerator00.bias = 0.01;
            scene.registerBeforeRender(function() {
               box.rotation.x += 0.01;
               box.rotation.x += 0.01;
            });
            return scene;
         };
         var scene = createScene();
         engine.runRenderLoop(function() {
            scene.render();
         });
      </script>
   </body>
</html>他在上面的代码行生成以下输出 :

要创建阴影,您需要创建阴影生成器。 考虑下面显示的示例。
var shadowGenerator00 = new BABYLON.ShadowGenerator(512, light);
要定义需要阴影的网格,需要将其添加到上面的生成器。
shadowGenerator00.getShadowMap().renderList.push(box);
现在,我们已经创建了一个地面和一个盒子。 我们希望盒子的阴影落在地上。 要做到这一点,我们需要确保地面被标记为接收阴影,其完成如下:
ground01.receiveShadows = true;
有一些可用于阴影的滤镜,如下所示:
 shadowGenerator.usePoissonSampling = true; - Called Poisson sampling
 shadowGenerator.useExponentialShadowMap = true; - Exponential Shadow Map
 shadowGenerator.useBlurExponentialShadowMap= true; - Blur Exponential Shadow Map
在我们的演示中,我们使用了shadowGenerator00.useBlurExponentialShadowMap = true; 您可以尝试其他人并查看输出的外观。
在这里,我们使用了名为gr1.jpg的图像。 图像存储在本地的图像/文件夹中。 您可以下载任何您选择的图像并在演示链接中使用。
在本节中,我们将了解网格上的高级纹理。 不同的纹理如下所示 :
立方体纹理
镜子和凹凸纹理
视频纹理
让我们将一些复杂的纹理应用于网格 - 镜像,凹凸,视频和折射。
| Sr.No. | Mesh & Description |
|---|---|
| 1 | MeshHightlight Layer Highlight layer is used to highlight the mesh in the scene. You can give color to it and the color is applied to the borders of the mesh. In case in a game you want to hightlight, the mesh hightlight layer can be used for the same. |
| 2 | Morph a Mesh Morphing changes the shape of an object to another by some means of transition. We have seen the updatable parameter for the shapes; the parameter is set to false otherwise. For morphing, it is set to true and the mesh is updated to change the shape. |
| 3 | Actions to Mesh Actions are used to add interaction to the mesh. Events are activated when you click on the mesh, or when mesh intersects or collides. |
| 4 | Mesh AssetsManager With assestsmanager class, you can load meshes, images and binaryfiles in the scene. |
| 5 | Import Mesh Using Import Mesh we will learn. |
| 6 | Mesh Morph Targets We have already seen morhphing of lines, ribbon, polygon, etc. Now, we will see morphing of sphere and box in this demo.With morph targets, the shape of the sphere is changed which is seen in the demo below. |
| 7 | Mesh Instances If you want to draw identical meshes in your scene , make use of the instances. |
| 8 | Mesh LOD & Instances LOD stands for line of distance. This feature allows you to specify meshes based on the distance of the viewer. As the distance from the viewer to the object increases, the level of detail for the mesh is shown clearly using LOD. |
| 9 | Mesh VolumemetricLightScatteringPost-process This process scatters the light as shown in the output given below. Test the same in browser and you will see how the light scatters through the mesh. |
| 10 | Mesh EdgesRenderer EdgesRendering is used to draw egdes around the mesh as shown in the output above. |
| 11 | Mesh BlendModes You can create a blend mode by modifying the alphamode of the materials. |
| 12 | Mesh SolidParticles SolidParticle System is updated on a mesh. All the properties that we have seen on a mesh can be used on the solid partilcle. |
| 13 | Mesh FacetData Facet data takes up a lot of memory and this feature is not enabled by default. To enable it, we need to create a mesh as required and update facet data to it. |