路由有助于根据用户在主页面上选择的选项将用户定向到不同的页面.因此,根据他们选择的选项,将向用户呈现所需的角度组件.
让我们看看如何在Angular 2应用程序中实现路由的必要步骤./p>
第1步 : 在index.html文件中添加基本引用标记.
<!DOCTYPE html>
<html>
   <head>
      <base href = "/">
      <title>Angular QuickStart</title>
      <meta charset = "UTF-8">
      <meta name = "viewport" content = "width = device-width, initial-scale = 1">

      <base href = "/">
      <link rel = "stylesheet" href = "styles.css">

      <!-- Polyfill(s) for older browsers -->
      <script src = "node_modules/core-js/client/shim.min.js"></script>
      <script src = "node_modules/zone.js/dist/zone.js"></script>
      <script src = "node_modules/systemjs/dist/system.src.js"></script>
      <script src = "systemjs.config.js"></script>

      <script>
         System.import('main.js').catch(function(err){ console.error(err); });
      </script>
   </head>

   <body>
      <my-app></my-app>
   </body>
</html>
第2步 : 为应用程序创建两个路由.为此,创建2个文件,名为 Inventory.component.ts 和 product.component.ts
第3步 : 将以下代码放在product.component.ts文件中.
import { Component } from '@angular/core';

@Component ({
   selector: 'my-app',
   template: 'Products',
})
export   class   Appproduct  {
}
第4步 : 将以下代码放在Inventory.component.ts文件中.
import { Component } from '@angular/core';

@Component ({
   selector: 'my-app',
   template: 'Inventory',
})
export class AppInventory  {
}
两个组件都没有做任何花哨的事情,只是根据组件呈现关键字.因此,对于Inventory组件,它将向用户显示Inventory关键字.对于产品组件,它会向用户显示产品关键字.
步骤5 : 在app.module.ts文件中,从'@ angular/core'添加以下代码 :
import { NgModule } from '@angular/core';
import { BrowserModule } from '@angular/platform-browser';
import { AppComponent }  from './app.component';
import { Appproduct } from './product.component';
import { AppInventory } from './Inventory.component';
import { RouterModule, Routes } from '@angular/router';

const appRoutes: Routes = [
   { path: 'Product', component: Appproduct },
   { path: 'Inventory', component: AppInventory },
];

@NgModule ({
   imports: [ BrowserModule,
   RouterModule.forRoot(appRoutes)],
   declarations: [ AppComponent,Appproduct,AppInventory],
   bootstrap: [ AppComponent ]
})
export class AppModule { }
关于上述程序需要注意以下几点 :
appRoutes包含2条路线,一条是Appproduct组件,另一条是AppInventory组件.
确保声明两个组件.
RouterModule.forRoot确保添加路由申请.
第6步 : 在app.component.ts文件中,添加以下代码.
import { Component } from '@angular/core';

@Component ({
   selector: 'my-app',
   template: `
   <ul>
      <li><a [routerLink] = "['/Product']">Product</a></li>
      <li><a [routerLink] = "['/Inventory']">Inventory</a></li>
   </ul>
   <router-outlet></router-outlet>`
})
export class AppComponent  { }
关于上述程序需要注意以下几点 :
< router-outlet></router-outlet>是根据用户选择的选项呈现组件的占位符.
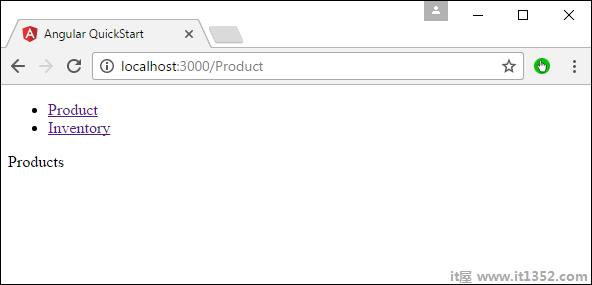
现在,保存所有代码并使用npm运行应用程序.转到浏览器,您将看到以下输出.
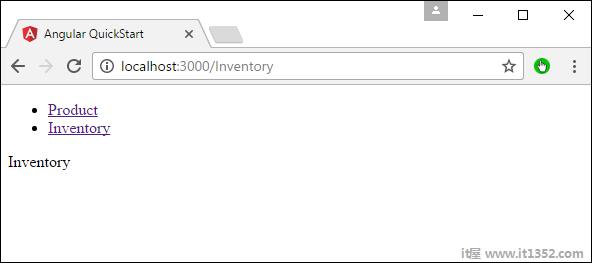
现在,如果您点击库存链接,您将获得以下输出.
在路由中,还可以添加错误路由.如果用户转到应用程序中不存在的页面,就会发生这种情况.
让我们看看如何实现这一点.
第1步 : 添加PageNotFound成分作为NotFound.component.ts如下所示&减去;
第2步 : 将以下代码添加到新文件中.
import { Component } from '@angular/core';

@Component ({
   selector: 'my-app',
   template: 'Not Found',
})
export class PageNotFoundComponent {
}
第3步 : 将以下代码添加到app.module.ts文件中.
import { NgModule } from '@angular/core';
import { BrowserModule } from '@angular/platform-browser';
import { AppComponent } from './app.component';
import { Appproduct } from './product.component'
import { AppInventory } from  './Inventory.component'
import { PageNotFoundComponent } from  './NotFound.component'
import { RouterModule, Routes } from '@angular/router';

const appRoutes: Routes = [
   { path: 'Product', component: Appproduct },
   { path: 'Inventory', component: AppInventory },
   { path: '**', component: PageNotFoundComponent }
];

@NgModule ({
   imports: [ BrowserModule,
   RouterModule.forRoot(appRoutes)],
   declarations: [ AppComponent,Appproduct,AppInventory,PageNotFoundComponent],
   bootstrap: [ AppComponent ]
})

export class AppModule {
}
以下几点需要注意上述程序 :
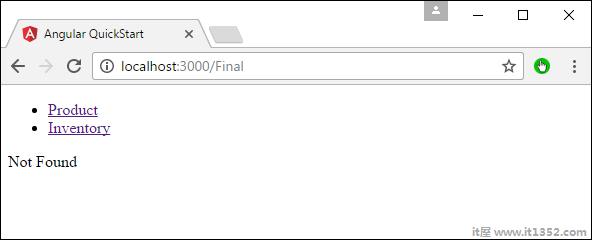
现在我们有一条名为path的额外路线:'** ',component:PageNotFoundComponent.因此,**适用于任何不符合默认路线的路线.它们将被定向到PageNotFoundComponent组件.
现在,保存所有代码并使用npm运行应用程序.转到您的浏览器,您将看到以下输出.现在,当您转到任何错误的链接时,您将获得以下输出.