Java是一种多线程编程语言,这意味着我们可以使用Java开发多线程程序.多线程程序包含两个或多个可以同时运行的部分,每个部分可以同时处理不同的任务,特别是当您的计算机有多个CPU时,可以最佳地利用可用资源.
根据定义,多任务处理是指多个进程共享公共处理资源(如CPU).多线程将多任务处理的概念扩展到可以将单个应用程序中的特定操作细分为单个线程的应用程序中.每个线程可以并行运行.操作系统不仅在不同应用程序之间划分处理时间,还在应用程序中的每个线程之间划分处理时间.
多线程使您能够以多种活动同时进行的方式编写程序.
线程在其生命周期中经历各个阶段.例如,线程诞生,启动,运行,然后死亡.下图显示了一个线程的完整生命周期.
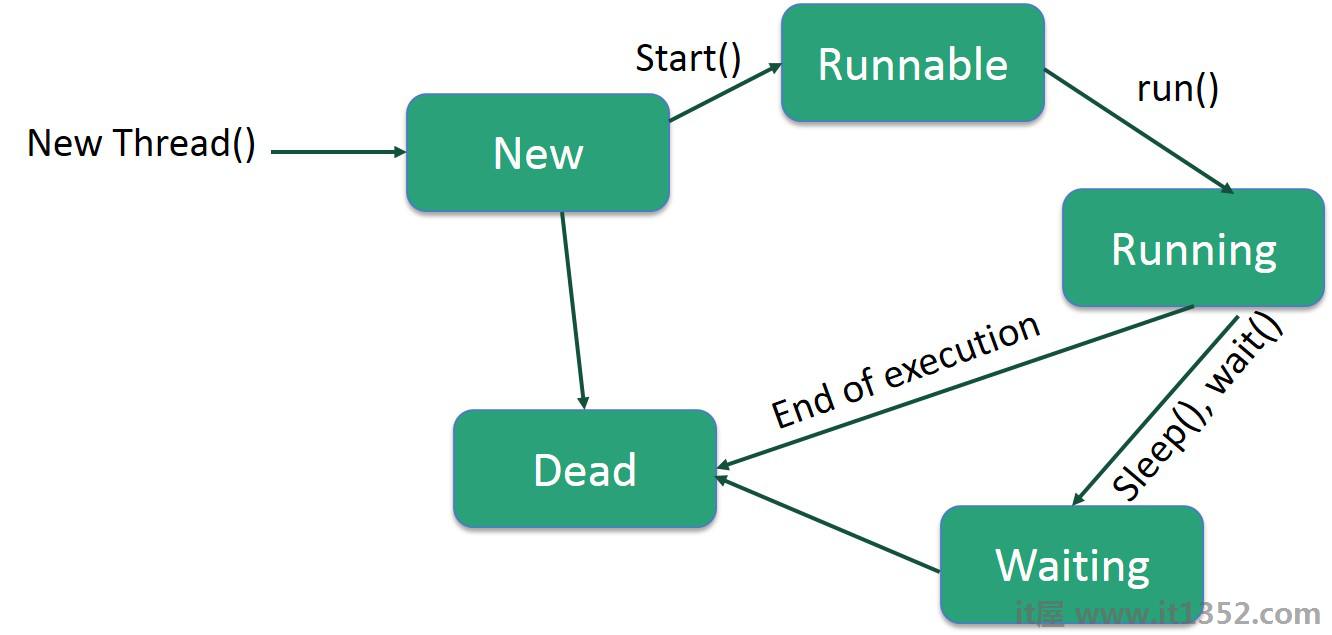
以下是生命周期的阶段 :
新 : 新线程在新状态下开始其生命周期.它一直处于这种状态,直到程序启动线程.它也被称为天生的线程
.
Runnable : 在新生成的线程启动后,线程变为可运行.处于此状态的线程被视为正在执行其任务.
等待 : 有时,线程转换到等待状态,而线程等待另一个线程执行任务.只有当另一个线程通知等待线程继续执行时,线程才会转换回runnable状态.
定时等待 : 可运行线程可以在指定的时间间隔内进入定时等待状态.处于此状态的线程在该时间间隔到期或等待的事件发生时转换回可运行状态.
终止(死亡) ) : 可运行线程在完成任务或以其他方式终止时进入终止状态.
每个Java线程都有一个优先级,可以帮助操作系统确定线程的调度顺序.
Java线程优先级在MIN_PRIORITY(常量为1)和MAX_PRIORITY之间的范围内(常数10).默认情况下,每个线程都被赋予优先级NORM_PRIORITY(常量为5).
具有较高优先级的线程对程序更重要,应在较低优先级线程之前分配处理器时间.但是,线程优先级不能保证线程执行的顺序,并且非常依赖于平台.
如果您的类旨在作为线程执行,然后您可以通过实现 Runnable 接口来实现此目的.您将需要遵循三个基本步骤和减号;
作为第一步,您需要实现由提供的run()方法a Runnable 界面.此方法为线程提供了一个入口点,您将把完整的业务逻辑放在此方法中.以下是run()方法的简单语法 :
public void run()
第二步,使用以下构造函数 :
实例化 Thread 对象
Thread(Runnable threadObj,String threadName);
其中, threadObj 是实现 Runnable 接口的类的实例, threadName 是新线程的名称.
创建Thread对象后,可以通过以下命令启动它调用 start()方法,该方法执行对run()方法的调用.以下是start()方法的简单语法 :
void start();
示例
这是一个创建新线程并开始运行它的示例 :
class RunnableDemo implements Runnable {
   private Thread t;
   private String threadName;

   RunnableDemo(String name) {
      threadName = name;
      System.out.println("Creating " +  threadName );
   }

   public void run() {
      System.out.println("Running " +  threadName );

      try {

         for(int i = 4; i > 0; i--) {
            System.out.println("Thread: " + threadName + ", " + i);

            // Let the thread sleep for a while.
            Thread.sleep(50);
         }
      } catch (InterruptedException e) {
         System.out.println("Thread " +  threadName + " interrupted.");
      }
      System.out.println("Thread " +  threadName + " exiting.");
   }

   public void start () {
      System.out.println("Starting " +  threadName );

      if (t == null) {
         t = new Thread (this, threadName);
         t.start ();
      }
   }
}

public class TestThread {

   public static void main(String args[]) {
      RunnableDemo R1 = new RunnableDemo("Thread-1");
      R1.start();

      RunnableDemo R2 = new RunnableDemo("Thread-2");
      R2.start();
   }
}
这将产生以下结果 :
输出
Creating Thread-1
Starting Thread-1
Creating Thread-2
Starting Thread-2
Running Thread-1
Thread: Thread-1, 4
Running Thread-2
Thread: Thread-2, 4
Thread: Thread-1, 3
Thread: Thread-2, 3
Thread: Thread-1, 2
Thread: Thread-2, 2
Thread: Thread-1, 1
Thread: Thread-2, 1
Thread Thread-1 exiting.
Thread Thread-2 exiting.
创建线程的第二种方法是创建一个新类使用以下两个简单步骤扩展 Thread 类.这种方法在处理使用Thread类中的可用方法创建的多个线程时提供了更大的灵活性.
您将需要覆盖运行() Thread类中可用的方法.此方法为线程提供了一个入口点,您将把完整的业务逻辑放在此方法中.以下是run()方法的简单语法 :
public void run()
创建Thread对象后,可以通过调用 start()方法启动它,该方法执行调用run( ) 方法.以下是start()方法的简单语法 :
void start();
示例
以下是为了扩展Thread而重写的前一个程序;
class ThreadDemo extends Thread {
   private Thread t;
   private String threadName;

   ThreadDemo(String name) {
      threadName = name;
      System.out.println("Creating " +  threadName );
   }

   public void run() {
      System.out.println("Running " +  threadName );

      try {

         for(int i = 4; i > 0; i--) {
            System.out.println("Thread: " + threadName + ", " + i);

            // Let the thread sleep for a while.
            Thread.sleep(50);
         }
      } catch (InterruptedException e) {
         System.out.println("Thread " +  threadName + " interrupted.");
      }
      System.out.println("Thread " +  threadName + " exiting.");
   }

   public void start () {
      System.out.println("Starting " +  threadName );

      if (t == null) {
         t = new Thread (this, threadName);
         t.start ();
      }
   }
}

public class TestThread {

   public static void main(String args[]) {
      ThreadDemo T1 = new ThreadDemo("Thread-1");
      T1.start();

      ThreadDemo T2 = new ThreadDemo("Thread-2");
      T2.start();
   }
}
这将产生以下结果 :
输出
Creating Thread-1
Starting Thread-1
Creating Thread-2
Starting Thread-2
Running Thread-1
Thread: Thread-1, 4
Running Thread-2
Thread: Thread-2, 4
Thread: Thread-1, 3
Thread: Thread-2, 3
Thread: Thread-1, 2
Thread: Thread-2, 2
Thread: Thread-1, 1
Thread: Thread-2, 1
Thread Thread-1 exiting.
Thread Thread-2 exiting.