Web应用程序的一个重要方面是为用户提供用户界面. HTML提供了< form> 标记,用于设计界面.可以适当地使用表单的元素,如文本输入,广播,选择等.
用户输入的数据以Http请求消息的形式提交通过GET或POST方法到服务器端脚本.
服务器端脚本必须从http重新创建表单元素请求数据.实际上,表单元素必须定义两次 - 一次是在HTML中,另一次是在服务器端脚本中.
使用HTML表单的另一个缺点是它很难(如果不是不可能)动态渲染表单元素. HTML本身无法验证用户的输入.
这是 WTForms ,一种灵活的形式,渲染和验证库非常方便. Flask-WTF扩展为这个 WTForms 库提供了一个简单的接口.
使用 Flask-WTF ,我们可以定义表单字段我们的Python脚本并使用HTML模板渲染它们.也可以将验证应用于 WTF 字段.
让我们看看HTML的动态生成是如何工作的.
<首先,需要安装Flask-WTF扩展.
pip install flask-WTF
已安装的软件包包含 Form 类,必须将其用作用户定义表单的父级.
WTforms 包中包含各种表单字段的定义.下面列出了一些标准表单字段.
| Sr.No | 标准表格字段&描述 |
|---|---|
| 1 | TextField 表示< input type ='text'> HTML表单元素 |
| 2 | BooleanField 表示< input type ='checkbox'> HTML表单元素 |
| 3 | DecimalField 显示带小数的数字的文本字段 |
| 4 | IntegerField 用于显示整数的TextField |
| 5 | RadioField 表示< input type ='radio'> HTML表单元素 |
| 6 | SelectField 表示选择表单元素 |
| 7 | TextAreaField 代表< testarea> html表单元素 |
| 8 | PasswordField 表示< input type ='password'> HTML表单元素 |
| 9 | SubmitField 代表< input type ='submit'>表单元素 |
例如,包含文本字段的表单可以设计为低于 :
from flask_wtf import Form
from wtforms import TextField

class ContactForm(Form):
name = TextField("Name Of Student")除'name'字段外,还有隐藏CSRF令牌的字段是自动创建的.这是为了防止跨站请求伪造攻击.
渲染时,这将产生一个等效的HTML脚本,如下所示.
<input id = "csrf_token" name = "csrf_token" type = "hidden" />
<label for = "name">Name Of Student</label><br>
<input id = "name" name = "name" type = "text" value = "" />
在Flask应用程序中使用用户定义的表单类,并使用模板呈现表单.
from flask import Flask, render_template
from forms import ContactForm
app = Flask(__name__)
app.secret_key = 'development key'

@app.route('/contact')
def contact():
   form = ContactForm()
   return render_template('contact.html', form = form)

if __name__ == '__main__':
   app.run(debug = True)
WTForms包还包含验证器类.将验证应用于表单字段非常有用.以下列表显示了常用的验证器.
| Sr.No | Validators Class&描述 |
|---|---|
| 1 | DataRequired 检查输入字段是否为空 |
| 2 | 检查字段中的文字是否遵循电子邮件ID约定 |
| 3 | IPAddress 验证输入字段中的IP地址 |
| 4 | Length 验证输入字段中字符串的长度是否在给定范围内 |
| 5 | NumberRange 验证给定范围内输入字段中的数字 |
| 6 | URL 验证网址输入字段输入 |
我们现在要对联系表格中的名称字段应用'DataRequired'验证规则.
name = TextField("Name Of Student",[validators.Required("Please enter your name.")])validate()表单对象的功能验证表单数据,如果验证失败则抛出验证错误. 错误消息将发送到模板.在HTML模板中,错误消息是动态呈现的.
{% for message in form.name.errors %}
   {{ message }}
{% endfor %}
以下示例演示了上面给出的概念. 联系表格的设计见(forms.py).
from flask_wtf import Form
from wtforms import TextField, IntegerField, TextAreaField, SubmitField, RadioField,
   SelectField

from wtforms import validators, ValidationError

class ContactForm(Form):
   name = TextField("Name Of Student",[validators.Required("Please enter
      your name.")])
   Gender = RadioField('Gender', choices = [('M','Male'),('F','Female')])
   Address = TextAreaField("Address")

   email = TextField("Email",[validators.Required("Please enter your email address."),
      validators.Email("Please enter your email address.")])

   Age = IntegerField("age")
   language = SelectField('Languages', choices = [('cpp', 'C++'),
      ('py', 'Python')])
   submit = SubmitField("Send")
V. alidators应用于名称和电子邮件字段.
以下是Flask应用程序脚本(formexample.py) .
from flask import Flask, render_template, request, flash
from forms import ContactForm
app = Flask(__name__)
app.secret_key = 'development key'

@app.route('/contact', methods = ['GET', 'POST'])
def contact():
   form = ContactForm()

   if request.method == 'POST':
      if form.validate() == False:
         flash('All fields are required.')
         return render_template('contact.html', form = form)
      else:
         return render_template('success.html')
      elif request.method == 'GET':
         return render_template('contact.html', form = form)

if __name__ == '__main__':
app.run(debug = True)临时脚本迟到(contact.html)如下 :
<!doctype html>
<html>
<body>
<h2 style = "text-align: center;">Contact Form</h2>
{% for message in form.name.errors %}
<div>{{ message }}</div>
{% endfor %}
{% for message in form.email.errors %}
<div>{{ message }}</div>
{% endfor %}
<form action = "http://localhost:5000/contact" method = post>
<fieldset>
<legend>Contact Form</legend>
{{ form.hidden_tag() }}
<div style = font-size:20px; font-weight:bold; margin-left:150px;>
{{ form.name.label }}<br>
{{ form.name }}
<br>
{{ form.Gender.label }} {{ form.Gender }}
{{ form.Address.label }}<br>
{{ form.Address }}
<br>
{{ form.email.label }}<br>
{{ form.email }}
<br>
{{ form.Age.label }}<br>
{{ form.Age }}
<br>
{{ form.language.label }}<br>
{{ form.language }}
<br>
{{ form.submit }}
</div>
</fieldset>
</form>
</body>
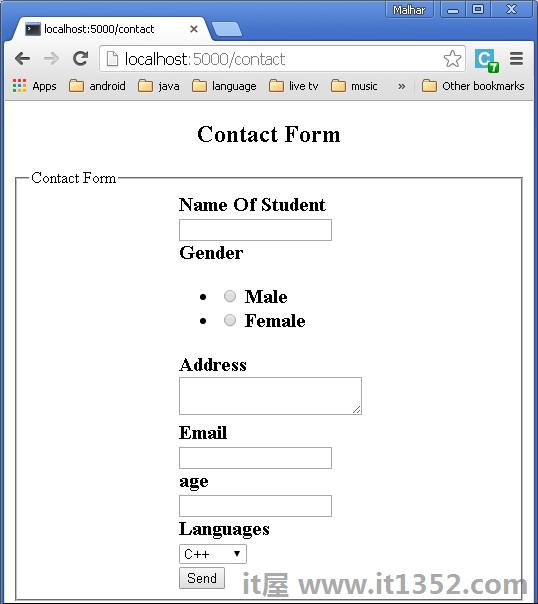
</html>在Python shell中运行 formexample.py 并访问URL http://localhost:5000/contact . 联系表单将显示如下.
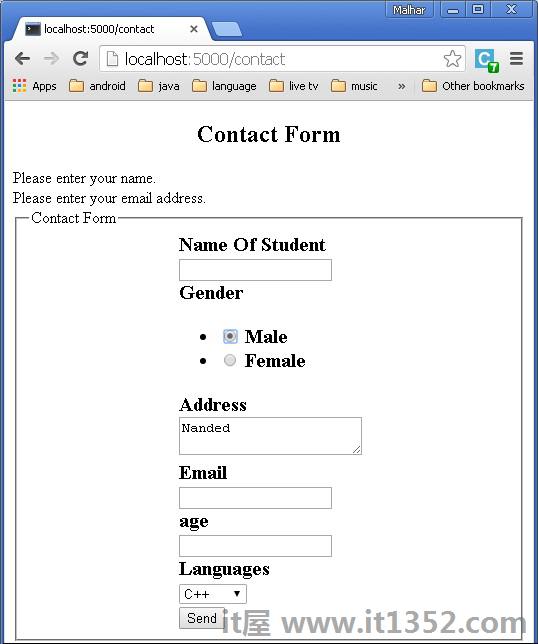
如果有任何错误,页面将显示为 :
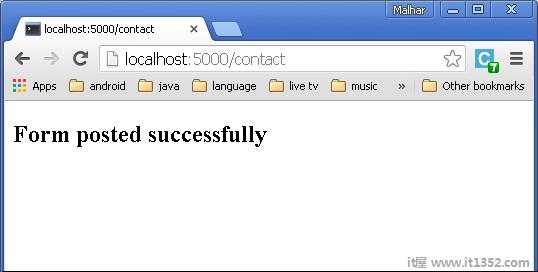
如果没有错误,将呈现'success.html'.