RichFaces附带了一项新功能,可以集中控制您网站的外观和感觉,称为Rich Skin. Skin是旧CSS文件的高级实现,后端开发人员可以更方便地控制网站的外观.有一些内置皮肤可以根据您的选择进行定制.
有很多内置皮肤-in皮肤在RichFaces组件jar文件中可用.以下是一些内置丰富的皮肤.
默认
普通
emeraldTown
blueSky
wine
japanCherry
ruby
classic
deepMarine
NULL
在下面的例子中,我们将实现"经典"皮肤.实现任何上述皮肤非常容易.在继续之前,请使用下面给出的代码行在"web.xml"文件中添加外观.我们可以从上面的列表中添加我们选择的任何皮肤.我们只需要修改< param-value>具有适当皮肤名称的标签.
<context-param>
   <param-name>org.richfaces.skin</param-name>
   <param-value>classic</param-value>
</context-param>
添加后,请创建一个"SkinExample.xhtml"文件,并将以下代码行添加到其中.
<?xml version = '1.0' encoding = 'UTF-8' ?>
<ui:composition xmlns = "http://www.w3.org/1999/xhtml"
   xmlns:h = "http://java.sun.com/jsf/html"
   xmlns:f = "http://java.sun.com/jsf/core"
   xmlns:ui = "http://java.sun.com/jsf/facelets"
   xmlns:a4j = "http://richfaces.org/a4j"
   xmlns:rich = "http://richfaces.org/rich">

   <f:view>
      <h:head>
         <title>Rich Faces Built in Skin</title>
      </h:head>

      <h:body>
         <h:form>
            <rich:panel style = "width:60%">
               <rich:tabPanel switchType = "AJAX">
                  <rich:tab header = "Name">
                     Tutorials Point
                  </rich:tab>

                  <rich:tab header = "Features">
                     Best Place to learn
                  </rich:tab>
               </rich:tabPanel>
            </rich:panel>
         </h:form>
      </h:body>

   </f:view>
</ui:composition>
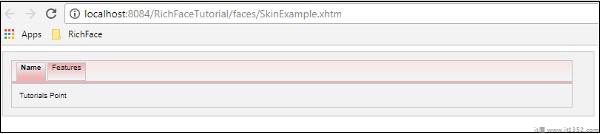
一旦我们运行此页面,下面将是浏览器中的输出,其中每个选项卡动态传播以生成不同的输出.一旦你点击下一个标签,它将显示不同的输出.

在上面的示例中,< rich:panel>创建一个面板,我们使用< rich:tab>创建不同的标签. < rich:tabPanel switchType ="AJAX">提供使用选项卡的AJAX转换.
皮肤只是CSS设计的扩展版本,将被应用在运行时到网页.在上一节中,我们学习了一些基本的内置功能.在本节中,我们将创建自己的皮肤或修改现有皮肤. RichFaces中的皮肤可以在以下三个级别进行自定义.
皮肤属性文件 : 所有皮肤都是通过"rechfaces-a4j-4.5.17.Final"jar文件中提到的不同属性文件生成的.我们需要做的就是创建一个相同的属性文件并将其保存在我们的源文件夹下并编辑其属性.我们需要相应地更改我们的"web.xml"以反映我们在网站上的新皮肤属性.
组件样式表 : 实现新的CSS文件并在应用程序中使用它.
覆盖样式类 : 可以通过直接提及xhtml文件中的样式属性来覆盖样式.
让我们考虑一个例子.我们将定制我们以前的"经典"皮肤.在"source"包中创建一个属性文件,并将其命名为"custom.skin.properties".以下是从上面提到的jar文件中可用的其他属性文件复制的此属性文件的条目.
#Colors
headerBackgroundColor = #black
headerGradientColor = #DF5858
headerTextColor = #FFFFFF
headerWeightFont = bold

generalBackgroundColor = #f1f1f1
generalTextColor = #000000
generalSizeFont = 10px
generalFamilyFont = Arial, Verdana, sans-serif

controlTextColor = #000000
controlBackgroundColor = #ffffff
additionalBackgroundColor = #F9E4E4

shadowBackgroundColor = #000000
shadowOpacity = 1
panelBorderColor = #C0C0C0
subBorderColor = #ffffff

tabBackgroundColor = #EDAEAE
tabDisabledTextColor = #C47979
trimColor = #F7C4C4
tipBackgroundColor = #FAE6B0
tipBorderColor = #E5973E

selectControlColor = #FF9409
generalLinkColor = #CF0000
hoverLinkColor = #FF0000
visitedLinkColor = #CF0000

# Fonts
headerSizeFont = 11px
headerFamilyFont = Arial, Verdana, sans-serif
tabSizeFont = 11
tabFamilyFont = Arial, Verdana, sans-serif
buttonSizeFont = 11
CHAPTER 11 ■ SKINS 223
buttonFamilyFont = Arial, Verdana, sans-serif

tableBackgroundColor = #FFFFFF
tableFooterBackgroundColor = #cccccc
tableSubfooterBackgroundColor = #f1f1f1
tableBorderColor = #C0C0C0
tableBorderWidth = 1px

#Calendar colors
calendarWeekBackgroundColor = #f5f5f5
calendarHolidaysBackgroundColor = #FFF1F1
calendarHolidaysTextColor = #980808
calendarCurrentBackgroundColor = #808080
calendarCurrentTextColor = #ffffff
calendarSpecBackgroundColor = #f1f1f1
calendarSpecTextColor = #000000

warningColor = #FFE6E6
warningBackgroundColor = #FF0000
editorBackgroundColor = #F1F1F1
editBackgroundColor = #FEFFDA

#Gradients
Gradient Type = plain
根据技能水平,我们可以更改此属性中的任何属性文件.我们可以添加新的Style类或编辑现有的类.完成新属性文件的创建后,就可以在"web.xml"文件中添加相同的文件了.以下是"web.xml"的输入,它应该指向我们的皮肤.
<context-param>
   <param-name>org.richfaces.skin</param-name>
   <param-value>custom</param-value>
</context-param>
注意 : 确保源属性目录中存在新的属性文件,否则会抛出运行时错误"NoClassFound Exception".
继续运行名为"SkinExample.xhtml"的上一个文件.以下将是浏览器中的输出,我们将能够看到网站的整个外观已经变为"Ruby",因为从ruby.properties文件中复制了新的属性文件.
在这个例子中,我们将在运行时更改皮肤.创建如下所示的外观类.
import javax.faces.bean.ManagedBean;
import javax.faces.bean.RequestScoped;

@ManagedBean
@RequestScoped

public class skinBean {
   private String skin;
   public skinBean() {
      this.skin="plane";
   }
   public String getSkin() {
      return skin;
   }
   public void setSkin(String skin) {
      this.skin = skin;
   }
}
然后按如下所示更改"web.xml"文件,以在运行时填充外观名称.
<context-param>
   <param-name>org.richfaces.skin</param-name>
   <param-value>#{skinBean.skin}</param-value>
</context-param>
这样做之后,我们需要更改JSF应用程序的配置文件.这些文件可以位于web-INF文件夹下.添加以下bean属性.
<managed-bean>
   <managed-bean-name>skinBean</managed-bean-name>
   <managed-bean-class>SkinBean</managed-bean-class>>
   <managed-bean-scope>session</managed-bean-scope>

   <managed-property>
      <property-name>skin</property-name>
      <value>plain</value>
   </managed-property>
</managed-bean>
以下是xhtml文件代码.
<?xml version = "1.0" encoding = "UTF-8"?>
<!DOCTYPE html>
<html xmlns = "http://www.w3.org/1999/xhtml"
   xmlns:h = "http://java.sun.com/jsf/html"
   xmlns:a4j = "http://richfaces.org/a4j"
   xmlns:f = "http://java.sun.com/jsf/core"
   xmlns:rich = "http://richfaces.org/rich">

   <h:head>
      <title>TODO supply a title</title>
   </h:head>

   <h:body>
      <h:form>
         <div style = "display: block; float: left">
            <h:selectOneRadio value = "#{skinBean.skin}" border = "0"
               layout = "pageDirection" title = "Changing skin" style = "font-size: 8;
               font-family: comic" onchange = "submit()">
               <f:selectItem itemLabel = "plain" itemValue = "plain" />
               <f:selectItem itemLabel = "emeraldTown" itemValue = "emeraldTown" />
               <f:selectItem itemLabel = "blueSky" itemValue = "blueSky" />
               <f:selectItem itemLabel = "wine" itemValue = "wine" />
               <f:selectItem itemLabel = "japanCherry" itemValue = "japanCherry" />
               <f:selectItem itemLabel = "ruby" itemValue = "ruby" />
               <f:selectItem itemLabel = "deepMarine" itemValue = "deepMarine" />
            </h:selectOneRadio>
         </div>

         <div style = "display: block; float: left">
            <rich:panel >
               <rich:panelMenu style = "font-family: monospace; font-size: 12;">
                  Changing skin in runtime
               </rich:panelMenu>

               <rich:panelMenu  style = "font-family: monospace; font-size: 12;">
                  This is a result of the modification "blueSky" skin
               </rich:panelMenu>
            </rich:panel>
         </div>
      </h:form>
   </h:body>

</html>
上面的代码将在浏览器中生成以下输出.
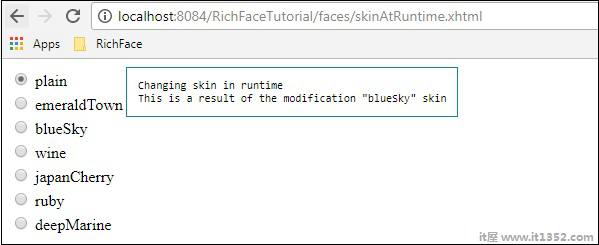
在上面的例子中,我们最初选择"plain",因此它指向plain.一旦通过单选按钮传播,它将相应地改变颜色.