以下示例显示如何使用Spring Web MVC Framework集成LOG4J.首先,让我们使用一个有效的Eclipse IDE,并坚持以下步骤,使用Spring Web Framework开发基于动态表单的Web应用程序.
| Step | 描述 |
|---|---|
| 1 | 在com.it1352包下创建一个名为TestWeb的项目,如下所述Spring MVC - Hello World章. |
| 2 | 在com.it1352包下创建一个Java类HelloController. |
| 3 | 从maven存储库页面下载log4j库 LOG4J .把它放在你的CLASSPATH中. |
| 4 | 创建SRC文件夹下的log4j.properties. |
| 5 | 最后一步是创建源文件和配置文件的内容并导出应用程序,如下所述. |
package com.it1352;
import org.apache.log4j.Logger;
import org.springframework.stereotype.Controller;
import org.springframework.web.bind.annotation.RequestMapping;
import org.springframework.web.bind.annotation.RequestMethod;
import org.springframework.ui.ModelMap;

@Controller
@RequestMapping("/hello")
public class HelloController{
   private static final Logger LOGGER = Logger.getLogger(HelloController.class);
   @RequestMapping(method = RequestMethod.GET)
   public String printHello(ModelMap model) {
      LOGGER.info("printHello started.");

      //logs debug message
      if(LOGGER.isDebugEnabled()){
         LOGGER.debug("Inside:  printHello");
      }
      //logs exception
      LOGGER.error("Logging a sample exception", new Exception("Testing"));

      model.addAttribute("message", "Hello Spring MVC Framework!");
      LOGGER.info("printHello ended.");
      return "hello";
   }
}# Root logger option
log4j.rootLogger = DEBUG, stdout, file
# Redirect log messages to console
log4j.appender.stdout = org.apache.log4j.ConsoleAppender
log4j.appender.stdout.Target = System.out
log4j.appender.stdout.layout = org.apache.log4j.PatternLayout
log4j.appender.stdout.layout.ConversionPattern = %d{yyyy-MM-dd HH:mm:ss} %-5p %c{1}:%L - %m%n
# Redirect log messages to a log file
log4j.appender.file = org.apache.log4j.RollingFileAppender
#outputs to Tomcat home
log4j.appender.file.File = ${catalina.home}/logs/myapp.log
log4j.appender.file.MaxFileSize = 5MB
log4j.appender.file.MaxBackupIndex = 10
log4j.appender.file.layout = org.apache.log4j.PatternLayout
log4j.appender.file.layout.ConversionPattern = %d{yyyy-MM-dd HH:mm:ss} %-5p %c{1}:%L - %m%n<beans xmlns = "http://www.springframework.org/schema/beans" xmlns:context = "http://www.springframework.org/schema/context" xmlns:xsi = "http://www.w3.org/2001/XMLSchema-instance" xmlns:mvc = "http://www.springframework.org/schema/mvc" xsi:schemaLocation = " http://www.springframework.org/schema/beans http://www.springframework.org/schema/beans/spring-beans-3.0.xsd http://www.springframework.org/schema/context http://www.springframework.org/schema/context/spring-context-3.0.xsd http://www.springframework.org/schema/mvc http://www.springframework.org/schema/mvc/spring-mvc-3.0.xsd"> <context:component-scan base-package = "com.IT屋" /> <bean class = "org.springframework.web.servlet.view.InternalResourceViewResolver"> <property name = "prefix" value = "/WEB-INF/jsp/" /> <property name = "suffix" value = ".jsp" /> </bean> </beans>
<%@ page contentType = "text/html; charset = UTF-8" %>
<html>
<head>
<title>Hello World</title>
</head>
<body>
<h2>${message}</h2>
</body>
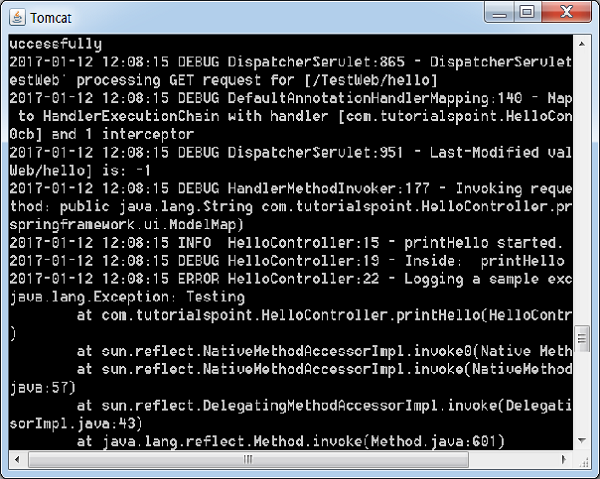
</html>在这里,我们已经将LOG4J配置为在Tomcat控制台和& t中存在的文件中记录详细信息. tomcat home → 记录为myapp.log.
完成创建源文件和配置文件后,导出应用程序.右键单击您的应用程序,使用 Export → WAR文件选项并将 TestWeb.war 文件保存在Tomcat的webapps文件夹中.
现在,启动Tomcat服务器并确保您能够使用标准浏览器从webapps文件夹访问其他网页.尝试URL : http://localhost:8080/TestWeb/hello ,我们将在Tomcat的日志中看到以下屏幕.