在本章中,我们将讨论VueJS中可用的过渡和动画功能.
VueJS提供了各种方法来应用过渡到在DOM中添加/更新HTML元素时的HTML元素. VueJS有一个内置的转换组件,需要包含元素,需要转换.
<transition name = "nameoftransition">
   <div></div>
</transition>
让我们考虑一个例子来了解过渡的工作.
<html>
   <head>
      <title>VueJs Instance</title>
      <script type = "text/javascript" src = "js/vue.js"></script>
   </head>
   <body>
      <style>
         .fade-enter-active, .fade-leave-active {
            transition: opacity 2s
         }
         .fade-enter, .fade-leave-to /* .fade-leave-active below version 2.1.8 */ {
            opacity: 0
         }
      </style>
      <div id = "databinding">
         <button v-on:click = "show = !show">Click Me</button>
         <transition name = "fade">
            <p v-show = "show" v-bind:style = "styleobj">Animation Example</p>
         </transition>
      </div>
      <script type = "text/javascript">
         var vm = new Vue({
            el: '#databinding',
            data: {
               show:true,
               styleobj :{
                  fontSize:'30px',
                  color:'red'
               }
            },
            methods : {
            }
         });
      </script>
   </body>
</html>
创建了一个名为clickme的按钮,使用该按钮我们可以将变量show的值更改为true,反之亦然.有一个 p标签,仅当变量为true时才显示文本元素.我们已经使用transition元素包装了p标记,如下面的代码所示.
<transition name = "fade">
   <p v-show = "show" v-bind:style = "styleobj">Animation Example</p>
</transition>
过渡的名称是淡出. VueJS为转换提供了一些标准类,并且类以转换名称为前缀.
以下是转换和减号的一些标准类;
v-enter : 在更新/添加元素之前,最初会调用此类.它是起始状态.
v-enter-active : 此类用于定义进入过渡阶段的延迟,持续时间和缓动曲线.这是整个活动状态,整个进入阶段都可以使用该课程.
v-leave : 在触发离开过渡时添加,删除.
v-leave-active : 在离开阶段应用.转换完成后将删除它.此类用于在离开阶段应用延迟,持续时间和缓动曲线.
上述每个类都将以前缀为前缀以过渡的名称.我们已将转换的名称指定为淡入淡出,因此类的名称变为 .fade_enter,.fade_enter_active,.fade_leave,.fade_leave_active .
它们是在以下代码中定义.
<style>
   .fade-enter-active, .fade-leave-active {
      transition: opacity 2s
   }
   .fade-enter, .fade-leave-to /* .fade-leave-active below version 2.1.8 */ {
      opacity: 0
   }
</style>
.fade_enter_active和.fade_leave_active是一起定义的,它在开始和离开阶段应用转换. opacity属性在2秒内更改为0.
持续时间在.fade_enter_active和.fade_leave_active中定义.最后一个阶段在.fade_enter,.fade_leave_to中定义.
浏览器中的显示如下.
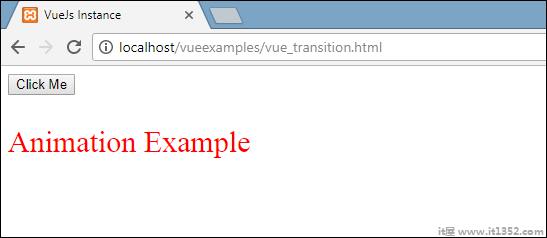
单击按钮,文本将在两秒内消失.
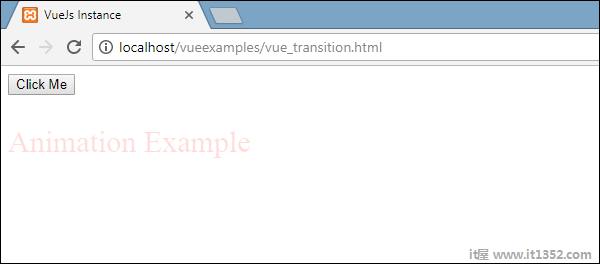
两秒钟后,文本将完全消失.
让我们考虑另一个例子,其中有一个图像,当点击按钮时它在x轴上移动.
<html>
   <head>
      <title>VueJs Instance</title>
      <script type = "text/javascript" src = "js/vue.js"></script>
   </head>
   <body>
      <style>
         .shiftx-enter-active, .shiftx-leave-active {
            transition: all 2s ease-in-out;
         }
         .shiftx-enter, .shiftx-leave-to /* .fade-leave-active below version 2.1.8 */ {
            transform :  translateX(100px);
         }
      </style>
      <div id = "databinding">
         <button v-on:click = "show = !show">Click Me</button>
         <transition name = "shiftx">
            <p v-show = "show">
               <img src = "images/img.jpg" style = "width:100px;height:100px;" />
            </p>
         </transition>
      </div>
      <script type = "text/javascript">
         var vm = new Vue({
            el: '#databinding',
            data: {
               show:true
            },
            methods : {
            }
         });
      </script>
   </body>
</html>
过渡的名称是 shiftx .转换属性用于使用以下代码将x轴上的图像移位100px.
<style>
.shiftx-enter-active, .shiftx-leave-active {
transition: all 2s ease-in-out;
}
.shiftx-enter, .shiftx-leave-to /* .fade-leave-active below version 2.1.8 */ {
transform : translateX(100px);
}
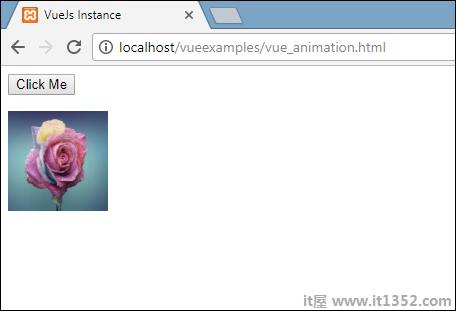
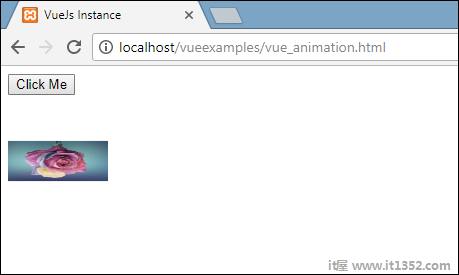
</style>以下是输出.
单击该按钮,图像将向右移动100px,如下面的屏幕截图所示.

动画应用与完成转换的方式相同.动画还有一些类需要声明才能使效果发生.
让我们考虑一个示例,看看动画是如何工作的.
<html>
   <head>
      <title>VueJs Instance</title>
      <script type = "text/javascript" src = "js/vue.js"></script>
   </head>
   <body>
      <style>
         .shiftx-enter-active {
            animation: shift-in 2s;
         }
         .shiftx-leave-active {
            animation: shift-in 2s reverse;
         }
         @keyframes shift-in {
            0%   {transform:rotateX(0deg);}
            25%  {transform:rotateX(90deg);}
            50%  {transform:rotateX(120deg);}
            75%  {transform:rotateX(180deg);}
            100% {transform:rotateX(360deg);}
         }
      </style>
      <div id = "databinding">
         <button v-on:click = "show = !show">Click Me</button>
         <transition name = "shiftx">
            <p v-show = "show">
               <img src = "images/img.jpg" style = "width:100px;height:100px;" />
            </p>
         </transition>
      </div>
      <script type = "text/javascript">
         var vm = new Vue({
            el: '#databinding',
            data: {
               show:true
            },
            methods : {
            }
         });
      </script>
   </body>
</html>
要应用动画,有与转换相同的类.在上面的代码中,我们有一个用p标签括起来的图像,如下面的代码所示.
<transition name = "shiftx">
   <p v-show = "show"><img src = "images/img.jpg" style = "width:100px;height:100px;" /></p>
</transition>
过渡的名称是 shiftx .应用的类如下 :
<style>
   .shiftx-enter-active {
      animation: shift-in 2s;
   }
   .shiftx-leave-active {
      animation: shift-in 2s reverse;
   }
   @keyframes shift-in {
      0%   {transform:rotateX(0deg);}
      25%  {transform:rotateX(90deg);}
      50%  {transform:rotateX(120deg);}
      75%  {transform:rotateX(180deg);}
      100% {transform:rotateX(360deg);}
   }
</style>
该类的前缀是转换名称,即shiftx-enter-active和.shiftx-leave-active.使用0%到100%的关键帧定义动画.在每个关键帧上定义的变换如下面的代码所示.
 @keyframes shift-in {
 0%{transform:rotateX(0deg);}
 25%{transform:rotateX(90deg);}
 50%{transform:rotateX(120deg);}
 75%{transform :rotateX(180deg);}
 100%{transform:rotateX(360deg);}
}
以下是输出.
点击按钮,它从0旋转到360学位并消失.
VueJS提供了一个自定义类列表,可以作为属性添加到过渡元素.
enter-class
enter-active-class
leave-class
leave-active-class
Custo当我们想要使用外部CSS库(例如animate.css)时,m类基本上起作用.
<html>
   <head>
      <link href = "https://cdn.jsdelivr.net/npm/animate.css@3.5.1" rel = "stylesheet" type = "text/css">
      <script type = "text/javascript" src = "js/vue.js"></script>
   </head>
   <body>
      <div id = "animate" style = "text-align:center">
         <button @click = "show = !show"><span style = "font-size:25px;">Animate</span></button>
         <transition
            name = "custom-classes-transition"
            enter-active-class = "animated swing"
            leave-active-class = "animated bounceIn">
            <p v-if = "show"><span style = "font-size:25px;">Example</span></p>
         </transition>
      </div>
      <script type = "text/javascript">
         var vm =  new Vue({
            el: '#animate',
            data: {
               show: true
            }
         });
      </script>
   </body>
</html>![]()
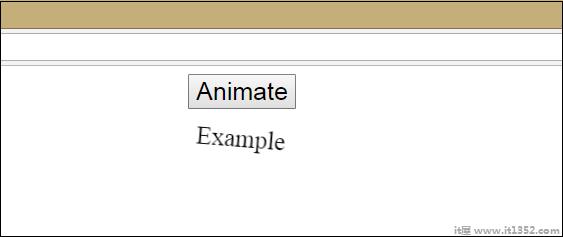
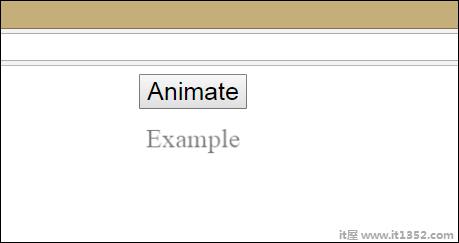
上面的代码中应用了两个动画.一个enter-active-class ="animated swing"和另一个leave-active-class ="animated bounceIn".我们正在使用自定义动画类来从第三方库中应用动画.
我们可以应用转换和使用VueJS的元素上的动画. Vue等待transionend和animationend事件检测动画或转换是否完成.
有时转换会导致延迟.在这种情况下,我们可以明确地应用持续时间如下.
<transition :duration = "1000"></transition>
<transition :duration = "{ enter: 500, leave: 800 }">...</transition>
我们可以在过渡元素上使用duration属性,如上所示.如果需要单独指定进入和离开的持续时间,可以按上面的代码所示完成.
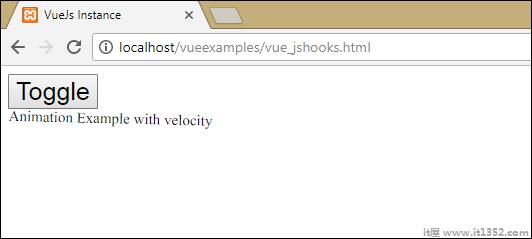
可以使用JavaScript事件将转换类称为方法.让我们考虑一个更好理解的例子.
<html>
   <head>
      <title>VueJs Instance</title>
      <script type = "text/javascript" src = "js/vue.js"></script>
   </head>
   <body>
      <script src = "https://cdnjs.cloudflare.com/ajax/libs/velocity/1.2.3/velocity.min.js"></script>
      <div id = "example-4">
         <button @click = "show = !show">
            <span style = "font-size:25px;">Toggle</span>
         </button>
         <transition  v-on:before-enter = "beforeEnter"
            v-on:enter = "enter"
            v-on:leave = "leave"
            v-bind:css = "false">
            <p v-if = "show" style = "font-size:25px;">Animation Example with velocity</p>
         </transition>
      </div>
      <script type = "text/javascript">
         var vm = new Vue({
            el: '#example-4',
            data: {
               show: false
            },
            methods: {
               beforeEnter: function (el) {
                  el.style.opacity = 0
               },
               enter: function (el, done) {
                  Velocity(el, { opacity: 1, fontSize: '25px' }, { duration: 1000 })
                  Velocity(el, { fontSize: '10px' }, { complete: done })
               },
               leave: function (el, done) {
                  Velocity(el, { translateX: '15px', rotateZ: '50deg' }, { duration: 1500 })
                  Velocity(el, { rotateZ: '100deg' }, { loop: 2 })
                  Velocity(el, {
                     rotateZ: '45deg',
                     translateY: '30px',
                     translateX: '30px',
                     opacity: 0
                  }, { complete: done })
               }
            }
         });
      </script>
   </body>
</html>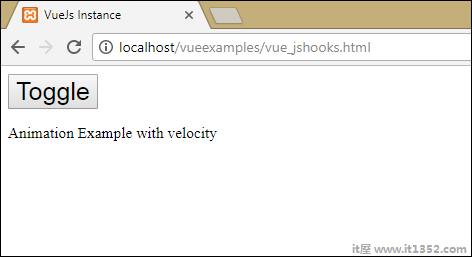
在在上面的示例中,我们使用转换元素上的js方法执行动画.
转换方法应用如下 :
<transition  v-on:before-enter = "beforeEnter"
   v-on:enter = "enter"
   v-on:leave = "leave"
   v-bind:css = "false">
   <p v-if = "show" style = "font-size:25px;">Animation Example with velocity</p>
</transition>
添加了 v-on 前缀以及调用该方法的事件的名称.这些方法在Vue实例中定义如下 :
methods: {
   beforeEnter: function (el) {
      el.style.opacity = 0
   },
   enter: function (el, done) {
      Velocity(el, { opacity: 1, fontSize: '25px' }, { duration: 1000 })
      Velocity(el, { fontSize: '10px' }, { complete: done })
   },
   leave: function (el, done) {
      Velocity(el, { translateX: '15px', rotateZ: '50deg' }, { duration: 1500 })
      Velocity(el, { rotateZ: '100deg' }, { loop: 2 })
      Velocity(el, {
         rotateZ: '45deg',
         translateY: '30px',
         translateX: '30px',
         opacity: 0
      }, { complete: done })
   }
}
在每种方法中都应用了所需的转换.在单击按钮时以及动画完成时应用了不透明度动画.第三方库用于动画.
在转换v-bind上添加了一个属性:css ="false",这样做是为了让Vue知道它是一个JavaScript转换./p>
为了在开始时添加动画,我们需要在transition元素中添加'appear'属性.
让我们看一个更好理解的例子.
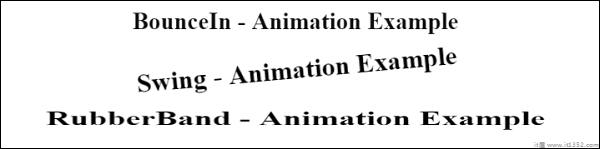
<html>
   <head>
      <link href = "https://cdn.jsdelivr.net/npm/animate.css@3.5.1" rel = "stylesheet" type = "text/css">
      <script type = "text/javascript" src = "js/vue.js"></script>
   </head>
   <body>
      <div id = "animate" style = "text-align:center">
         <transition
            appear
            appear-class = "custom-appear-class"
            appear-active-class = "animated bounceIn">
            <h1>BounceIn - Animation Example</h1>
         </transition>
         <transition
            appear
            appear-class = "custom-appear-class"
            appear-active-class = "animated swing">
            <h1>Swing - Animation Example</h1>
         </transition>
         <transition
            appear
            appear-class = "custom-appear-class"
            appear-active-class = "animated rubberBand">
            <h1>RubberBand - Animation Example</h1>
         </transition>
      </div>
      <script type = "text/javascript">
         var vm =  new Vue({
            el: '#animate',
            data: {
               show: true
            }
         });
      </script>
   </body>
</html>
在上面的例子中,我们使用了animate.css库中的三种不同的动画.我们已将过期元素添加到过渡元素中.
执行上述代码时,以下将是浏览器中的输出.
我们可以使用以下内容包装组件的转换以下代码.我们在这里使用了动态组件.
<html>
   <head>
      <title>VueJs Instance</title>
      <script type = "text/javascript" src = "js/vue.js"></script>
      <link href = "https://cdn.jsdelivr.net/npm/animate.css@3.5.1" rel = "stylesheet" type = "text/css">
   </head>
   <body>
      <div id = "databinding" style = "text-align:center;">
         <transition  appear
            appear-class = "custom-appear-class"
            appear-active-class = "animated wobble">
            <component v-bind:is = "view"></component>
         </transition>
      </div>
      <script type = "text/javascript">
         var vm = new Vue({
            el: '#databinding',
            data: {
               view: 'component1'
            },
            components: {
               'component1': {
                  template: '<div><span style = "font-
                  size:25;color:red;">Animation on Components</span></div>'
               }
            }
         });
      </script>
   </body>
</html>