GWT支持使用History类的浏览器历史记录管理,您可以参考 GWT - History Class 章节.
GWT使用术语令牌这只是一个应用程序可以解析为返回特定状态的字符串.应用程序将此标记作为URL片段保存在浏览器的历史记录中.
在 GWT - 历史记录类章节中,我们通过编写代码来处理历史记录中的令牌创建和设置.
在本文中,我们将讨论一个特殊的小部件Hyperlink,它自动为我们完成令牌创建和历史管理,并提供书签的应用程序功能.
此示例将指导您完成演示GWT应用程序书签的简单步骤.
以下步骤更新GWT应用程序我们在 GWT中创建 - 创建应用程序章节 :
| Step | 描述 |
|---|---|
| 1 | 在 GWT - 创建应用程序中解释,在包 com.it1352下创建一个名为 HelloWorld 的项目章. |
| 2 | 修改 HelloWorld.gwt.xml , HelloWorld.css , HelloWorld. html 和 HelloWorld.java ,如下所述.保持其余文件不变. |
| 3 | 编译并运行应用程序以验证实现的逻辑的结果. |
以下是修改后的模块描述符的内容 src/com.it1352/HelloWorld.gwt.xml.
<?xml version = "1.0" encoding = "UTF-8"?>
<module rename-to = 'helloworld'>
   <!-- Inherit the core Web Toolkit stuff.                        -->
   <inherits name = 'com.google.gwt.user.User'/>

   <!-- Inherit the default GWT style sheet.                       -->
   <inherits name = 'com.google.gwt.user.theme.clean.Clean'/>

   <!-- Specify the app entry point class.                         -->
   <entry-point class = 'com.IT屋.client.HelloWorld'/>
   <!-- Specify the paths for translatable code                    -->
   <source path = 'client'/>
   <source path = 'shared'/>

</module>
以下是修改后的样式表文件的内容 war/HelloWorld.css .
body {
   text-align: center;
   font-family: verdana, sans-serif;
}

h1 {
   font-size: 2em;
   font-weight: bold;
   color: #777777;
   margin: 40px 0px 70px;
   text-align: center;
}
以下是修改过的HTML主机文件的内容 war/HelloWorld.html
<html>
   <head>
      <title>Hello World</title>
      <link rel = "stylesheet" href = "HelloWorld.css"/>
      <script language = "javascript" src = "helloworld/helloworld.nocache.js">
      </script>
   </head>

   <body>
      <iframe src = "javascript:''"id = "__gwt_historyFrame"
         style = "width:0;height:0;border:0"></iframe>
      <h1> Bookmarking Demonstration</h1>
      <div id = "gwtContainer"></div>
   </body>
</html>
让我们有以下Java文件 src/com.it1352/HelloWorld.java 的内容,我们将使用它来演示Bookmarking in GWT代码.
package com.it1352.client;
import com.google.gwt.core.client.EntryPoint;

import com.google.gwt.event.logical.shared.ValueChangeEvent;
import com.google.gwt.event.logical.shared.ValueChangeHandler;

import com.google.gwt.user.client.History;
import com.google.gwt.user.client.ui.HTML;
import com.google.gwt.user.client.ui.HorizontalPanel;
import com.google.gwt.user.client.ui.Hyperlink;
import com.google.gwt.user.client.ui.RootPanel;
import com.google.gwt.user.client.ui.TabPanel;
import com.google.gwt.user.client.ui.VerticalPanel;

public class HelloWorld implements EntryPoint {

   private TabPanel tabPanel;

   private void selectTab(String historyToken){
      /*  parse the history token */
      try {
         if (historyToken.substring(0, 9).equals("pageIndex")) {
            String tabIndexToken = historyToken.substring(9, 10);
            int tabIndex = Integer.parseInt(tabIndexToken);
            /* Select the specified tab panel */
            tabPanel.selectTab(tabIndex);
         } else {
            tabPanel.selectTab(0);
         }
      } catch (IndexOutOfBoundsException e) {
         tabPanel.selectTab(0);
      }
   }

   /**
    * This is the entry point method.
    */
   public void onModuleLoad() {
      /* create a tab panel to carry multiple pages */
      tabPanel = new TabPanel();

      /* create pages */
      HTML firstPage = new HTML("<h1>We are on first Page.</h1>");
      HTML secondPage = new HTML("<h1>We are on second Page.</h1>");
      HTML thirdPage = new HTML("<h1>We are on third Page.</h1>");

      String firstPageTitle = "First Page";
      String secondPageTitle = "Second Page";
      String thirdPageTitle = "Third Page";

      Hyperlink firstPageLink = new Hyperlink("1", "pageIndex0");
      Hyperlink secondPageLink = new Hyperlink("2", "pageIndex1");
      Hyperlink thirdPageLink = new Hyperlink("3", "pageIndex2");

      HorizontalPanel linksHPanel = new HorizontalPanel();
      linksHPanel.setSpacing(10);
      linksHPanel.add(firstPageLink);
      linksHPanel.add(secondPageLink);
      linksHPanel.add(thirdPageLink);

      /* If the application starts with no history token,
         redirect to a pageIndex0 */
      String initToken = History.getToken();

      if (initToken.length() == 0) {
         History.newItem("pageIndex0");
         initToken = "pageIndex0";
      }

      tabPanel.setWidth("400");
      /* add pages to tabPanel*/
      tabPanel.add(firstPage, firstPageTitle);
      tabPanel.add(secondPage,secondPageTitle);
      tabPanel.add(thirdPage, thirdPageTitle);

      /* add value change handler to History
       * this method will be called, when browser's Back button
       * or Forward button are clicked.
       * and URL of application changes.
       * */
      History.addValueChangeHandler(new ValueChangeHandler<String>() {
         @Override
         public void onValueChange(ValueChangeEvent<String> event) {
            selectTab(event.getValue());
         }
      });

      selectTab(initToken);

      VerticalPanel vPanel = new VerticalPanel();

      vPanel.setSpacing(10);
      vPanel.add(tabPanel);
      vPanel.add(linksHPanel);

      /* add controls to RootPanel */
      RootPanel.get().add(vPanel);
   }
}
完成所有更改后,让我们在开发模式下编译并运行应用程序在 GWT - 创建应用程序章节中做了.如果您的应用程序一切正常,这将产生以下结果 :
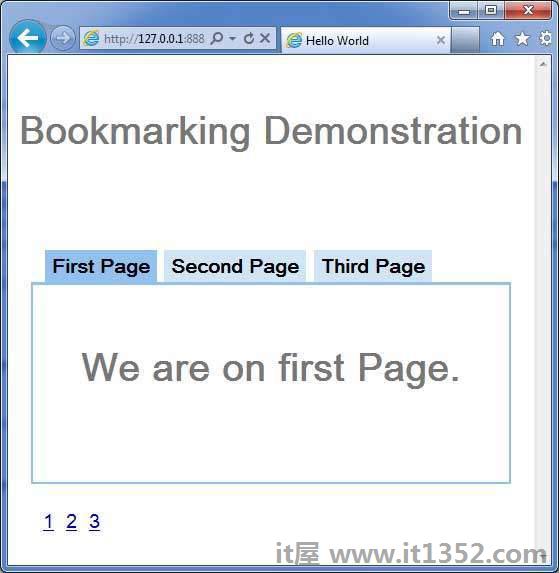
现在点击1,2或3.您可以注意到标签随索引而变化.
您应该注意到,当您点击1,2或3时,应用程序网址已更改且#pageIndex已添加到网址
您还可以看到浏览器的后退和前进按钮现已启用.
使用浏览器的后退和前进按钮,您将看到不同的选项卡获取相应地选择.
右键单击1,2或3.您可以看到打开,在新窗口中打开,在新标签页中打开,添加到收藏夹等选项等等.
右键单击3.选择添加到收藏夹.将书签保存为第3页.
打开收藏夹并选择第3页.您将看到第三个选项卡已选中.