GWT提供了调试客户端和服务器端代码的强大功能.
在开发模式期间,GWT Application基于Java代码,不会转换为JavaScript.
当应用程序在开发模式下运行时,Java虚拟机(JVM)实际上将应用程序代码作为编译的Java字节码执行,使用GWT功能连接到浏览器窗口.
GWT使用基于浏览器的插件连接到JVM.
因此,开发人员可以自由使用任何基于Java的IDE来调试客户端GWT代码以及服务器 - 边代码.
在本文中,我们将演示如何使用Eclipse调试GWT客户端代码.我们将执行以下任务 :
在代码中设置断点并在BreakPoint Explorer中查看它们.
在调试过程中逐行逐步执行代码.
查看变量的值.
检查所有值的值变量.
检查表达式的值.
显示挂起线程的堆栈帧.
此示例将指导您完成演示调试GWT应用程序的简单步骤.按照以下步骤更新我们在 GWT - 创建应用程序章节中创建的GWT应用程序;
| 步骤 | 描述 |
|---|---|
| 1 | 在包 com.it1352下创建一个名为 HelloWorld 的项目,如下所述在 GWT - 创建应用程序章节. |
| 2 | 修改 HelloWorld.gwt.xml , HelloWorld.css , HelloWorld.html 和 HelloWorld.java 如下所述.保持其余文件不变. |
| 3 | 编译并运行应用程序以验证实现的逻辑的结果. |
以下是修改后的模块描述符的内容 src/com.it1352/HelloWorld.gwt.xml.
<?xml version = "1.0" encoding = "UTF-8"?>
<module rename-to = 'helloworld'>
   <!-- Inherit the core Web Toolkit stuff.                        -->
   <inherits name = 'com.google.gwt.user.User'/>

   <!-- Inherit the default GWT style sheet.                       -->
   <inherits name = 'com.google.gwt.user.theme.clean.Clean'/>

   <!-- Specify the app entry point class.                         -->
   <entry-point class = 'com.IT屋.client.HelloWorld'/>

   <!-- Specify the paths for translatable code                    -->
   <source path = 'client'/>
   <source path = 'shared'/>

</module>
以下是修改后的样式表文件的内容 war/HelloWorld.css .
body {
   text-align: center;
   font-family: verdana, sans-serif;
}

h1 {
   font-size: 2em;
   font-weight: bold;
   color: #777777;
   margin: 40px 0px 70px;
   text-align: center;
}

.gwt-Label{
   font-size: 150%;
   font-weight: bold;
   color:red;
   padding:5px;
   margin:5px;
}
以下是修改后的HTML主机文件 war/HelloWorld.html 的内容,以容纳两个按钮.
<html>
   <head>
      <title>Hello World</title>
      <link rel = "stylesheet" href = "HelloWorld.css"/>
      <script language = "javascript" src = "helloworld/helloworld.nocache.js">
      </script>
   </head>

   <body>
      <h1>Debugging Application Demonstration</h1>
      <div id = "gwtContainer"></div>
   </body>
</html>
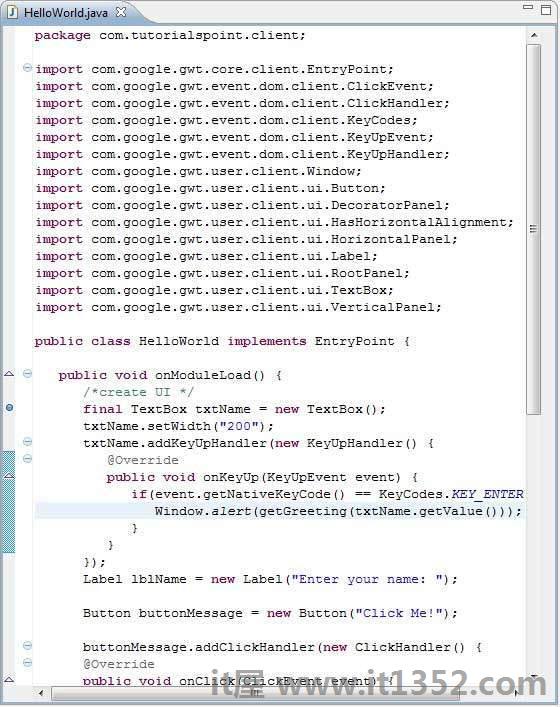
让我们有以下Java文件 src/com.it1352/HelloWorld.java 的内容,我们将使用它来演示调试功能GWT Code.
package com.it1352.client;
import com.google.gwt.core.client.EntryPoint;
import com.google.gwt.event.dom.client.ClickEvent;
import com.google.gwt.event.dom.client.ClickHandler;
import com.google.gwt.event.dom.client.KeyCodes;
import com.google.gwt.event.dom.client.KeyUpEvent;
import com.google.gwt.event.dom.client.KeyUpHandler;
import com.google.gwt.user.client.Window;
import com.google.gwt.user.client.ui.Button;
import com.google.gwt.user.client.ui.DecoratorPanel;
import com.google.gwt.user.client.ui.HasHorizontalAlignment;
import com.google.gwt.user.client.ui.HorizontalPanel;
import com.google.gwt.user.client.ui.Label;
import com.google.gwt.user.client.ui.RootPanel;
import com.google.gwt.user.client.ui.TextBox;
import com.google.gwt.user.client.ui.VerticalPanel;

public class HelloWorld implements EntryPoint {

   public void onModuleLoad() {
      /*create UI */
      final TextBox txtName = new TextBox();
      txtName.setWidth("200");
      txtName.addKeyUpHandler(new KeyUpHandler() {
         @Override
         public void onKeyUp(KeyUpEvent event) {
            if(event.getNativeKeyCode() == KeyCodes.KEY_ENTER){
               Window.alert(getGreeting(txtName.getValue()));
            }
         }
      });
      Label lblName = new Label("Enter your name: ");

      Button buttonMessage = new Button("Click Me!");

      buttonMessage.addClickHandler(new ClickHandler() {
      @Override
      public void onClick(ClickEvent event) {
         Window.alert(getGreeting(txtName.getValue()));
      }});

      HorizontalPanel hPanel = new HorizontalPanel();
      hPanel.add(lblName);
      hPanel.add(txtName);
      hPanel.setCellWidth(lblName, "130");

      VerticalPanel vPanel = new VerticalPanel();
      vPanel.setSpacing(10);
      vPanel.add(hPanel);
      vPanel.add(buttonMessage);
      vPanel.setCellHorizontalAlignment(buttonMessage,
      HasHorizontalAlignment.ALIGN_RIGHT);

      DecoratorPanel panel = new DecoratorPanel();
      panel.add(vPanel);

      // Add widgets to the root panel.
      RootPanel.get("gwtContainer").add(panel);
   }

   public String getGreeting(String name){
      return "Hello "+name+"!";
   }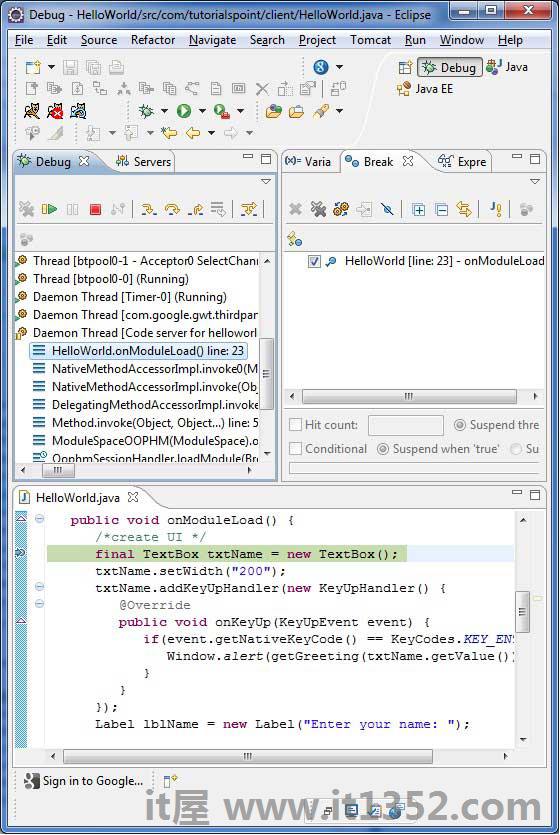
}在第一个放置一个断点HelloWorld.java的 onModuleLoad()行
现在点击![]() Debug application menu并选择 HelloWorld 应用程序来调试应用程序.
Debug application menu并选择 HelloWorld 应用程序来调试应用程序.

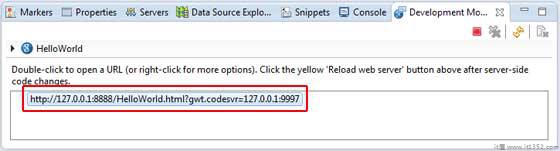
如果一切正常,您必须在Eclipse中看到包含URL的GWT开发模式,如下所示.双击URL以打开GWT应用程序.
一旦应用程序启动,您将看到关注Eclipse断点,因为我们已将断点放在第一行入口点方法上.
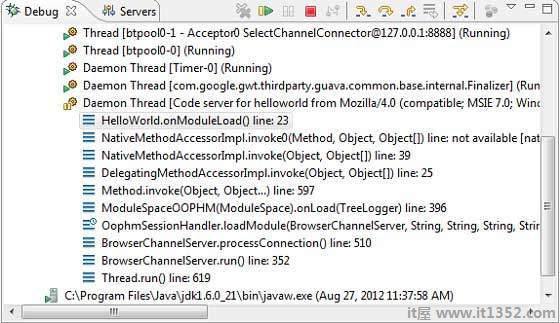
您可以看到挂起线程的堆栈跟踪.
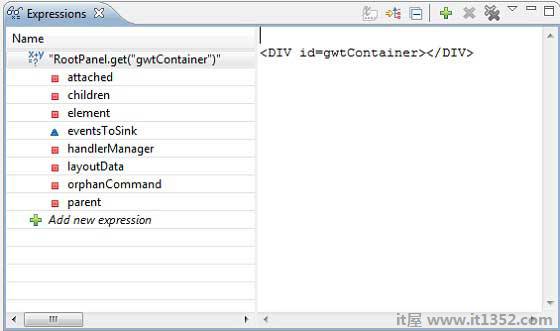
你可以看到表达式的值.
您可以看到放置的断点列表.

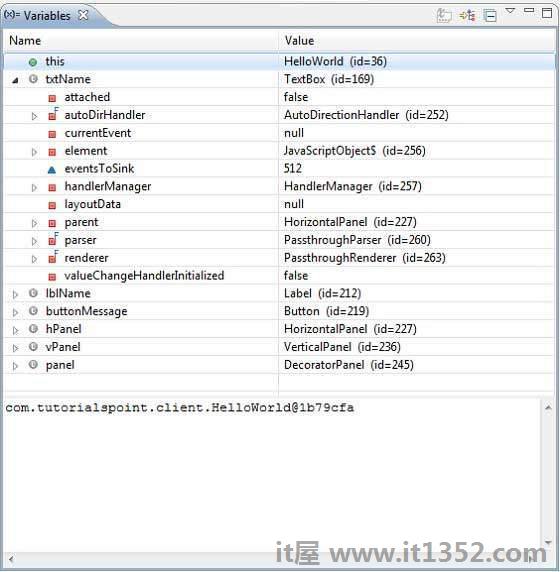
现在继续按F6直到你到达onModuleLoad()方法的最后一行.作为功能键的参考,F6逐行检查代码,F5逐步进入内部,F8将恢复应用程序.现在你可以看到onModuleLoad()方法的所有变量的值列表.
可以使用与调试Java应用程序相同的方式调试GWT客户端代码.将断点放在任何一行,并使用GWT的调试功能.